
How to use a facet as a language switch
If your site has posts in multiple languages, but you don’t want to introduce the complexity of a full-fledged multilingual solution like WPML or Polylang, you could consider just using a facet to let users switch listing templates between available languages.
This tutorial explains how to do this. The described setup consists of:
- A language taxonomy (or custom field) to set the posts’ language(s)
- A language facet, using the language taxonomy (or custom field) as data source
- Language facet styling (flag icons and such)
- Optional pre-selection of the language based on the visitor’s preferred browser language
- Visitor’s browser language detection.
- Automatic pre-selection of the visitor’s browser language:
Step 1: Create a language taxonomy (or custom field)
First, your posts need a way to store their language. You could either use a custom field or taxonomy. In this tutorial we create (“register”) a simple custom language taxonomy, for example using a plugin like Advanced Custom Fields, Pods or Custom Post Type UI.
Let’s give this taxonomy the name lang, and add a few terms representing the available post languages. In this tutorial, we’ll use three languages:
| Term name | Term slug |
|---|---|
English |
english |
Nederlands |
nederlands |
Deutsch |
deutsch |
Step 2: Create the language facet
Now let’s create the language facet. Make sure to name it lang to match the code in this tutorial.
If you want the user to select more than one language, choose a Checkboxes facet type. If you set the “Facet logic” setting to “OR (match any)”, users can select posts in more than one language.
Or, if you want the facet to look more like an actual language “switch” (single-select), choose a Radio facet type instead. To remove the “Any” option (which a regular language switch does not have), just leave the “Default label” setting empty.
For both facet types, set the custom lang taxonomy (created in step 1) as the facet’s data source.
If you want your languages in a specific order, you can set the “Sort by” setting to “Term order” and use one of the described taxonomy order plugins to set the desired language choice order. Or you can use the facetwp_facet_orderby hook.
Now make sure you have some posts that have a language term selected, and save them, so they will be indexed for the language facet.
Now create a listing template that retrieves your posts, and add the language facet to the page. You should now be able to filter your posts by their language.
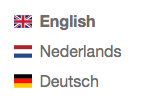
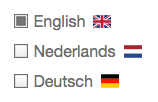
Let’s add some styling and flags to make the facet look like a language switch, as shown in the images on the right:
Step 3: Style the language facet
Add the following snippet to your (child) theme’s functions.php to style the Checkboxes or Radio facet that we created in step 2. You can remove the lines that are not needed, depending on the chosen facet type.
The CSS removes the facet choice counts and adds language flags.
In this tutorial, we are using a free flag icon library that you can download here (or here on Github). Find the /flags folder and add it to your theme directory. In the CSS below, set the correct theme name/path in the three background-image paths. Adapt these flag CSS rules to match the languages available in your language taxonomy created in step 1.
For Radio facets, the CSS removes the radio buttons and sets the selected choice to bold, because without radio buttons, there is no way to know which selection is active.
The styled lang Checkboxes or Radio facet should now look like the corresponding image on the right.
Note that if you named your language facet anything other than lang, replace all .facetwp-facet-lang selectors in the CSS below with .facetwp-facet-{yourfacetname}.
How to use custom PHP code?
PHP code can be added to your (child) theme's functions.php file. Alternatively, you can use the Custom Hooks add-on, or a code snippets plugin. More info
add_action( 'wp_head', function () { ?> <style> /* For Checkboxes and Radio facets - with flags on the right of each choice. */ /* Download the https://flagicons.lipis.dev/ library, find the /flags folder, add it to your theme, and set your theme path below (3x). */ /* Remove the facet choice counts. */ .facetwp-facet-lang .facetwp-counter { display: none; } .facetwp-facet-lang [data-value="nederlands"] .facetwp-display-value { background-image: url(/wp-content/themes/my-theme/flags/4x3/nl.svg); } .facetwp-facet-lang [data-value="english"] .facetwp-display-value { background-image: url(/wp-content/themes/my-theme/flags/4x3/gb.svg); } .facetwp-facet-lang [data-value="deutsch"] .facetwp-display-value { background-image: url(/wp-content/themes/my-theme/flags/4x3/de.svg); } .facetwp-facet-lang .facetwp-display-value { background-repeat: no-repeat; } /* For Checkboxes facets - with flag on the right of each choice. */ .facetwp-facet-lang.facetwp-type-checkboxes .facetwp-display-value { background-position: right center; background-repeat: no-repeat; background-size: 18px auto; padding-right: 26px; } /* For Radio facets - with flag on the left of each choice. Removes the radio icon. */ /* Optionally remove the 'Any' choice by leaving the 'Default label' facet setting empty. */ .facetwp-facet-lang.facetwp-type-radio .facetwp-radio { background: none !important; /* Remove radio icon */ padding-left: 0; } .facetwp-facet-lang.facetwp-type-radio .facetwp-display-value { background-position: left center; background-repeat: no-repeat; background-size: 18px auto; padding-left: 26px; } /* For Radio facets - style the selected language. */ .facetwp-facet-lang.facetwp-type-radio .checked .facetwp-display-value { font-weight: bold; } </style> <?php }, 100 );
Step 4: Pre-select the language facet based on the user language
Optionally, you can automatically pre-select the language facet based on the detected browser language of the site visitor, similar to what plugins like WPML and Polylang do. The preferred main and secondary browser languages can be set in any browser’s preferences.
Step 4a: Add browser language detection
To detect the visitor’s main/top browser language, add the function in the following snippet to your (child) theme’s function.php.
At the top, in lines 6-11, add the same languages that are available in the lang taxonomy that we created in step 1. Set the two-letter language codes coming from the detected browser language (e.g. 'nl'). Or use the full language codes if needed (e.g. 'pt-br'), and match them to their facet value. This must be the technical choice value as visible in the URL after using the facet, and not the “facet display value” (the visible choice label). Because we are using a taxonomy, the facet value is the term’s slug (without any capitals or spaces).
Note that in the return on line 52, we return english as the detected language if the detected visitor’s browser language is not in our defined language list at the top. Adapt this fallback language as needed.
How to use custom PHP code?
PHP code can be added to your (child) theme's functions.php file. Alternatively, you can use the Custom Hooks add-on, or a code snippets plugin. More info
function fwp_get_browser_language_choice() { // Add or change to your available languages // Browser language code => facet choice value (= term slug) // Full codes (e.g. 'pt-br') are matched before primary subtags (e.g. 'pt') $map = [ 'nl' => 'nederlands', 'en' => 'english', 'de' => 'deutsch', //'fr' => 'francais', ]; // No header (e.g. crawlers): no pre-selection if ( empty( $_SERVER['HTTP_ACCEPT_LANGUAGE'] ) ) { return false; } // Parse e.g. "nl-NL,nl;q=0.9,en-US;q=0.8,en;q=0.7" $langs = []; foreach ( explode( ',', $_SERVER['HTTP_ACCEPT_LANGUAGE'] ) as $i => $part ) { $bits = explode( ';', trim( $part ) ); $code = strtolower( trim( $bits[0] ) ); $q = 1.0; if ( isset( $bits[1] ) && preg_match( '/q\s*=\s*([0-9.]+)/', $bits[1], $m ) ) { $q = (float) $m[1]; } if ( '' !== $code && '*' !== $code && 0 < $q ) { $langs[] = [ 'code' => $code, 'q' => $q, 'i' => $i ]; } } // Sort by q (desc), keep header order for equal q (PHP 7 compatible) usort( $langs, function( $a, $b ) { if ( $a['q'] == $b['q'] ) { return $a['i'] - $b['i']; } return ( $a['q'] < $b['q'] ) ? 1 : -1; } ); foreach ( $langs as $lang ) { if ( isset( $map[ $lang['code'] ] ) ) { return $map[ $lang['code'] ]; } $primary = explode( '-', $lang['code'] )[0]; if ( isset( $map[ $primary ] ) ) { return $map[ $primary ]; } break; // Only the visitor's top language counts: if it's not in $map, the result is 'english' } // Fall-back if top language not in $map return 'english'; }
Next, we’ll add the actual pre-selection code. There are two different ways to pre-select the language facet with the language that the above function detects. Which solution to choose depends on whether your site has page caching enabled (via plugins like LiteSpeed Cache, WP Rocket, W3TC, WP Super Cache, or a similar plugin), or not:
Step 4b: Pre-select the language without page caching
If your site does not have page caching, add the following snippet to your (child) theme’s functions.php, below the detection function added in step 4a. The snippet uses the facetwp_preload_url_vars hook to pre-select the detected visitor’s browser language in the facet. This hook is the normal recommended way to pre-select facets on first page load.
Note that when using this hook, there will be no language selection visible in the URL on page load, but the facet itself will have the detected language selected.
How to use custom PHP code?
PHP code can be added to your (child) theme's functions.php file. Alternatively, you can use the Custom Hooks add-on, or a code snippets plugin. More info
add_filter( 'facetwp_preload_url_vars', function( $url_vars ) { if ( empty( $url_vars['lang'] ) ) { $lang = fwp_get_browser_language_choice(); if ( $lang ) { $url_vars['lang'] = [ $lang ]; } } return $url_vars; } );
The above solution will not work when your site is using page caching. If that is the case, you need to use the following solution instead:
Step 4b: Pre-select the language with page caching
If your site does have page caching, things get slightly more complicated. If you’d use the above code with the facetwp_preload_url_vars hook, the detected browser language would be cached, and each visitor would get the same pre-selected language on first page load, which is not what we want.
To fix this, instead of the code above, add the following snippet to your (child) theme’s functions.php, below the detection function added in step 4a.
This solution uses WP’s template_redirect hook to 302 redirect the page on page load, with the detected and pre-selected facet language selection in the URL, while telling the caching mechanism to not cache this redirected page.
In line 4, make sure to set your language facet name, as created in step 2.
Next, in lines 7-9, adapt the condition so that the code only targets the page containing your listing template(s) that have the language facet. We’re using ! is_page() here, but you can use any Conditional Tag.
How to use custom PHP code?
PHP code can be added to your (child) theme's functions.php file. Alternatively, you can use the Custom Hooks add-on, or a code snippets plugin. More info
add_action( 'template_redirect', function() { // Set your language facet name $lang_facet_name = 'lang'; // Limit the redirect to the page(s) with the language facet if ( ! is_page( 'my-template-page' ) ) { return; } // Get the facet's URL prefix setting (default: "_") $prefix = FWP()->helper->get_setting( 'prefix' ); // Do nothing if the language selection is already in the URL (or the visitor's own selection) if ( isset( $_GET[ $prefix . $lang_facet_name ] ) || ! empty( $_POST ) ) { return; } // The response depends on the browser language, so it must never be cached header( 'Vary: Accept-Language' ); nocache_headers(); if ( ! defined( 'DONOTCACHEPAGE' ) ) { define( 'DONOTCACHEPAGE', true ); } // Get the user's browser language preference $lang = fwp_get_browser_language_choice(); // 302 redirect with the language facet selection if ( $lang ) { wp_safe_redirect( add_query_arg( $prefix . $lang_facet_name, rawurlencode( $lang ) ), 302 ); exit; } } );
A few important notes on this approach:
- Using the above code will add the pre-selected language to the URL on first page load, as opposed to the solution without page caching that uses the
facetwp_preload_url_varshook (which does not do this). - To prevent caching of the redirected page, the code uses
DONOTCACHEPAGEwhich is (or should be) honoured by all WordPress page-cache plugins. Thenocache_headers()in line 21 covers caching solutions that sit in front of WordPress, such as Varnish and most CDNs, which respectCache-Control: no-cache. - The unfiltered URL is never cached. For visitors with a matching browser language, that will not matter, since they’re redirected right away. But crawlers and visitors without the header get an uncached render.
- Theoretically, there may be caching solutions that ignore
no-cacheheaders. A “cache everything” CDN rule (e.g. a Cloudflare page rule set that way) could still cache the redirect. Make sure to test and adapt your caching rules accordingly. - If the visitor deselects the language in the facet and then reloads the page, they’re redirected again. Theoretically, this could be avoided by setting a cookie to remember the visitor’s choice, which is what e.g. the Polylang plugin does. This is out of scope for this tutorial but could easily be added.
- SEO crawlers usually send no
Accept-Languageheader, so they get the unfiltered page without a redirect, which is good for SEO indexing.