facetwp_templates
Overview
With this hook, you can programmatically register/add new Listing Builder listing templates, instead of using the plugin interface.
Why register listings programmatically?
Here are several reasons why you may want to register your listings in code:
- To prevent users from changing listing settings. Listings that are added this way will appear as “locked listings” in the plugin settings. While this does not absolutely prevent users from changing the listing settings, it will take a deliberate “unlock” action to do so (and this “unlock” action can be disabled too).
- You can have your listings and their settings under version control (e.g. with git). This way you can revert to previous sets of listings or previous listing settings.
- If your listings and settings are tied to a theme, anyone using the code/theme automatically has the registered listings and their settings.
- If you are using FacetWP with WordPress multi-site, all sites in the multi-site network can have the same listings and listing settings, as long as they are using the same theme. You no longer have to change listing settings in each site separately, and you can maintain them in one place: the theme’s functions.php file.
Parameters
- $templates | array | An array of existing listings
How to register a listing programmatically
To register one or more listing templates in code, you need to pass an array of the listings(s) settings to the hook, either in JSON, or in PHP, as shown below.
But how to get all available settings for a particular listing? The quickest way to get a complete and up-to-date array of all available settings for a specific listing is to first create the listing in the interface, set all its options, and then export the listing.
To do so, go to Settings > FacetWP > Settings > Import/Export, select one or more listings and click the “Export” button:
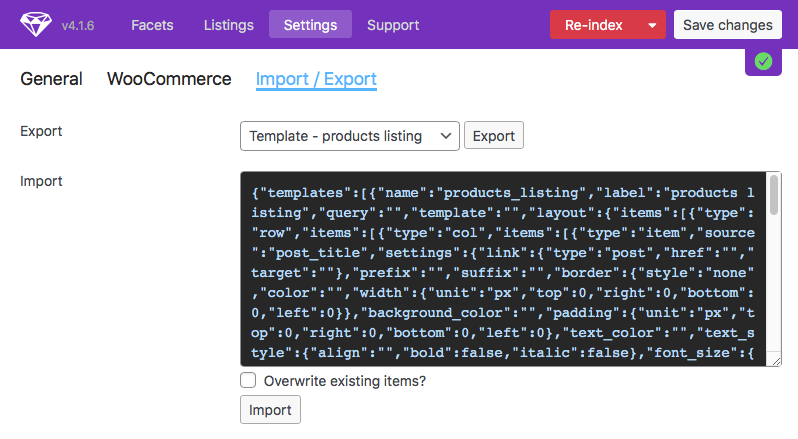
Copy the exported JSON code that appears in the text box. Make sure to keep the JSON safe, because the next step is to delete the listing(s) you just exported (use the gear icon, then click “Save changes”), otherwise the code-registered listing(s) will not appear.
Now you have two options to register the listing(s):
Using exported JSON directly
To use the exported JSON of one or more listings directly, you can add the following code to your (child) theme’s functions.php. Paste the exported JSON between the single quotes on line 5.
How to use custom PHP code?
PHP code can be added to your (child) theme's functions.php file. Alternatively, you can use the Custom Hooks add-on, or a code snippets plugin. More info
add_filter( 'facetwp_templates', function( $templates ) { // Paste the exported JSON between the single quotes like this: json_decode('PASTE JSON HERE'); $add_templates = json_decode( '{"templates":[{"name":"products_listing","label":"Products listing","query":"","template":"","layout":{"items":[{"type":"row","items":[{"type":"col","items":[{"type":"item","source":"post_title","settings":{"link":{"type":"none","href":"","target":""},"prefix":"","suffix":"","border":{"style":"none","color":"","width":{"unit":"px","top":0,"right":0,"bottom":0,"left":0}},"background_color":"","padding":{"unit":"px","top":0,"right":0,"bottom":0,"left":0},"text_color":"","text_style":{"align":"","bold":false,"italic":false},"font_size":{"unit":"px","size":0},"name":"el-zi717e","css_class":"","is_hidden":""}}],"settings":{"border":{"style":"none","color":"","width":{"unit":"px","top":0,"right":0,"bottom":0,"left":0}},"background_color":"","padding":{"unit":"px","top":0,"right":0,"bottom":0,"left":0},"text_color":"","text_style":{"align":"","bold":false,"italic":false},"font_size":{"unit":"px","size":0},"name":"el-25bd2a","css_class":""}}],"settings":{"grid_template_columns":"1fr","border":{"style":"none","color":"","width":{"unit":"px","top":0,"right":0,"bottom":0,"left":0}},"background_color":"","padding":{"unit":"px","top":0,"right":0,"bottom":0,"left":0},"text_color":"","text_style":{"align":"","bold":false,"italic":false},"font_size":{"unit":"px","size":0},"name":"el-49y6ye","css_class":""}}],"settings":{"num_columns":1,"grid_gap":10,"no_results_text":"","border":{"style":"none","color":"","width":{"unit":"px","top":0,"right":0,"bottom":0,"left":0}},"background_color":"","padding":{"unit":"px","top":0,"right":0,"bottom":0,"left":0},"text_color":"","text_style":{"align":"","bold":false,"italic":false},"font_size":{"unit":"px","size":0},"name":"el-xi1t6","css_class":"","custom_css":""}},"query_obj":{"post_type":[{"label":"Products","value":"product"}],"posts_per_page":10,"orderby":[{"key":"title","order":"ASC","type":"CHAR"}],"filters":[]},"modes":{"display":"visual","query":"visual"}}]}', true ); foreach ( $add_templates['templates'] AS $new_template ) { $templates[] = $new_template; } return $templates; });
After refreshing the page, your new code-registered listing(s) should appear in the list, at the bottom, with a “locked” icon. If you don’t see the locked listings(s), make sure you have deleted the listing(s) you exported (use the gear icon, then click “Save changes”), otherwise the code-registered listing(s) will not appear.
Using a converted PHP array
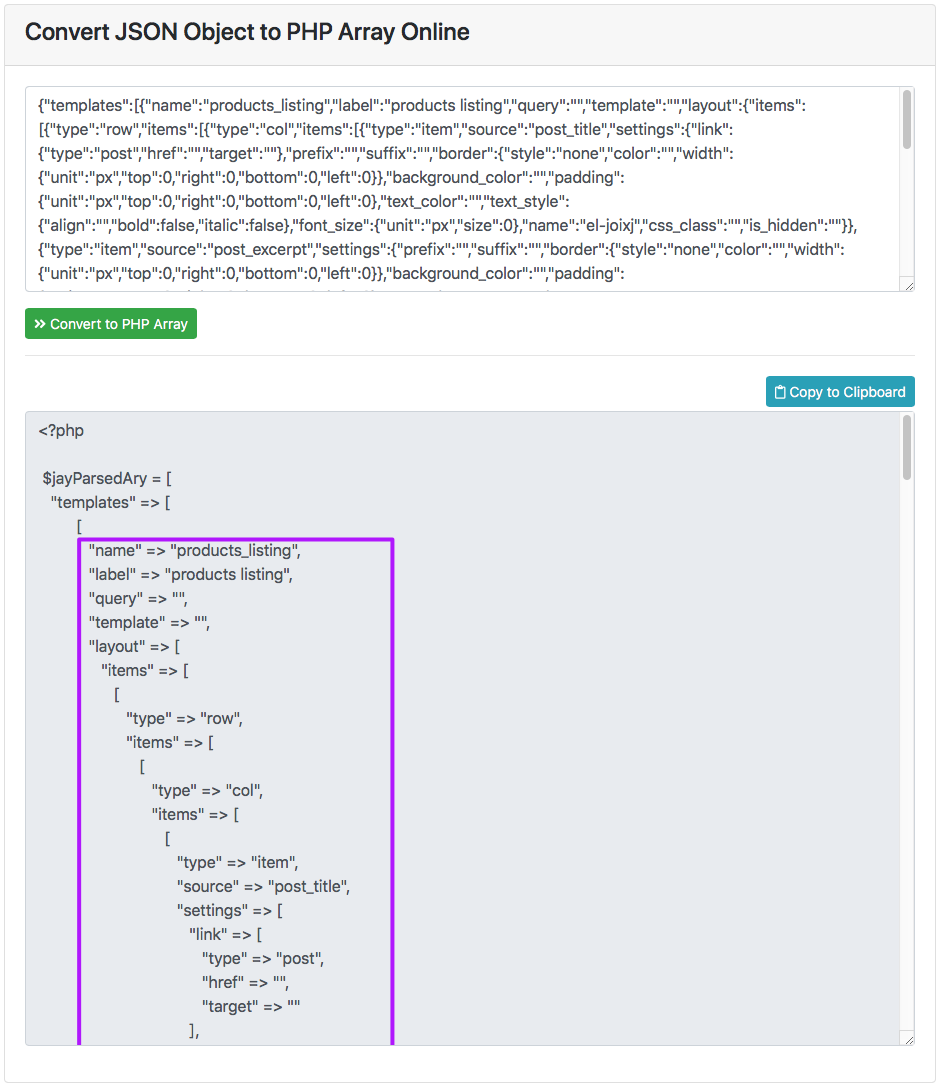
If you prefer seeing the listing settings array, or you want to make manual changes more easily, you can convert the exported JSON to a PHP array first.
A quick way to do this is to paste it into an online JSON to PHP array converter like https://jsontophp.com.
Copy the converted PHP array’s key/value pairs with all the listings’s settings and paste them into the hook code, as shown in the examples below.
Register one new listing
For example, to register a new listing named products_listing, add the following code to your (child) theme’s functions.php:
How to use custom PHP code?
PHP code can be added to your (child) theme's functions.php file. Alternatively, you can use the Custom Hooks add-on, or a code snippets plugin. More info
add_filter( 'facetwp_templates', function( $templates ) { // add a new 'products_listing' listing to the existing $templates array $templates[] = [ "name" => "products_listing", "label" => "products listing", "query" => "", "template" => "", "layout" => [ "items" => [ // ...etc. ], "settings" => [ // ...etc. ] ], "query_obj" => [ "post_type" => [ [ "label" => "Products", "value" => "product" ] ], "posts_per_page" => 10, "orderby" => [ [ "key" => "title", "order" => "ASC", "type" => "CHAR" ] ], "filters" => [ ] ], "modes" => [ "display" => "visual", "query" => "visual" ] ] ; // return the modified $templates array return $templates; }, 10, 1 );
After refreshing the page, your new code-registered listing should appear in the list, at the bottom, with a “locked” icon. If you don’t see the locked listing, make sure you have deleted the listing you exported (use the gear icon, then click “Save changes”), otherwise the code-registered listing will not appear.
Register multiple new listings
To register multiple listings at once, just add another listing to the $templates array. The following example adds two new listings: one named products_listing and another named blog_listing:
How to use custom PHP code?
PHP code can be added to your (child) theme's functions.php file. Alternatively, you can use the Custom Hooks add-on, or a code snippets plugin. More info
add_filter( 'facetwp_templates', function( $templates ) { // add a new 'products_listing' listing to the existing $templates array $templates[] = [ // settings for this listing "name" => "products_listing", "label" => "products listing", "query" => "", "template" => "", "layout" => [ "items" => [ // ...etc. ], "settings" => [ // ...etc. ] ], // ... etc. ] ; // add a new 'blog_listing' listing to the existing $templates array $templates[] = [ // settings for this listing "name" => "blog_listing", "label" => "blog listing", "query" => "", "template" => "", "layout" => [ "items" => [ // ... ], "settings" => [ //... etc. ] ], // ... etc. ] ; // return the modified $templates array return $templates; }, 10, 1 );
After refreshing the page, your new code-registered listings should appear in the list, at the bottom, with a “locked” icon. If you don’t see the locked listings, make sure you have deleted the listings you exported (use the gear icon, then click “Save changes”), otherwise the code-registered listings will not appear.
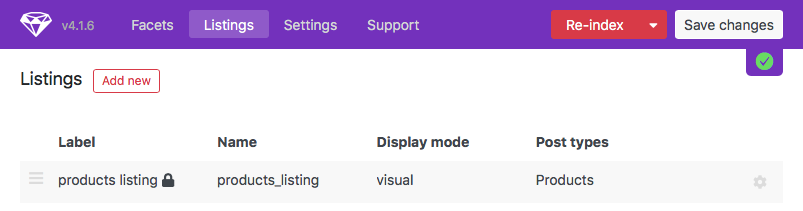
Locked listings
After registering a listing with this hook, it will appear in FacetWP’s Listings overview with a “locked” icon:
If the new listing does not appear, make sure its name is unique and not already used for another listing. Make sure you have deleted the listing(s) you exported (use the gear icon, then click “Save changes”), otherwise the code-registered listing(s) will not appear.
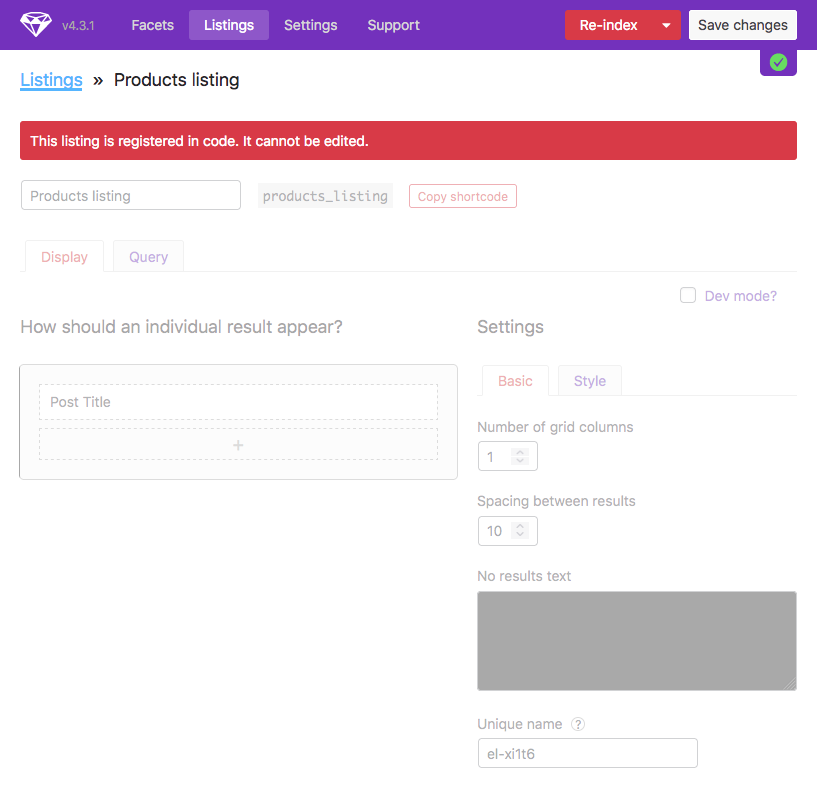
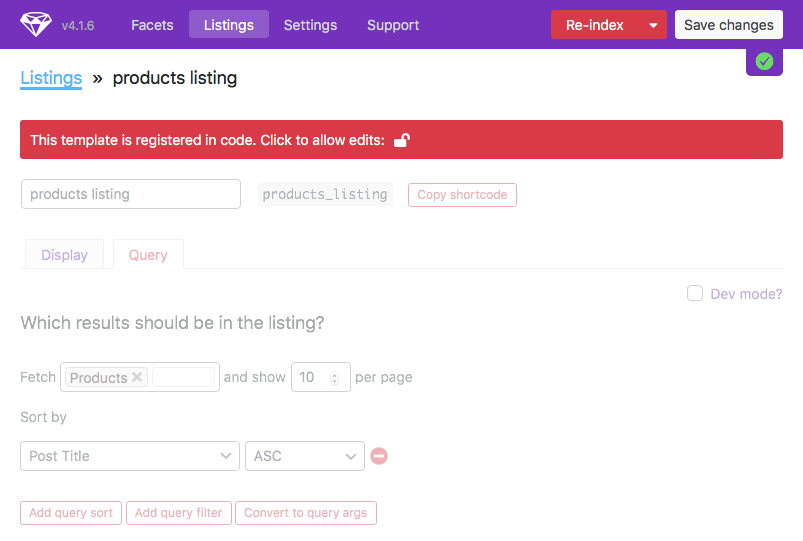
The settings screen of a locked listing will have a red “This template is registered in code. Click to allow edits” warning on top, and the settings will be dimmed and become unclickable:
When you click the lock icon behind “Click to allow edits”, and then change the settings (or leave the settings as they are) and click “Save changes”, the listing will no longer be registered by your code, but again in the database like a normal listing. After that, changes to the listing settings in the hook will no longer have an effect unless you change the listing’s name in the code, which will then create a new code-registered listing with that name.
If you want to prevent other users from unlocking listings this way, you’ll have to register them in a slightly different way:
Prevent unlocking of listings
If you are registering your listings in code, and want to prevent admin users from unlocking listings (accidentally or on purpose), you can register your listing(s) as follows. The extra code makes sure that unlocked code-registered listings are deleted and added again as a locked listing, basically preventing them from being changed or removed.
Don’t forget to add the extra CSS that removes the “Click to allow edits” link.
To register listings directly with JSON, use the following:
How to use custom PHP code?
PHP code can be added to your (child) theme's functions.php file. Alternatively, you can use the Custom Hooks add-on, or a code snippets plugin. More info
add_filter( 'facetwp_templates', function( $templates ) { $add_templates = json_decode( '{"templates":[{"name":"products_listing","label":"Products listing","query":"","template":"","layout":{"items":[{"type":"row","items":[{"type":"col","items":[{"type":"item","source":"post_title","settings":{"link":{"type":"none","href":"","target":""},"prefix":"","suffix":"","border":{"style":"none","color":"","width":{"unit":"px","top":0,"right":0,"bottom":0,"left":0}},"background_color":"","padding":{"unit":"px","top":0,"right":0,"bottom":0,"left":0},"text_color":"","text_style":{"align":"","bold":false,"italic":false},"font_size":{"unit":"px","size":0},"name":"el-zi717e","css_class":"","is_hidden":""}}],"settings":{"border":{"style":"none","color":"","width":{"unit":"px","top":0,"right":0,"bottom":0,"left":0}},"background_color":"","padding":{"unit":"px","top":0,"right":0,"bottom":0,"left":0},"text_color":"","text_style":{"align":"","bold":false,"italic":false},"font_size":{"unit":"px","size":0},"name":"el-25bd2a","css_class":""}}],"settings":{"grid_template_columns":"1fr","border":{"style":"none","color":"","width":{"unit":"px","top":0,"right":0,"bottom":0,"left":0}},"background_color":"","padding":{"unit":"px","top":0,"right":0,"bottom":0,"left":0},"text_color":"","text_style":{"align":"","bold":false,"italic":false},"font_size":{"unit":"px","size":0},"name":"el-49y6ye","css_class":""}}],"settings":{"num_columns":1,"grid_gap":10,"no_results_text":"","border":{"style":"none","color":"","width":{"unit":"px","top":0,"right":0,"bottom":0,"left":0}},"background_color":"","padding":{"unit":"px","top":0,"right":0,"bottom":0,"left":0},"text_color":"","text_style":{"align":"","bold":false,"italic":false},"font_size":{"unit":"px","size":0},"name":"el-xi1t6","css_class":"","custom_css":""}},"query_obj":{"post_type":[{"label":"Products","value":"product"}],"posts_per_page":10,"orderby":[{"key":"title","order":"ASC","type":"CHAR"}],"filters":[]},"modes":{"display":"visual","query":"visual"}}]}', true ); $adding = wp_list_pluck( $add_templates['templates'], 'name' ); foreach ( $templates AS $template => $values ) { if ( in_array( $values['name'], $adding ) && !isset( $values['_code'] ) ) { unset( $templates[$template] ); // Unset unlocked code-based listings } } foreach ( $add_templates['templates'] AS $new_template ) { $templates[] = array_merge( $new_template, [ '_code' => true ] ); // Re-lock listings if previously unlocked } return $templates ; });
Or, to register listings with a PHP array:
How to use custom PHP code?
PHP code can be added to your (child) theme's functions.php file. Alternatively, you can use the Custom Hooks add-on, or a code snippets plugin. More info
add_filter( 'facetwp_templates', function( $templates ) { $add_templates = [ 'templates' => [ [ // settings for this listing "name" => "products_listing", "label" => "products listing", "query" => "", "template" => "", "layout" => [ "items" => [ // ...etc. ], "settings" => [ // ...etc. ] ], "query_obj" => [ "post_type" => [ [ "label" => "Products", "value" => "product" ] ], "posts_per_page" => 11, "orderby" => [ [ "key" => "title", "order" => "ASC", "type" => "CHAR" ] ], "filters" => [ ] ], "modes" => [ "display" => "visual", "query" => "visual" ] ], [ // settings for this listing "name" => "blog_listing", "label" => "blog listing", "query" => "", "template" => "", "layout" => [ "items" => [ // ... ], "settings" => [ //... etc. ] ], // ... etc. ] ] ]; $adding = wp_list_pluck( $add_templates['templates'], 'name' ); foreach ( $templates AS $template => $values ) { if ( in_array( $values['name'], $adding ) && !isset( $values['_code'] ) ) { unset( $templates[$template] ); // Unset unlocked code-based listings } } foreach ( $add_templates['templates'] AS $new_template ) { $templates[] = array_merge( $new_template, [ '_code' => true ] ); // Re-lock listings if previously unlocked } return $templates ; });
Next, add the following CSS, which makes sure there is no way to edit the locked settings. The “Click to allow edits” link will be removed, and a “This listing is registered in code. It cannot be edited.” will show:
How to use custom PHP code?
PHP code can be added to your (child) theme's functions.php file. Alternatively, you can use the Custom Hooks add-on, or a code snippets plugin. More info
add_action('admin_head', function() { echo '<style> #app .facetwp-region .item-locked { display: none; } #app .facetwp-region-templates .locked:before { content: "This listing is registered in code. It cannot be edited."; display: block; padding: 10px; margin-bottom: 20px; background-color: var(--red); border-radius: 3px; color: var(--white); position: relative; z-index: 100000; } </style>'; });
With this CSS the red “locked” banner will look like this: