Submit Button
Add a submit button to redirect facets and filter results on another page
We often get asked how to show filters on one page (like the homepage) that redirect to another, separate results page. This can be done with the Submit Button add-on.
This add-on generates a submit button that passes chosen facet data from the primary page to a secondary results page.
How to set it up
Step 1: Install the Submit button add-on
First, download, install and activate the Submit Button add-on plugin.
Step 2: Create a listing template
In order for facets to appear on the primary page, there needs to be a listing template so that FacetWP knows which facet choices to display. In most cases you don’t want that listing to be visible on the primary pages, so we will hide it with CSS in step 5.
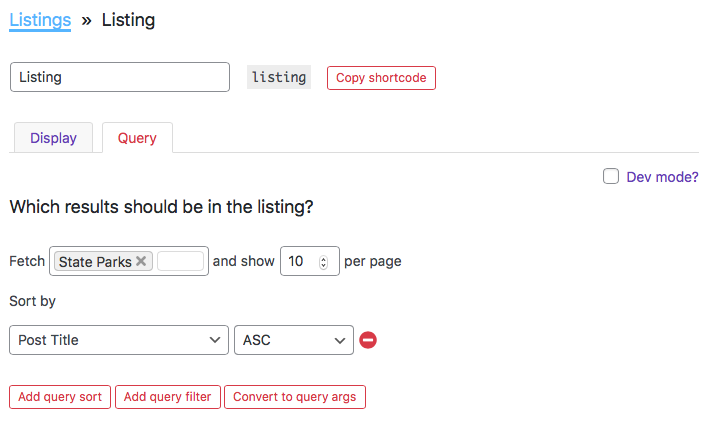
The easiest way to create this listing template is with FacetWP’s Listing Builder.
Browse to Settings > FacetWP > Listings and add a new listing template. Click on the “Query” tab (you can ignore the “Display” tab for now). Here we’ll tell FacetWP which post type(s) to pull content from. Try to get the query the same or matched as closely as possible to that of the results page you will be redirecting to. It’s also possible to use this same listing template on the results page itself, see step 4.
Step 3: Create the facets
Next, create the facets you want to place on the primary filtering page and the secondary results page.
Step 4: Set up the results page
Next, set up the results page. It’s possible you already have a results page with facets set up. If so, then all you’ll need to do is add the facets you made in step 3 to the results page. If not, you can create one.
The easiest way is to use the Listing Builder and put the listing shortcode on a basic WordPress page, together with the facet shortcodes made in step 3. You can use the listing template already made in step 2. Use the Display tab to build and style the individual results, then paste the shortcode on the results page. Do not hide this listing like on the primary page!
Alternatively, you can create a separate/new listing any way you want, e.g with a page builder widget or custom WP_Query.
If you use an existing WP archive page or page with a custom WP_Query, you only have to put the facet shortcodes made in step 3 somewhere on the page (e.g. in the sidebar).
No matter what kind of listing template you use for the results page, make sure the query used is exactly the same or as close as possible to the query used on the primary page listing template made in step 2.
Step 5: Set up the primary filtering page
Let’s say you have made a Listing Builder listing named listing in step 2, and two facets named location and categories in step 3. And that the results page you made in step 4 is located at the URI: /listings/.
First, edit the appropriate template file where you want the facets and submit button to appear (for example homepage.php). Add the following code to output your listing template, facets, and the submit button:
How to use custom PHP code?
PHP code can be added to your (child) theme's functions.php file. Alternatively, you can use the Custom Hooks add-on, or a code snippets plugin. More info
<?php echo facetwp_display( 'facet', 'location' ); ?> <?php echo facetwp_display( 'facet', 'categories' ); ?> <div style="display:none"><?php echo facetwp_display( 'template', 'listing' ); ?></div> <button class="fwp-submit" data-href="/listings/">Submit</button>
Make sure that the results page URI (in this example /listings/) is the button’s data-href attribute. This will make the button redirect to the results page on click.
Alternatively, you could use shortcodes (if you are using the WP editor, a Gutenberg block, or a page builder plugin like Bricks, Elementor or Beaver Builder):
How to use shortcodes?
Shortcodes can be placed directly in post/page edit screens. You can also add them in text/HTML widgets. The WordPress Block Editor has a Shortcode block to place them in. And most Page builders have a dedicated shortcode module/widget. In PHP templates, shortcodes can be displayed with WP's do_shortcode() function:
echo do_shortcode('[my-shortcode]');. More info[facetwp facet="location"] [facetwp facet="categories"] <div style="display:none">[facetwp template="listing"]</div> [facetwp submit="/listings/" label="Submit"]
If you are using Elementor, with the Elementor add-on installed, you can also use FacetWP widgets to add your facets, listing and submit button to your page.
Notice that we’re hiding the listing template with CSS. It’s only needed for the facets to know what content to filter.
If everything is in place, when using the facets and then clicking the submit button, the page will redirect to the results page, with the selected facet options pre-selected on the results page.
Add the submit button with an Elementor FacetWP Button widget
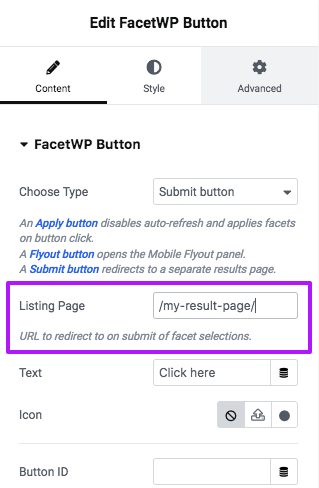
If you are using Elementor, and have the Elementor add-on installed, you can use the FacetWP Button widget to place a submit button on your page, as shown on the right.
Just add the FacetWP Button widget, and select “Submit button” as the button type. Then add a redirect URL in the ‘Listing Page’ setting.
Also your facets and listing templates (as described in the above steps) can be placed with FacetWP Facet and FacetWP Listing widgets.
Add the submit button with Beaver Builder FacetWP Button module
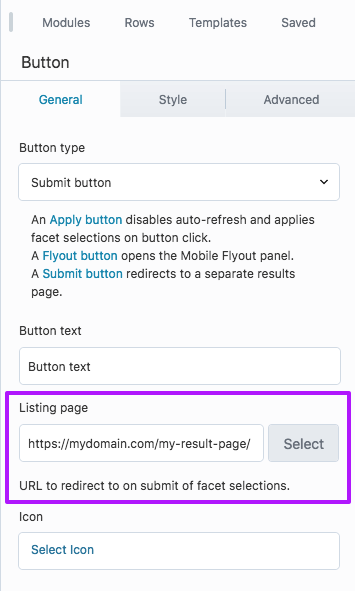
If you are using Beaver Builder, and have the Beaver Builder add-on installed, you can use the FacetWP Button module to place a submit button on your page, as shown on the right.
Just add the FacetWP Button widget, and select “Submit button” as the button type. Then add a redirect URL in the ‘Listing Page’ setting.
Also your facets and listing templates (as described in above steps) can be placed with FacetWP Facet and FacetWP Listing modules.
Optional: add the Submit button to the Mobile Flyout
If you are using the Mobile Flyout add-on, you can optionally also add the Submit button to the flyout.
Optional: Automatically submit
Submit on Enter
If you want the submit button to work not only when clicked, but also when a user presses Enter, add the following code to your (child) theme’s functions.php. The code first checks if any facets are in use, to prevent redirects without facet selections:
How to use custom PHP code?
PHP code can be added to your (child) theme's functions.php file. Alternatively, you can use the Custom Hooks add-on, or a code snippets plugin. More info
add_action( 'wp_footer', function() { ?> <script> (function($) { $(document).keyup(function(event) { var keycode = (event.keyCode ? event.keyCode : event.which); if (keycode == '13') { // Optional: first check if any facets are in use var in_use = false; $.each(FWP.facets, function(name, val) { if (val.length > 0) { in_use = true; } }); if (in_use) { FWP.parseFacets(); FWP.setHash(); $(".fwp-submit").trigger("click"); } } }); })(jQuery); </script> <?php }, 100 );
Submit on facet selection
If you have only one facet on the primary filtering page, instead of using the above code to submit on pressing Enter, you could also opt to submit and redirect immediately on making a selection in that facet, with the following code below.
This only makes sense for facets with a single selection, like a Radio facet or an Autocomplete facet.
If you are using an Autocomplete facet, know that this facet already performs an automatic refresh when pressing Enter. So with the following code in place, it will not only submit and redirect when pressing Enter after typing one or more characters in its input field, but also directly after selecting a choice from its dropdown.
Add the following code to your (child) theme’s functions.php. The code first checks for the page URI (the part of the URL after the domain name, without slashes at the beginning or end), to prevent the code from running on other pages. This example assumes the submit button is on the front page, on which the URI is empty. Adapt the URI if you are using this on another page.
How to use custom PHP code?
PHP code can be added to your (child) theme's functions.php file. Alternatively, you can use the Custom Hooks add-on, or a code snippets plugin. More info
add_action( 'wp_footer', function() { ?> <script> (function($) { document.addEventListener('facetwp-loaded', function() { // only redirect on the front page (where the URI is empty) if ( '' == FWP_HTTP.uri ) { // replace 'my-facet-name' with your facet name if (FWP.facets['my-facet-name'].length) { FWP.parseFacets(); FWP.setHash(); $(".fwp-submit").trigger("click"); } }; }); })(jQuery); </script> <?php }, 100 );
With the above code working, you may want to hide the Submit button altogether, because it is not really needed anymore. Because the button needs to stay in the page source to perform the redirect, this has to be done with CSS:
How to use custom CSS?
CSS code can be placed in your (child) theme's style.css file. Alternatively, you can add it manually between
<style>tags in the<head>section, in your (child) theme's header.php file. You can also load it with a hook in your (child) theme's functions.php file, or in the Custom Hooks add-on. To load the code only on pages with facets, use thefacetwp_scriptshook. To load it on all pages, usewp_headorwp_footer. Or you can use a code snippets plugin. More info.fwp-submit { display: none; }
And if you are using an Autocomplete facet in this setup, you could even choose to hide its “Go” button, in combination with a proper placeholder text like “Type and press Enter”.
Visually disable or dim the Submit button while using facets
If you want to change the appearance of the Submit button on the primary filtering page, while users are interacting with the facets, add the following snippet to your (child) theme’s functions.php.
The first part adds the class disabled to the button on refresh (when facets are being used), and removes it again when the refresh has finished. The CSS in the second part changes the button’s opacity value. You could also give the button another color:
How to use custom PHP code?
PHP code can be added to your (child) theme's functions.php file. Alternatively, you can use the Custom Hooks add-on, or a code snippets plugin. More info
// Add a 'disabled' class to the button during refresh: add_action( 'facetwp_scripts', function() { ?> <script> (function($) { // On start of the facet refresh, add the 'disabled' class, but not on first page load: $(document).on('facetwp-refresh', function() { if ( FWP.loaded ) { // Only true after the first page load $('.fwp-submit').addClass('disabled'); } }); // On finishing the facet refresh, remove the class $(document).on('facetwp-loaded', function() { $('.fwp-submit').removeClass('disabled'); }); })(jQuery); </script> <?php }, 100 ); // Change the CSS of the button while it has the class 'disabled': add_action( 'wp_head', function() { ?> <style> .fwp-submit.disabled { opacity: 0.6; /* Dims the button. You could also change its background-color. */ } </style> <?php }, 100 );
Note: for similar applications of the above code, see our tutorials on how to fade the listing template during refresh, and on how to add a loading text or spinner icon during refresh.
Scroll the results page after using the Submit Button
If you want to do something on the results page right after using the Submit Button, add the following code to your (child) theme’s functions.php.
This example will make the page scroll to the top of the results listing, but only on the initial page load (not on the subsequent AJAX page loads when using facets), and only if the Submit Button has been used (causing there to be facet selections in the URL). It uses the FWP.loaded variable to check if it is the initial page load, and the FWP.buildQueryString() function to check if there are any facet selections in the URL:
How to use custom PHP code?
PHP code can be added to your (child) theme's functions.php file. Alternatively, you can use the Custom Hooks add-on, or a code snippets plugin. More info
add_action( 'wp_head', function() { ?> <script> (function($) { $(document).on('facetwp-loaded', function() { if ( ! FWP.loaded ) { // Run on the initial page load only if ( '' != FWP.buildQueryString() ) { // Run only when there are facet selections in the URL // Do something. // For example a scroll to the top of the results listing: $('html, body').animate({ scrollTop: $('.facetwp-template').offset().top }, 500); } } }); })(jQuery); </script> <?php }, 100 );
For more examples of how to scroll the page, see our page scrolling tutorial.
Listify and Listable themes
The themes Listify and Listable both have their own implementation of facets on the homepage with a submit button that redirects to a separate results page. Check our Listify or Listable pages for some known issues with these themes.
See also
Submit Button
Add a submit button to redirect facets and filter results on another page
Download this add-on from your account page:
Download Add-On