WooCommerce
FacetWP includes built-in support for WooCommerce. It even supports variable products. See below for a step-by-step guide.
Create your facets
After adding some products, go to Settings > FacetWP and click the “Add facet” link.
For the facet’s Data source, select a choice under the “WooCommerce” header.
WooCommerce data sources
Facets can be created using most WooCommerce data, including:
- Price
- Sale Price
- Regular Price
- Average Rating
- Stock Status (in stock / out of stock)
- On Sale
- Featured
- Product Type
- Product categories
- Product tags
- Product attributes
Add facets to your shop pages
For most themes, simply add your facet shortcodes into a sidebar text widget. FacetWP will automatically detect the products query and loop, and display relevant facet choices.
Show facet choices for out-of-stock products
WooCommerce by default shows out-of-stock products in product listings. This is controlled by the global WooCommerce setting “Hide out of stock items from the catalog”, under WooCommerce > Settings > Products > Inventory > Out of stock visibility:

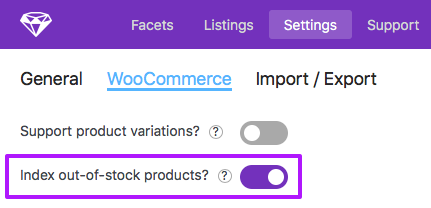
However, FacetWP does not index out-of-stock products by default. You can make FacetWP index them by enabling the “Index out-of-stock products” setting under FacetWP > Settings > Woocommerce.
After enabling this setting, make sure to re‑index.
If you don’t want out-of-stock products included in your product archive listing, enable “Hide out of stock items from the catalog” in the WooCommerce settings, and disable FacetWP’s “Index out-of-stock products” setting.
Note that the “Hide out of stock items from the catalog” setting and the products’ “Stock status” setting only work as expected on native WooCommerce product archive pages, but not on other types of templates. If you are using a custom products query, or a Listing Builder template that queries products, and you want to hide out-of-stock products, read this guide.
Create a stock status facet
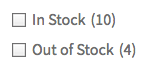
If you want to create a facet that shows stock status choices, see the tips in this section.
Using WooCommerce product variations
FacetWP fully supports WooCommerce variable products, also called “product variations”.
Variable products are a combination of product attributes. After enabling variations in the settings, setting up product attributes and variable products, and doing a full re-index, you can create facets with product attributes as data source. You can then use these facets to filter parent products by these attributes, for example by color.
Enable FacetWP support for product variations
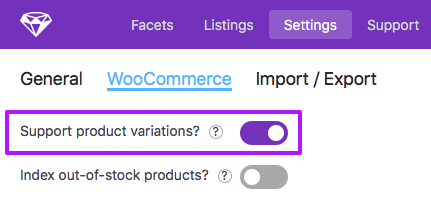
If you want to use product variations in facets, you first have to enable support for it.
You can do this in FacetWP’s admin UI, under Settings > WooCommerce > Support product variations.
After enabling this setting, make sure to re‑index.
How to set up product variations
To learn how variable products in WooCommerce work, you can follow this guide on the WooCommerce website.
To understand the power of WooCommerce product variations in combination with FacetWP, you can also first watch the short video walkthrough below.
Understanding and setting up product variations can be quite confusing if you have never done it before. A step-by-step explanation:
1. Set up product attributes
What is a “product variant” in WooCommerce exactly? Technically, a product variant is a combination of values of “product attributes”. An example:
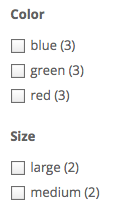
A product attribute could be “size”. This attribute’s values could be “large”, “medium” and “small”.
A product variation could be simply one of these values: “large”. But variations are more powerful because you can combine several attributes’ values into one product variation. Consider a second attribute “color” with the values “blue”, “green” and “red”. A product variation could be any combination of values of these two attributes, for example, “large red” or “medium green”. These product variations can be added to each product. For example, a t-shirt could only be available in size medium in green, and in size large in red.
Because product variations consist of product attribute values, before you can add variations to a product, you need to add some product attributes.
Attributes can be set up as custom attributes for a single product only, or globally, so you can re-use them for multiple products.
Product level custom attributes you have to add for each product individually (see step 3).
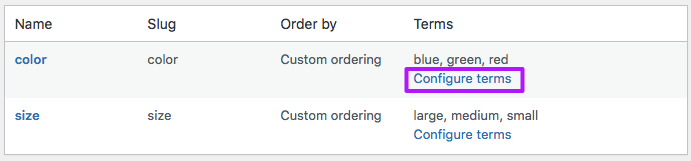
Global attributes are stored as custom taxonomies, each with its own terms. They can be added under Products > Attributes in the WP admin column on the left. Below is an example setup of two global attributes: “color” and “size”. Both attributes have three possible values (terms), which you can configure by clicking the “Configure terms” link:
Next, in each product’s edit page, you have to set up the attributes and variations for that specific product:
2. Set the product type to “Variable product”
To use product variations, first, it’s important to set the correct product type on each product page. Click the “Product data” dropdown and select “Variable product”. See the image in the next step.
3. Add product attributes
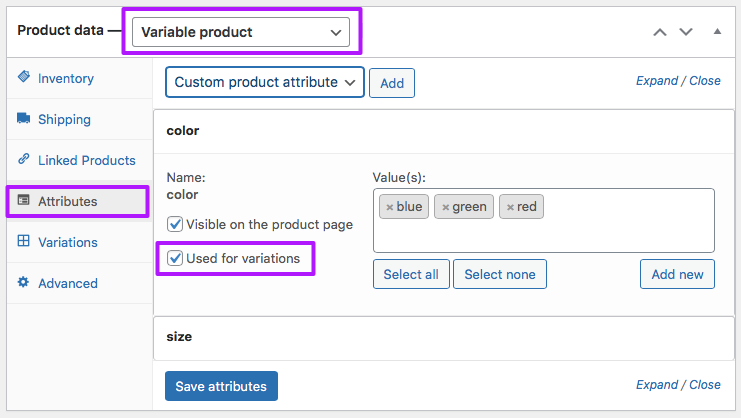
On the “Attributes” tab, you can add custom attributes specifically for this product, or you can select the global attributes that you have configured in step 1. For the first option, just click the “Add” button directly. For the second option, select a previously configured global attribute with the dropdown first and then click “Add”.
Then you can decide which values should be available for each attribute, for this product specifically. For example all defined color values, or only “green” and “red”. In the example shown in the image below, we have added 2 attributes, ‘color’ and ‘size’, and for the ‘color’ attribute we have set 3 possible values.
In the next step we are going to combine the selected attribute values into product variations. For this to work, it’s important to enable the “Used for variations” checkbox – for each attribute separately:
4. Add product variations
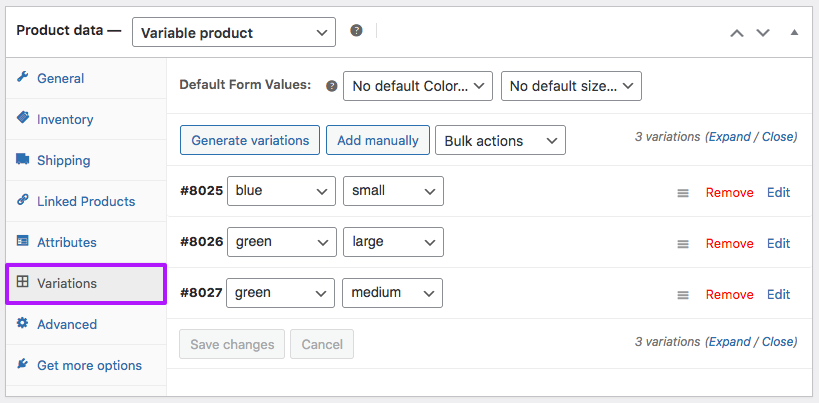
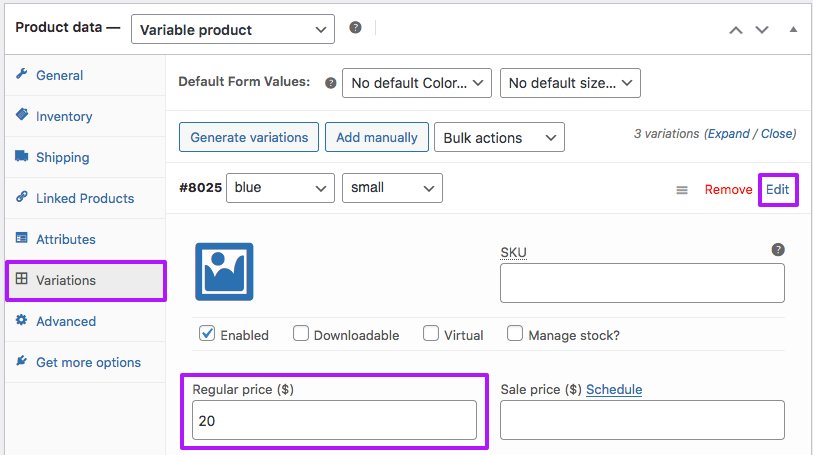
Next, on the “Variations” tab you can configure available product variations, by adding combinations of attribute values.
Click “Generate variations” to create every possible combination of values from the previously added product attributes. Or add variations one at a time, by clicking the “Add manually” button.
In this example, we created three variations from the values of the ‘color’ and ‘size’ attributes:
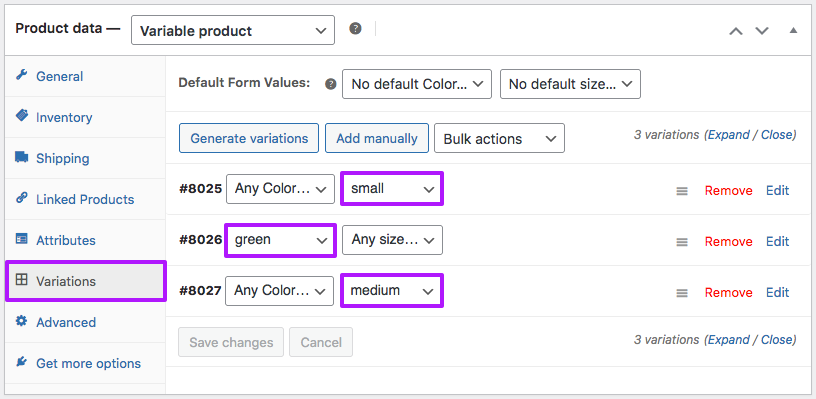
Make sure to explicitly set your attribute values in every variation. If you set them to “Any {attribute}”, the product will not get indexed for that attribute (if you have a facet that uses this attribute as its data source). If you have attribute-based facets that are missing certain options, or are empty, this is likely the cause.
For example, a product with the following variations set, will only get indexed for “small” and “medium” in a “size” facet that uses the “size” attribute as its data source. And only for “green” in a “color” facet that uses the “color” attribute as its data source:
Next, it is important to click open each variation and add a price, because variations that do not have a price will not be shown in the shop:
5. Set up facets for each attribute
Now we are all set up to create facets for each attribute, in this example for “color” and “size”.
Before you do this, make sure you already have created a few products that actually use the attributes and variations, as described above. Otherwise, the attributes will not show up in the facet’s Data source options.
Global attributes show up in the facet’s Data source dropdown in two ways. For example an attribute “size” will show up as:
Product size (pa_size)(under the “WooCommerce” heading).attribute_pa_size(under the “Custom Fields” heading). Note:_pa_stands for “product attribute”).
You can choose either one:
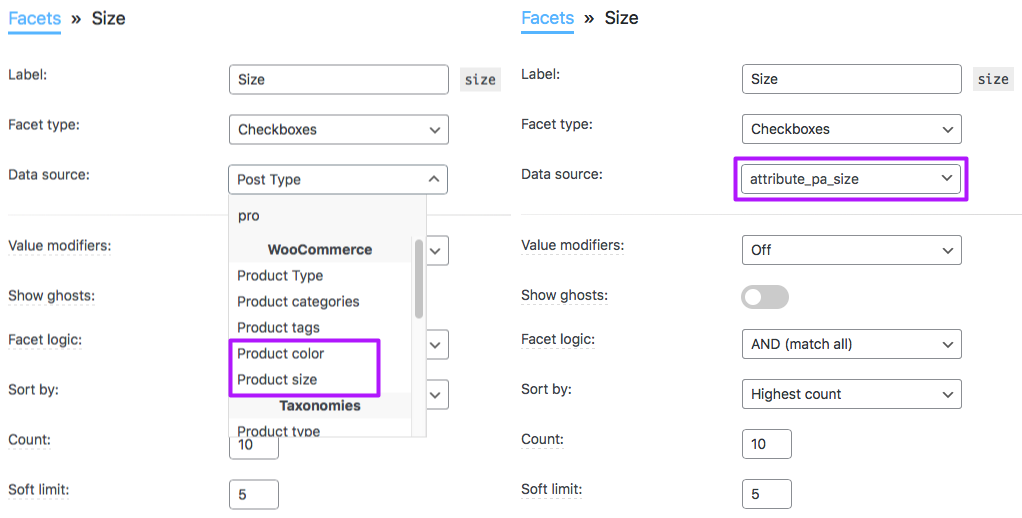
Note that if you don’t have variable products, and you don’t have the “Support product variations” setting enabled, you need to select the attribute field that is under the WooCommerce heading in the data source dropdown. In the above example this would be: Product size (pa_size), as shown on the left.
Product level custom attributes, for example “size”, will show up as:
attribute_size(under the “Custom Fields” heading).
After setting up your facet(s), add them to your page with a shortcode.
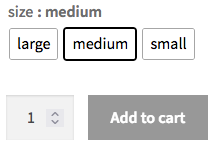
The logic of facets that use product attributes is smart enough to take into account that product variations can consist of multiple attribute values. This means that facets will only show choices (attribute values) that exist in available product variations. If this sounds confusing, check the video below at around 2:09 for a clear example.
Product variations video walkthrough
A full walkthrough of how to implement product variations in facets is shown in the screencast below.
Keep in mind that the video was made with previous versions of WooCommerce and FacetWP, so many settings are looking different than the screenshots on this page.
Link filtered products directly to WooCommerce product variations
If you have set up variations and you have created facets that have product attributes as their data source, it is possible to let the filtered products link directly to the selected product variation, and highlight this variation on the product page.
See this tutorial to learn how to set this up.
Using WooCommerce pagination and sorting
FacetWP has built-in support for WooCommerce pagination and sorting/ordering, so in general there is no need to use a Pager facet or a Sort facet on shop pages.
A good reason to keep WooCommerce’s native pagination or sorting is that you can keep your theme’s styling, while if you replace it with a Pager facet or Sort facet, you have to style these facets to match your theme.
One reason to replace WooCommerce pagination with a Pager facet, would be if you want to use the “Load more” Pager facet type.
If you decide to use a Sort facet instead of WooCommerce sorting, make sure to set the “Default product ordering” setting correctly, to prevent a non-working Sort facet.
Fix WooCommerce pagination, result counts and sorting
If you decide to keep WooCommerce pagination and/or sorting, keep in mind that for these to work properly with FacetWP, the blocks with class woocommerce-pagination and woocommerce-ordering must be placed inside the element with class facetwp-template. If this is not the case, the pagination, result counts and sorting/ordering will not refresh after interacting with facets. Note that this is the opposite requirement of when you use a Pager or Sort facet (or any type of facet), which needs to be placed outside the facetwp-template element.
On default shop pages WooCommerce pagination and/or sorting will not be inside facetwp-template automatically. FacetWP automatically adds the facetwp-template class to the <ul> with products that WooCommerce creates, and the pagination and/or sorting code will end up outside of it.
There are two ways to fix this:
- Edit the shop archive template in your theme (generally
archive-product.php) and manually place thefacetwp-templateclass on an element that surrounds the product loop and the WooCommerce pagination and sorting elements. - If you can’t edit your shop archive template directly, add the following code to your (child) theme’s
functions.php. It will add thefacetwp-templatewrapper to the right spot, surrounding the WooCommerce pagination and ordering code:
How to use custom PHP code?
PHP code can be added to your (child) theme's functions.php file. Alternatively, you can use the Custom Hooks add-on, or a code snippets plugin. More info
function fwp_wrapper_open() { if ( ! is_singular() ) : echo '<div class="facetwp-template">'; endif; } function fwp_wrapper_close() { if ( ! is_singular() ) : echo '</div><!-- end facetwp-template -->'; endif; } add_action( 'woocommerce_before_shop_loop', 'fwp_wrapper_open', 5 ); add_action( 'woocommerce_after_shop_loop', 'fwp_wrapper_close', 15 ); add_action( 'woocommerce_no_products_found', 'fwp_wrapper_open', 5 ); add_action( 'woocommerce_no_products_found', 'fwp_wrapper_close', 15 );
If the above code does not work, check your theme for WooCommerce theme support:
Fix issues with WooCommerce theme support
The above code to fix pagination and sorting will only work if your theme has explicitly declared “theme support” for WooCommerce, which makes it use WooCommerce archive template overrides, like archive-product.php for the shop page.
If WooCommerce theme support is not declared, WooCommerce will only use shortcodes to display the shop. And because these shortcodes will be used on singular pages or posts, the above code will not run.
Not declaring WooCommerce theme support will also cause other issues, like custom code that uses is_archive() to target WooCommerce archive templates, malfunctioning because the shop page is not an archive template in this case, but a normal page template.
To check for WooCommerce theme support, check for the presence of add_theme_support('woocommerce'); in your theme files. If it is not there, you can declare it yourself by adding the following snippet to your (child) theme’s functions.php:
How to use custom PHP code?
PHP code can be added to your (child) theme's functions.php file. Alternatively, you can use the Custom Hooks add-on, or a code snippets plugin. More info
function mytheme_add_woocommerce_support() { add_theme_support( 'woocommerce' ); } add_action( 'after_setup_theme', 'mytheme_add_woocommerce_support' );
Note that you can optionally pass extra theme settings when declaring WooCommerce theme support.
Fix pagination issues with WooCommerce Product Search
If you are using the WooCommerce Product Search plugin, you may see pagination issues using WooCommerce pagination or Pager facets, specifically on product category/term pages.
This is a known incompatibility that has a workaround.
Fix pagination issues with Custom Permalinks for WooCommerce
If your WooCommerce pagination or Pager facet is not working on category archive pages, and you have the Custom Permalinks for WooCommerce plugin installed, the likely cause of the issue is that this plugin adds 301 redirects to paged pages. See this page for how to fix this.
Replace WooCommerce pagination with a Pager facet
You may want to replace the default WooCommerce pagination with a Pager facet, for example because you want to use a “Load more” Pager type.
Of course you could manually remove the WooCommerce pagination in your theme’s shop archive templates, and replace it with a Pager facet’s display code.
If you don’t want to remove the WooCommerce pagination code, you can also simply hide it with CSS:
How to use custom CSS?
CSS code can be placed in your (child) theme's style.css file. Alternatively, you can add it manually between
<style>tags in the<head>section, in your (child) theme's header.php file. You can also load it with a hook in your (child) theme's functions.php file, or in the Custom Hooks add-on. To load the code only on pages with facets, use thefacetwp_scriptshook. To load it on all pages, usewp_headorwp_footer. Or you can use a code snippets plugin. More info.woocommerce-pagination { display: none !important; }
Be aware that to work properly, the Pager facet display code/shortcode needs to be outside of the facetwp-template container element (as opposed to WooCommerce pagination, which needs to be inside it). Usually, this container element is the <ul> with products that WooCommerce creates, unless you have placed the facetwp-template class manually on another element.
An alternative approach would be to override the default WooCommerce pagination template, by copying the following custom pagination template to yourtheme/woocommerce/loop/pagination.php. Make sure to replace my_custom_pager with the name of your Pager facet:
How to use custom PHP code?
PHP code can be added to your (child) theme's functions.php file. Alternatively, you can use the Custom Hooks add-on, or a code snippets plugin. More info
<?php /** * Pagination - Show numbered pagination for catalog pages * * This template can be overridden by copying it to yourtheme/woocommerce/loop/pagination.php. * * Create a pager facet in facetwp's settings and use that facet name in the code below. Be sure to change * the shortcode to use your facet's name instead of "my_custom_pager" * * @see https://docs.woocommerce.com/document/template-structure/ * @package WooCommerce/Templates * @version 3.3.1 */ if ( ! defined( 'ABSPATH' ) ) { exit; } if ( function_exists('FWP') ) : ?> <?php echo facetwp_display( 'facet', 'my_custom_pager' ); // change 'my_custom_pager' to the name of your pager facet ?> <?php else : $total = isset( $total ) ? $total : wc_get_loop_prop( 'total_pages' ); $current = isset( $current ) ? $current : wc_get_loop_prop( 'current_page' ); $base = isset( $base ) ? $base : esc_url_raw( str_replace( 999999999, '%#%', remove_query_arg( 'add-to-cart', get_pagenum_link( 999999999, false ) ) ) ); $format = isset( $format ) ? $format : ''; if ( $total <= 1 ) { return; } ?> <nav class="woocommerce-pagination"> <?php echo paginate_links( apply_filters( 'woocommerce_pagination_args', array( // WPCS: XSS ok. 'base' => $base, 'format' => $format, 'add_args' => false, 'current' => max( 1, $current ), 'total' => $total, 'prev_text' => '←', 'next_text' => '→', 'type' => 'list', 'end_size' => 3, 'mid_size' => 3, ) ) ); ?> </nav> <?php endif; ?>
Replace WooCommerce sorting with a Sort facet
FacetWP has built-in support for WooCommerce sorting, so generally there is no need to use a Sort facet on shop pages, unless you need the features that come with that facet type.
If you decide to keep WooCommerce sorting, make sure that the WooCommerce sort code block is inside the element with class “facetwp-template” (as opposed to (Sort) facets which need to be outside of it.
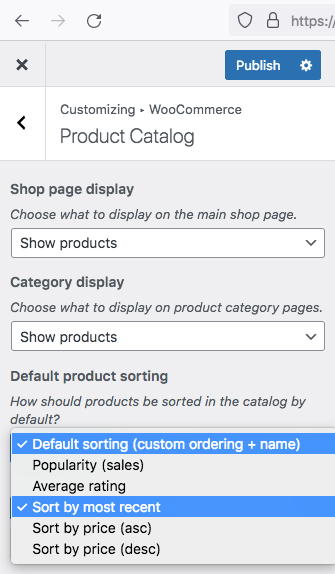
If you opt to use a Sort facet instead, it’s important that you set WooCommerce’s “Default product sorting” option correctly, otherwise the Sort facet will not work.
To do so, open your shop page and click “Customize” in the top menu. In the sidebar, navigate to WooCommerce > Product Catalog.
With the “Default product sorting” dropdown you can now select the default order of the product query. Only the following two options will work with a Sort facet:
- Default sorting (custom ordering + name)
- Sort by most recent
If you select any of the other available default sorting options (like “Popularity (sales)”, “Average rating” or “Sort by price”), the Sort facet will not work.
The reason is that these options are not standard WP_Query ordering methods. With these custom ordering methods, WooCommerce uses special joins with its own tables, which conflict with the Sort facet functionality.
If you want to use any of the other default sorting methods in the “Default product sorting” options, you need to use a pre_get_posts hook to set it. For example, if you want to use a default ordering by price, from high to low:
- First, set the “Default product sorting” dropdown to “Default sorting (custom ordering + name)” and save by clicking “Publish”.
- Next, add the following snippet to your (child) theme’s functions.php:
How to use custom PHP code?
PHP code can be added to your (child) theme's functions.php file. Alternatively, you can use the Custom Hooks add-on, or a code snippets plugin. More info
add_action('pre_get_posts', function ( $query ) { if ( is_admin() || ! $query->is_main_query() ) { return; } // For product archive pages and product category archive pages if ( is_post_type_archive('product') || is_shop() || is_tax('product_cat') ) { $query->set('orderby', 'meta_value_num'); $query->set('meta_key', '_price'); $query->set('order', 'DESC'); } });This makes the products order by price, from high to low (
DESC), on product archives and product category archives. - You can now use a Sort facet without issues. If your Sort facet also has an option to sort by price (desc), you can pre-select it with the facetwp_preload_url_vars hook, like this:
How to use custom PHP code?
PHP code can be added to your (child) theme's functions.php file. Alternatively, you can use the Custom Hooks add-on, or a code snippets plugin. More info
// Replace 'my/page' with the URI of your shop page (everything after the domain name, excluding any slashes at the beginning and end). // Replace 'product-category' with the URL base for the product category archives (the part of the URL before the term name, without the domain name, excluding any slashes at the beginning and end. E.g. for domain.com/product-category/tools, it would be 'product-category'. // Replace 'my_sort_facet' with the name of your Sort facet (2x). // Replace 'price_high_low' with the Sort facet option to be pre-selected. add_filter( 'facetwp_preload_url_vars', function( $url_vars ) { if ( 'my/page' == FWP()->helper->get_uri() || false !== strpos( FWP()->helper->get_uri(), 'product-category' ) ) { if ( empty( $url_vars['my_sort_facet'] ) ) { $url_vars['my_sort_facet'] = ['price_high_low']; } } return $url_vars; } );This example assumes that your Sort facet has a
price_high_lowsort option set. It pre-selects this sort option on product archives and product category archives.
Product variations and sorting by price with a Sort facet
Be aware that sorting by price is currently not supported with the Sort facet, if you are using product variations and have variable products in the query. It may seem to work, but the logic of the Sort facet is based on WP_Query and therefore supports only basic custom fields-based sorting by meta key. Product variation prices are unfortunately more complex than that because all variation prices are synced to the parent product’s post meta.
If you need sorting by product variation price, you could use WooCommerce’s built-in sort box, which works on the “normal” WooCommerce product archive. FacetWP fully supports WooCommerce product archive pages. Make sure that this sort box is within the .facetwp-template container, as explained above.
Hide the WooCommerce sort box
If you choose to use a Sort facet and you don’t want to remove the WooCommerce ordering code, you can simply hide it with CSS:
How to use custom CSS?
CSS code can be placed in your (child) theme's style.css file. Alternatively, you can add it manually between
<style>tags in the<head>section, in your (child) theme's header.php file. You can also load it with a hook in your (child) theme's functions.php file, or in the Custom Hooks add-on. To load the code only on pages with facets, use thefacetwp_scriptshook. To load it on all pages, usewp_headorwp_footer. Or you can use a code snippets plugin. More info.woocommerce-ordering { display: none; }
Filter product categories
It is possible to let FacetWP filter WooCommerce product categories instead of products. For this to work, four things need to be in place:
- WooCommerce needs to be set up to display product categories instead of products.
- Filtering product categories needs to be enabled for FacetWP.
- A facet needs to exist that has product categories as its data source.
- One or more facets need to be added to the product archive and/or category archive pages.
1. Display product categories in WooCommerce
To let WooCommerce display product categories instead of products, navigate to the WooCommerce Product Catalog settings in the Customizer:
Appearance > Customize > WooCommerce > Product Catalog
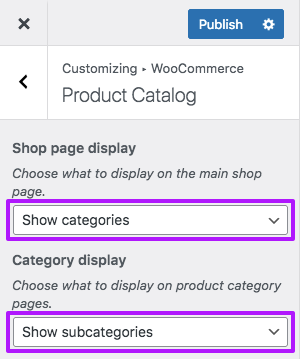
The “Shop page display” setting can be set to:
- Show products (the default)
- Show categories
- Show categories & products
Similarly, the “Category display” setting can be set to:
- Show products (the default)
- Show subcategories
- Show subcategories & products
“Show products” is the default setting to display and filter products. To display and filter only product categories, choose “Show categories”. Or, to show a mix of product categories and products, choose “Show categories & products”.
Re-enable the Customizer
If you don’t see the Customizer, you are probably using a block theme, and you are not using a plugin that enables it. FSE (Full Self Editing) block themes usually disable the legacy Customizer. To enable it again, you can use the customize_register hook in your (child) theme’s functions.php:
How to use custom PHP code?
PHP code can be added to your (child) theme's functions.php file. Alternatively, you can use the Custom Hooks add-on, or a code snippets plugin. More info
add_action( 'customize_register', '__return_true' );
2. Enable filtering product categories for FacetWP
FacetWP’s ability to filter product categories is disabled by default. To enable it, add the following to your (child) theme’s functions.php:
How to use custom PHP code?
PHP code can be added to your (child) theme's functions.php file. Alternatively, you can use the Custom Hooks add-on, or a code snippets plugin. More info
add_filter( 'facetwp_woocommerce_support_categories_display', '__return_true' );
3. Create a product category based facet
For FacetWP to be able to filter product categories correctly, a facet needs to exist that has product categories (the product_cat taxonomy) as its data source. This facet’s settings would look like this:
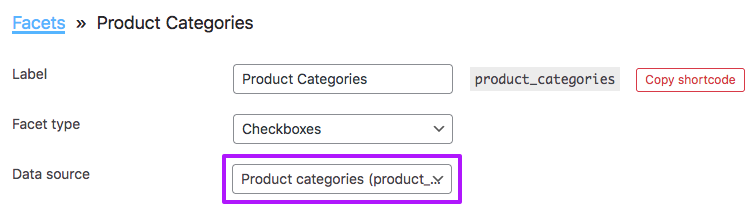
The actual facet name is irrelevant, you can name it whatever you want. It is important to re-index after creating the facet. You don’t have to add the facet to your page if you don’t need it. It just needs to exist and be indexed, so FacetWP can use the indexed data to determine the number of product categories after filtering.
4. Add facets to the shop/category archive header
To filter product categories, one or more facets need to be on the page. One of them can be the product category-based one that needs exist in FacetWP settings, but you can use any facet. However, don’t use Pager facets or Sort facets in this setup (see the explanation below).
Adding facets to the top or sidebar of the shop page (the product archive) can be done in many ways. We will not go into this here. As for your product category archives, don’t add them directly in the term description field. When you do this, the term description, including the facets, will disappear if the page is (re)loaded directly with an active facet selection.
One way to prevent this is by adding your facets to the category archive header like this:
How to use custom PHP code?
PHP code can be added to your (child) theme's functions.php file. Alternatively, you can use the Custom Hooks add-on, or a code snippets plugin. More info
add_action( 'woocommerce_archive_description', function() { echo do_shortcode( '[facetwp facet="my_facet_name"]' ); // Replace "my_facet_name" with the name of your facet. // Add more facets here. }, 15 );
Behavior when filtering product categories
With the above four things in place, the following will happen:
- When filtering with facets, the (sub)categories will be filtered, based on products contained in them. In other words, facets will filter products within categories, not the categories themselves. When using a Search facet, the same applies: it will search within products, not within categories.
- Facets will show counts corresponding with the total number of products in the current category and the remaining subcategories. Also the counts displayed below the categories in the listing represent the number of products, not the number of (sub)categories.
- When choosing “Show (sub)categories” in the WooCommerce settings, Pager facets and Sort facets will not work correctly. Pages and sort options will show up in these facets, but they will either do nothing or will lead to confusing paged results with products, because categories themselves are not paged in the query. So it is best to not use any Pager and Sort facets in this setup.
- When choosing “Show (sub)categories & products” in the WooCommerce settings, Pager facets and Sort facets will work, but only for the products in the listing. The categories will all be prepended statically before the products, on the first page.
- If there are facets in use, categories and subcategories will have the facet URL query variables appended to their archive link. This makes it possible for users to drill down in the category hierarchy with their facet selection, and arrive at the products they filtered for, no matter how deep these are nested in the hierarchy. If the categories are not hierarchical, users will arrive at the filtered products in one click. It is possible to prevent these query variables from being added, with the following snippet:
Prevent facet URL query variables from being appended to the category archive links
If you don’t want the facet URL query variables being appended to the category archive links when facets are in use (as described above), add the following snippet to your (child) theme’s functions.php:
How to use custom PHP code?
PHP code can be added to your (child) theme's functions.php file. Alternatively, you can use the Custom Hooks add-on, or a code snippets plugin. More info
add_filter( 'term_link', function( $term_link, $term, $taxonomy ) { if ( 'product_cat' == $taxonomy && did_action( 'woocommerce_shop_loop_header' ) && !did_action( 'woocommerce_after_shop_loop' ) ) { $url = parse_url($term_link); $term_link = $url['scheme'] . '://' . $url['host'] . $url['path']; // Rewrite link wihtout any query vars } return $term_link; }, 11, 3);
Using “Add to cart” buttons with FacetWP
There are multiple ways to add “Add to cart” buttons to product listing templates.

Whether the button works with FacetWP (specifically, after using facets) depends on the listing template type, and on the state of the “Enable AJAX add to cart buttons on archives” setting (which can be found under WooCommerce > Settings > Products > Add to cart behaviour).
Add an “Add to cart” button in product archives or custom WP_Query listing templates
The built-in “Add-to-cart” buttons that WooCommerce itself adds in regular non-block product archives, will work out of the box. It does not matter if the button is set to use AJAX or not. Also, facet selections will be retained when the button is clicked.
In custom WP_Query type listing template loops, you can add an “Add to cart” button with WooCommerce’s “add-to-cart” shortcode, like this:
How to use custom PHP code?
PHP code can be added to your (child) theme's functions.php file. Alternatively, you can use the Custom Hooks add-on, or a code snippets plugin. More info
echo do_shortcode( '[add_to_cart id="' . $post->ID . '"]' );
In these kinds of listing templates, this button will work with or without AJAX, before and after using facets. And it will retain facet selections when clicked.
If you keep “Redirect to the cart page after successful addition” disabled, it will prevent a redirect when the button is clicked.
Using the “Add to Cart Button” block in the Product Collection block

If you are using the Blocks add-on, the default “Add to Cart Button” block within the WooCommerce Product Collection block will not work after FacetWP’s AJAX refresh, if the “Enable AJAX add to cart buttons on archives” setting (under WooCommerce > Settings > Products > Add to cart behaviour) is enabled.
This issue unfortunately does not have a simple fix: at the time of writing, there is no way to re-trigger the block’s JavaScript after a facet refresh, because it is using the WP Interactivity API. You can follow this GitHub issue for updates on a possible fix in a future WooCommerce version.
So the only way to get the default “Add to Cart Button” block working after a facet refresh is to disable the “Enable AJAX add to cart buttons on archives” setting.
If you don’t like a non-AJAX add-to-cart button, you could find and use a third-party “add to cart” block that does not use the WP Interactivity API, and retrigger its JavaScript using the facetwp-loaded hook.
Or, the most practical solution, is to use a custom shortcode to render the “regular” (classic/non-block) WooCommerce add-to-cart button in the Product Collection block.
Add an “Add to cart” button in Listing Builder templates
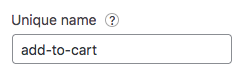
add-to-cart.If you are using a Listing Builder listing template for your products listing, you can use the facetwp_builder_item_value hook to add an “Add to cart” button to your products, in the following way:
First, create a Button item (or any other item type) and give it the “Unique name” of add-to-cart, as shown in the image on the right.
Then add the following snippet to your (child) theme’s functions.php. It will override the output of the builder item with an “add-to-cart” shortcode.
How to use custom PHP code?
PHP code can be added to your (child) theme's functions.php file. Alternatively, you can use the Custom Hooks add-on, or a code snippets plugin. More info
<?php // Add a Button item in your Listing Builder template, and give it the Unique name 'add-to-cart'. add_filter( 'facetwp_builder_item_value', function( $value, $item ) { if ( 'add-to-cart' == $item['settings']['name'] ) { global $post; $value = do_shortcode( '[add_to_cart id="' . $post->ID . '"]' ); } return $value; }, 10, 2 );
This button will work with FacetWP, also after using facets, as long as the “Enable AJAX add to cart buttons on archives” setting is enabled. It will also retain facet selections when the buton is clicked.
However, if the “Enable AJAX add to cart buttons on archives” setting is disabled, you’ll notice a rest_no_route error when clicking the button after using facets, because the button does not retain the correct URI.
To fix this, add the following code to your (child) theme’s functions.php. It makes sure that after using facets, the correct URI in the buttons is retained. It also retains any facet selections when the button is clicked and the page is reloaded with the add-to-cart= query argument in the URL.
How to use custom PHP code?
PHP code can be added to your (child) theme's functions.php file. Alternatively, you can use the Custom Hooks add-on, or a code snippets plugin. More info
// Retain the add-to-cart URI and facet selections after a refresh add_filter( 'woocommerce_product_add_to_cart_url', function( $url, $product ) { if ( function_exists('FWP') && strpos( $url, 'add-to-cart' ) > 0 ) { $vars = []; // First page load if ( FWP()->request->is_preload ) { array_walk( FWP()->request->url_vars, function( $value, $key ) use (&$vars) { $vars[ FWP()->helper->get_setting( 'prefix' ) . $key ] = implode(",",(array)$value); }, $vars ); } else { // Retain the URI after a facet refresh $custom_path = '/' . FWP()->helper->get_uri() . '/'; $url = add_query_arg( 'add-to-cart', $product->get_id(), home_url( $custom_path ) ); $valid_names = wp_list_pluck( FWP()->helper->get_facets(), 'name' ); $valid_names = array_merge( $valid_names, [ 'paged', 'per_page', 'sort' ] ); array_walk( FWP()->facet->http_params['get'], function( $value, $key ) use (&$vars, &$valid_names) { if ( 0 === strpos( $key, FWP()->helper->get_setting( 'prefix' ) ) && in_array( substr_replace($key, '', 0, strlen(FWP()->helper->get_setting( 'prefix' ))), $valid_names ) ) { $vars[ $key ] = implode(",", stripslashes_deep((array)$value)); } } ); } foreach ( $vars AS $facet_name => $value ) { $url = add_query_arg( $facet_name, $value, $url ); } } return $url; }, 20, 2 );
Using 3rd-party “Add to cart” buttons
There are many plugins that can be used to add (AJAX) “Add to cart” buttons or related JavaScript functionality. You may run into issues with the button or other parts of the functionality not working anymore after a facet refresh.
This is not unique to “Add to cart” buttons: every JavaScript code that runs on post/product items in the query loop needs to be re-triggered after a FacetWP AJAX refresh (which happens when using facets). This can be done with the facetwp-loaded event, as shown in these examples.
The exact JavaScript code to re-initialize the button depends on the used plugin. There are a few examples in our code snippets library.
Using FacetWP with Stock status and Catalog visibility settings
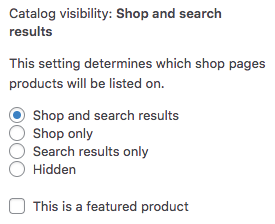
WooCommerce products have several “product status” fields and settings that are (or can be) used to determine if a product appears in the listing or not. Examples are the “Stock status” setting and the “Catalog visibility” settings.
These settings will work (mostly) if you are using a native WooCommerce product archive. But they will not work as expected on custom product queries or Listing Builder listing templates that query products.
This guide goes through all caveats and fixes for using Stock status, Catalog visibility and other product status settings with FacetWP.
If you want to create a facet that shows stock status choices, see the tips in this section.
Using FacetWP with the WooCommerce [products] shortcode
With the WooCommerce [products] shortcode it’s easy to add a products/shop grid or list to any normal WordPress page.
However, this shortcode will not work with FacetWP out of the box. To be able to use it on pages with facets, read this guide.
Make product attributes or product tags hierarchical
WooCommerce product attributes (which are custom taxonomies), are not hierarchical by default. If you want them to be, add the following code to your (child) theme’s functions.php. Make sure to replace color with the name (the slug) of your attribute, and keep pa_ before it:
How to use custom PHP code?
PHP code can be added to your (child) theme's functions.php file. Alternatively, you can use the Custom Hooks add-on, or a code snippets plugin. More info
// Make Woo product attributes hierarchical. // Replace "color" with the name (slug) of your attribute. Keep "pa_" before it. add_filter('woocommerce_taxonomy_args_pa_color', function( $args ) { $args['hierarchical'] = true; return $args; });
Now you can use this attribute in a hierarchical facet and show parent and child terms/choices.
The same can be done with product tags:
How to use custom PHP code?
PHP code can be added to your (child) theme's functions.php file. Alternatively, you can use the Custom Hooks add-on, or a code snippets plugin. More info
// Make Woo product tags hierarchical. add_filter('woocommerce_taxonomy_args_product_tag', function( $args ) { $args['hierarchical'] = true; return $args; });
Make product tags sortable with drag-and-drop
By default, Woo product categories and product attribute terms are sortable in the admin interface, by dragging them into a custom order with the little hamburger icon on the right:
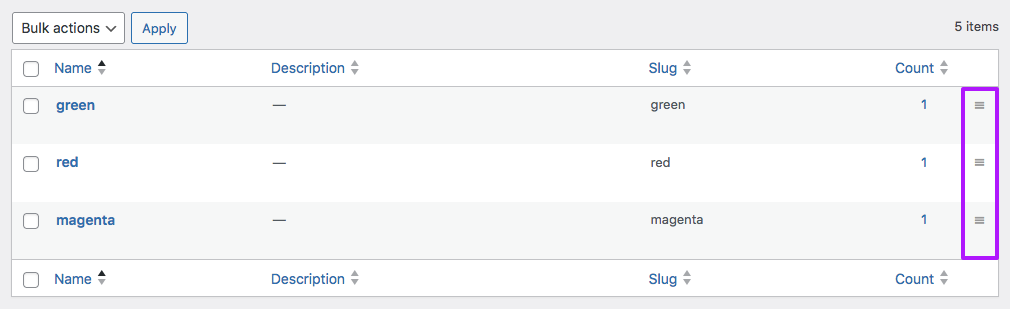
FacetWP honors this custom order if you use product categories (product_cat) or product attributes (pa_yourattributeslug) as a facet’s data source, and set the “Sort by” setting to “Term order”.
To get the same drag-and-drop feature for product tags, add the following to your (child) theme’s functions.php:
How to use custom PHP code?
PHP code can be added to your (child) theme's functions.php file. Alternatively, you can use the Custom Hooks add-on, or a code snippets plugin. More info
// Make Woo product tags sortable with drag-and-drop. // To use the custom order, set the facet's "Sort by" setting to "Term order". add_filter('woocommerce_sortable_taxonomies', function($taxonomies) { $taxonomies[] = 'product_tag'; return $taxonomies; });
You can now drag the tags into a custom order. When you use product_tag as a facet’s data source, and set “Sort by” to “Term order”, the facet choices will be displayed in this custom order.
Using Select2 with WooCommerce
WooCommerce has built-in support for the Select2 JavaScript library, and WooCommerce’s accessible alternative, SelectWoo.
You may either want to fix issues with it running on the WooCommerce sort dropdown, or you may want to enable it yourself.
Fix the WooCommerce sort dropdown with Select2/SelectWoo enabled on it
Your theme (or your own custom code) may be enqueuing the Select2/SelectWoo script and styles that come with WooCommerce, and subsequently may be running select2() on specific dropdowns, maybe without you even noticing.
We see this happen often on the WooCommerce native sort dropdown (the one with class woocommerce-ordering. This dropdown will then look and work differently than the HTML <select> element it normally is.
FacetWP automatically detects and works with this sort dropdown (if you make sure it is within the “facetwp-template” class). But not when Select2 or SelectWoo is enabled on it; it will then simply not work.
To fix this, you could simply remove the select2() call on the .woocommerce-ordering .orderby element (and then maybe even dequeue/deregister the script/styles entirely). Or, if you want to keep Select2 enabled on it, you can fix it by adding the following snippet to your (child) theme’s functions.php:
How to use custom PHP code?
PHP code can be added to your (child) theme's functions.php file. Alternatively, you can use the Custom Hooks add-on, or a code snippets plugin. More info
add_action( 'facetwp_scripts', function() { ?> <script> (function($) { document.addEventListener('facetwp-loaded', function() { // Enable FacetWP detection of the WooCommerce orderby dropdown with Select2 enabled on it. $('.woocommerce-ordering .orderby').on('change', function() { var qs = new URLSearchParams(window.location.search); qs.set('orderby', $(this).val()); history.pushState(null, null, window.location.pathname + '?' + qs.toString()); FWP.soft_refresh = true; FWP.refresh(); }); }); })(jQuery); </script> <?php }, 100 );
Enable Select2/SelectWoo on the WooCommerce sort dropdown
If you want to enable Select2 or SelectWoo on the WooCommerce sort dropdown yourself, you’ll need to first enqueue the scripts and styles, by adding the following snippet to your (child) theme’s functions.php:
How to use custom PHP code?
PHP code can be added to your (child) theme's functions.php file. Alternatively, you can use the Custom Hooks add-on, or a code snippets plugin. More info
add_action('wp_enqueue_scripts', function() { if( is_shop() || is_product_category() ) { // Adapt if necessary. wp_enqueue_script( 'selectWoo' ); // Enqueue Woo's accessible SelectWoo script. Alternatively use the original Select2 script: wp_enqueue_script( 'select2' ); wp_enqueue_style( 'select2' ); // Enqueue Select2 styles. } }, 100);
Then, add the following script, which enables Select2 on the .woocommerce-ordering .orderby dropdown element, and subsequently fixes FacetWP’s detection of it. The option in line 9 removes the Select2 searchbox in the dropdown:
How to use custom PHP code?
PHP code can be added to your (child) theme's functions.php file. Alternatively, you can use the Custom Hooks add-on, or a code snippets plugin. More info
add_action( 'facetwp_scripts', function() { ?> <script> (function($) { document.addEventListener('facetwp-loaded', function() { // Enable Select2 on the WooCommerce orderby dropdown. $('.woocommerce-ordering .orderby').select2({ minimumResultsForSearch: -1, // Removes Select2 searchbox. Set to -1, it disables the search box for any number of options. }); // Enable FacetWP detection of the WooCommerce orderby dropdown with Select2 enabled on it. $('.woocommerce-ordering .orderby').on('change', function() { var qs = new URLSearchParams(window.location.search); qs.set('orderby', $(this).val()); history.pushState(null, null, window.location.pathname + '?' + qs.toString()); FWP.soft_refresh = true; FWP.refresh(); }); }); })(jQuery); </script> <?php }, 100 );