Schedule Indexer
Trigger periodic re-indexing with WP‑Cron
This add-on can be used to schedule a periodic re-index with WP-Cron.
The plugin adds a WP-cron event that triggers a full re-index. By default, it will run the indexer on an hourly cron schedule.
Usage
1. Download and install the add-on
Download the add-on from your account, install it as a plugin, and activate it.
2. Disable automatic indexing
FacetWP has an automatic indexer that performs a single re-index when an individual item (a post, page, and category or term name/slug) is edited or saved. This keeps the index up to date automatically without having to worry about it, and without putting the potentially heavy burden of a full re-index on your site.

When using this add-on, which triggers re-indexing with a recurring WP‑Cron schedule, it’s important to disable automatic indexing, to prevent multiple indexing events running at the same time. You can do this by disabling the “Enable automatic indexing” setting (introduced in version 4.3.4),
Alternatively, you can disable automatic indexing with the facetwp_indexer_is_enabled hook, by adding the following to your (child) theme’s functions.php. The code does exactly the same as disabling the setting.
How to use custom PHP code?
PHP code can be added to your (child) theme's functions.php file. Alternatively, you can use the Custom Hooks add-on, or a code snippets plugin. More info
add_filter( 'facetwp_indexer_is_enabled', '__return_false' );
3. Set a schedule
If you are happy with the default hourly indexing schedule, that’s it. If you want it to run on another schedule, you can use one of the other available built-in schedules, or create a custom schedule.
4. Test the schedule
To test the cron schedule and to see when the next indexing event will run exactly, you can use the WP Crontrol plugin. And to check if the indexer has already run, you can use FacetWP’s “Show indexer stats” button.
While testing this plugin, be aware that WP-Cron events are only triggered when there is activity on the front end of the website. So if the scheduled event time has passed and you see no indexing running, make sure to visit a few pages on the front-end of your website. If you don’t like this shortcoming of WP-Cron, consider replacing it with a server cron. Or you can use a server cron with WP-CLI indexing commands instead of this add-on.
Use a built-in indexing schedule
The add-on uses the wp_schedule_event() function, which has the following built-in schedules:
hourlytwicedailydailyweekly(since WP 5.4.0)
To change the default hourly schedule, you can use the facetwp_index_schedule hook to pass one of the other built-in schedules to the add-on. For example, to let the indexer run automatically on a daily schedule, add the following code to your (child) theme’s functions.php:
How to use custom PHP code?
PHP code can be added to your (child) theme's functions.php file. Alternatively, you can use the Custom Hooks add-on, or a code snippets plugin. More info
add_filter( 'facetwp_index_schedule', function() { return 'daily'; },10);
Use a custom indexing schedule
If you want to use a custom schedule, you can create your own schedule with WP’s cron_schedules filter.
For example, you could add a quarterly schedule that runs every 15 minutes, by adding the following code to your (child) theme’s functions.php. You can name the schedule whatever you want and give it a descriptive display name. The interval needs to be set in seconds:
How to use custom PHP code?
PHP code can be added to your (child) theme's functions.php file. Alternatively, you can use the Custom Hooks add-on, or a code snippets plugin. More info
add_filter('cron_schedules', function( $schedules ) { $schedules['quarterly'] = array( 'interval' => 900, // In seconds: 900 is the number of seconds in 15 minutes 'display' => __('Once Every Quarter') // The display name of the custom schedule ); return $schedules; },10);
Then, below the above code, add the facetwp_index_schedule hook to pass the new quarterly schedule to the add-on:
How to use custom PHP code?
PHP code can be added to your (child) theme's functions.php file. Alternatively, you can use the Custom Hooks add-on, or a code snippets plugin. More info
add_filter( 'facetwp_index_schedule', function() { return 'quarterly'; // Add the cron schedule created with the 'cron_schedules' hook },10);
Check the indexing schedule and event with WP Crontrol
Cron schedules and events can be difficult to test and debug. We recommended checking if your custom schedule is actually added to WordPress, and/or if the fwp_scheduled_index WP‑Cron event is actually scheduled to run at the set interval. The best way to do this is by installing the WP Crontrol plugin and doing the following checks:
Check the custom cron schedule
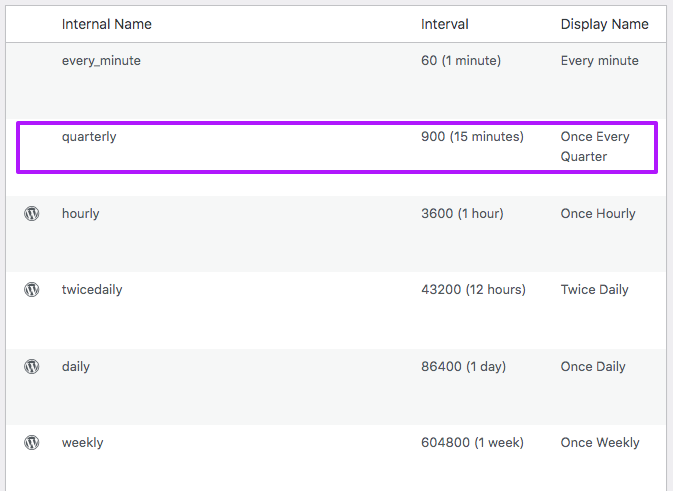
If you created a custom schedule, first check if the schedule is present in WP Crontrol’s “Cron Schedules” tab.
For example, if you used the quarterly example above, the quarterly schedule, it should appear in the “Cron Schedules” tab as shown in the screenshot on the right, with its correct Interval and Display name.
If you don’t see your schedule, first check the code in your (child) theme’s functions.php for errors and make sure it is uploaded. Next, de-activate and re-activate the add-on, and check again if the schedule is present in the “Cron Schedules” tab.
Check the scheduled cron event
For the indexing cron event to run, it needs to have the fwp_scheduled_index event scheduled. You can check if this event is scheduled in WP Crontrol’s “Cron Events” tab. If it is set up correctly, it should be present and set to run on the chosen schedule as displayed in the “Recurrence” column:

There can be many events scheduled in this overview, use the search bar if needed. If you still don’t see the event, first check the code in your (child) theme’s functions.php for errors and make sure it is uploaded. Next, de-activate and re-activate the add-on, and check again if the schedule is present in the “Cron Events” tab.
Check if the indexer event has run
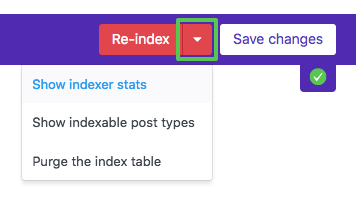
After the cron event has run, you can verify the last time the indexer has run by clicking the “Show indexer stats” option in the dropdown of the “Re-index” button, on the Settings > FacetWP admin page.
When testing, be aware that WP-Cron events are only triggered when there is activity on the front end of the website. So if you see that the event is scheduled in the “Cron Events” tab, but you don’t see it running (or the “Show indexer stats” does not show that it has run after the event time has passed), make sure to load a few pages on the front-end of your site.
If all this is not working, make sure that you don’t have WP-Cron disabled.
Replace WP-Cron with a server cron
If you don’t want the indexing cron schedule set with this add-on to be dependent on the above mentioned shortcomings of WP-Cron, you can replace WP-Cron with a server cron. A server (“real”) cron job will always run exactly at the scheduled moment, independent from front-end site activity, like WP‑Cron.
Alternative indexing cron solutions
Programmatically trigger re-indexing with WP-Cron
If you want to programmatically trigger re-indexing from within your own custom code, you can do so with the FWP->indexer->index() function. See this page for more info.
This function can also be used to let your code trigger a non-recurring WP-Cron event that initiates re-indexing of all, one, or multiple posts, immediately or at a specified later time.
Trigger re-indexing with WP-CLI and server cron
It is also possible to trigger re-indexing by using WP-CLI indexing commands in a server cron job. Using server cron can also be useful if you have disabled WP-Cron for performance reasons.
With FacetWP’s built-in WP-CLI indexing command options you can also use server crons to do partial re-indexes of only specific posts, post types, and facets, and you can purge the index table, as a whole or partially.
Re-indexing with WP-CLI is the recommended approach for indexing high-content sites, or sites with large amounts of content imported regularly. In these cases the automatic indexing process can sometimes become problematic. Using WP-CLI will give you full control over when the indexing process runs exactly, and at which frequency.
Also with this approach, make sure that FacetWP’s automatic indexing is turned off with the facetwp_indexer_is_enabled hook to prevent multiple indexing events running at the same time.
Changelog
1.1
- Apr 12, 2023
- New Added the
facetwp_index_schedulehook to dynamically change schedule or pass a custom schedule.
1.0
- Apr 12, 2023
- New Schedule Indexer first version.
See also
Schedule Indexer
Trigger periodic re-indexing with WP‑Cron
Download this add-on from your account page:
Download Add-On