Slider
Overview
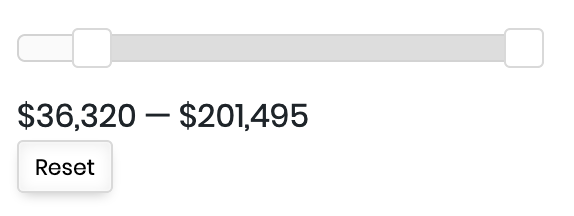 The Slider facet type allows users to visually narrow results between two number ranges.
Available options
| Name | Description |
|---|---|
| Data source | Where the value lives (taxonomy, custom field, post attribute). If you also set an “Other data source”, this value will be used for the lower limit |
| Other data source | Use this setting if you want to use a separate value for the upper limit |
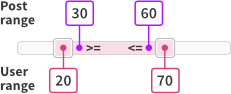
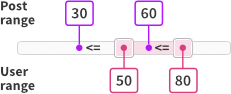
| Compare type | This setting is only relevant when the Other data source setting is in use. It determines how the range of the post’s two data source values is compared to the user-selected range. Note that for all compare types, <= and >= comparisons are used:
|
| Prefix | The text that appears before each slider value, for example a currency sign. This label is translatable with the facetwp_i18n hook. |
| Suffix | The text that appears after each slider value, for example “m2”. This label is translatable with the facetwp_i18n hook. |
| Reset text | The text of the Reset button. Default: “Reset”. This label is translatable with the facetwp_i18n hook. |
| Format | The number format |
| Step | The amount of increase between intervals (the default is 1) |

Value storage and empty post range values
If a Slider facet uses two data sources, the lower value is stored as facet_value, and the upper value is stored as facet_display_value in the index table.
There are a few things to keep in mind in this situation:
- If a post has no value set for the first (main) data source field, the post will not be indexed, so it will never appear in the results. The same is true for posts that do not yet have this field set in the database because they have not been saved after adding the custom field in (for example) Advanced Custom Fields.
- If a post has no value set for the second data source field, or if that field has not yet been saved for the first time, the post will be indexed but the value for the post’s range upper limit will then be set to
0. This may lead to unexpected or illogical results, depending on the “Compare type” you have set for the facet.
To prevent the above situations, make sure that if you use two data source fields, all posts actually have two values set.
The Slider facet’s disabled state

By filtering with other facets, a Slider facet can end up with a filtering “range” of only one value. (Or with only “0” as value – when there are no results).
When that happens, the slider interface does not make sense anymore, and the Slider will be shown in a “disabled” state, similar to “ghost” choices in for example a Checkboxes facet. In this state, the whole slider is dimmed, the slider handles cannot be changed, and a “not-allowed” cursor will inform users that the slider is currently disabled.
Using dates or times
The Slider facet is number-based, so it will not work with dates out-of-the-box.
However, with a few indexing and date conversion tricks, you can create a year slider, or a month + year slider:
Create a year slider
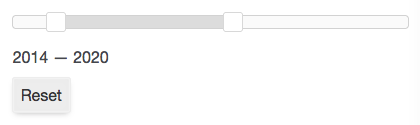
To create a Slider facet showing years, you could create a custom field that contains the year as a number (e.g. “2024”), and choose that field as the Slider facet’s data source. But what if you want to use the Post Date, or another date field?
To index only the year from a date field, you can use the facetwp_index_row hook. The following snippet assumes a Slider facet with the Post Date set as its data source. Before indexing the date, the code extracts the year from the date string for both the facet_value (the technical value as shown in the URL when the Slider is being used), and the facet_display_value (the value as shown in the slider itself).
Add the snippet to your (child) theme’s functions.php. Make sure to replace my_slider_facet_name with the name of your Slider facet and do a full re-index:
How to use custom PHP code?
PHP code can be added to your (child) theme's functions.php file. Alternatively, you can use the Custom Hooks add-on, or a code snippets plugin. More info
// Choose the Post Date (or another date field) as the Slider facet's data source. add_filter( 'facetwp_index_row', function( $params, $class ) { if ( 'my_slider_facet_name' == $params['facet_name'] ) { // Replace "my_slider_facet_name" with the name of your Slider facet $raw_value = $params['facet_value']; $params['facet_value'] = date( 'Y', strtotime( $raw_value ) ); $params['facet_display_value'] = $params['facet_value']; } return $params; }, 10, 2 );
Create a month-year slider
Creating a month + year slider is slightly more complicated. A month + year value in any format is not a number that can be used in the slider logic. It would not work to increase or decrease the facet values with the set step count.
The code below shows how to convert month + year to a number that can be used. And converted back to a readable month + year for display in the slider labels. The code assumes that the Slider facet has a date or datetime field as its data source, with the dates stored as YYYY-MM-DD, like for example, Post Date.
In the first part of the code, we use the facetwp_index_row hook to change the format of the dates when stored in FacetWP’s indexing table. In line 7, we first convert the raw date value to YYYYMM. Then we extract the year and month, and store the value as the total number of months. This basically converts year + month to a number that can be used in the slider, with a step count set to 1.
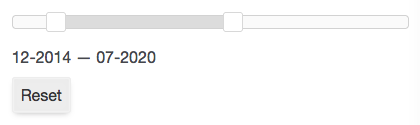
The second part of the code uses the facetwp/set_label/slider hook to re-convert the slider labels back into readable month + date values, e.g. 01-2026 or 01/2026. See the section below for more examples of using this hook.
If needed, you can adapt the separator between month and year in line 47.
The code preserves any pre- or suffix set in the facet’s settings.
Add the snippet to your (child) theme’s functions.php. Make sure to replace my_slider_facet_name with the name of your Slider facet in line 4 and line 28, and do a full re-index.
How to use custom PHP code?
PHP code can be added to your (child) theme's functions.php file. Alternatively, you can use the Custom Hooks add-on, or a code snippets plugin. More info
// Index dates as a linear month count number (the total number of months) add_filter( 'facetwp_index_row', function( $params, $class ) { if ( 'my_slider_facet_name' == $params['facet_name'] ) { // Replace "my_slider_facet_name" with the name of your Slider facet $raw_value = $params['facet_value']; // full datetime value e.g. 2025-10-19124612 $yeardate = date( 'Ym', strtotime( $raw_value ) ); // Convert value to year and month, e.g. 202601 if ( strlen( $yeardate ) == 6 ) { $year = (int) substr( $yeardate, 0, 4 ); $month = (int) substr( $yeardate, 4, 2 ); // Calculate and index total month count $params['facet_value'] = ( $year * 12 ) + $month; $params['facet_display_value'] = $params['facet_value']; } } return $params; }, 100, 2 ); // Format the Slider labels as month-year, e.g. 01-2026 or 01/2026 add_action( 'wp_head', function() { ?> <script> document.addEventListener('facetwp-loaded', function() { FWP.hooks.addAction('facetwp/set_label/slider', function($this) { var facet_name = 'my_slider_facet_name'; // Replace "my_slider_facet_name" with the name of your Slider facet if ( $this.attr('data-name') == facet_name ) { var min = FWP.settings[facet_name]['lower']; var max = FWP.settings[facet_name]['upper']; var prefix = FWP.settings[facet_name]['prefix']; var suffix = FWP.settings[facet_name]['suffix']; // Function to turn total months back into MM-YYYY var decodeMonthYear = function(totalMonths) { var val = parseInt(totalMonths); var year = Math.floor((val - 1) / 12); var month = ((val - 1) % 12) + 1; // Pad month with leading zero var monthStr = (month < 10) ? '0' + month : month; return monthStr + '-' + year; // Adapt separator as needed. E.g. 01-2026 or 01/2026 }; var from = decodeMonthYear(min); var to = decodeMonthYear(max); if ( min === max ) { var label = prefix + from + suffix; } else { var label = prefix + from + suffix + ' — ' + prefix + to + suffix; } $this.find('.facetwp-slider-label').html(label); } }); }); </script> <?php }, 100 );
Create a time slider
hr value in the “Suffix” setting.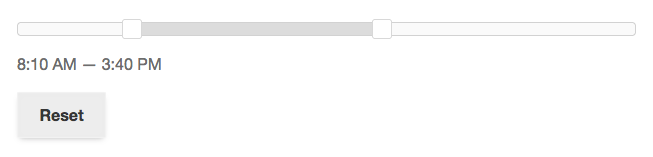
A Slider facet that uses times could be a neat solution to let users select a time period and filter posts that fall within that period. Or to filter posts that have a time range that the user’s time range falls within. An example would be filtering a listing of stores that have opening times within the time range selected by the user in the Slider facet.
To get this working, your posts need to have two custom fields that each store a time. For example, a start time and an end time, or an opening time and a closing time. It is important that these time values are stored in the HH:MM format.
You could use simple text-based custom fields for this. In this case, you need to manually enter times in the correct 24-hr HH:MM format. Or, if you want to prevent wrongly entered time formats, you could use dedicated Advanced Custom Fields Time Picker fields that already store the time in the right format. If you use a Time Picker field, the “Display format” and “Return format” field settings are not important. You can set these however you prefer.
Next, add a Slider facet, and set its “Data source” setting to your start/opening time field, and its Other data source” setting to your end/closing time field. Make sure the step count is set to 1.
Set the “Compare type” setting to the desired option. “Enclose” would work if the facet needs to filter posts that have a time range entirely within the time range selected in the facet. For example to let a user select a time range that falls entirely within the opening times of a store. “Intersect” would work if you want the user-selected time range to intersect with the post’s time range. For example to filter stores that are open somewhere in the user-selected timeslot.
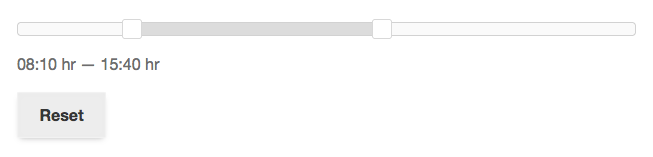
If you want to display 24-hour times, you could add hr to the “Suffix” setting, so that the times will be output like in the image on the top right. If you want to output AM and PM times, leave the “Suffix” field empty.
Because a Slider facet can only handle numbers, not time values, we need to index our time values as numbers. The trick we’re going to use is to convert the time values to the number of minutes after midnight. To do so, add the following snippet to your (child) theme’s functions.php. Make sure to replace my_time_slider in line 2 with the name of your Slider facet.
How to use custom PHP code?
PHP code can be added to your (child) theme's functions.php file. Alternatively, you can use the Custom Hooks add-on, or a code snippets plugin. More info
add_filter( 'facetwp_index_row', function( $params, $class ) { if ( 'my_time_slider' === $params['facet_name'] ) { // Replace "my_time_slider" with the name of your Slider facet // Helper function to convert "HH:MM" to minutes since midnight $to_minutes = function( $time_string ) { if ( preg_match( '/^(\d{1,2}):(\d{2})/', $time_string, $m ) ) { return ( (int) $m[1] * 60 ) + (int) $m[2]; } return ''; // Return empty value if the format does not match, so it is skipped }; $params['facet_value'] = $to_minutes( $params['facet_value'] ); $params['facet_display_value'] = $to_minutes( $params['facet_display_value'] ); } return $params; }, 10, 2 );
Make sure some of your posts have times saved in both fields, then do a full re-index.
To make the Slider facet display real times, we need to convert the indexed “minutes after midnight” numbers to time values again. You have two options here: 24-hour times or AM and PM times.
To output the times as 24-hour times (with or without the above-mentioned hr suffix), add the following snippet to your (child) theme’s functions.php. Make sure to replace my_time_slider in line 7 with the name of your Slider facet.
How to use custom PHP code?
PHP code can be added to your (child) theme's functions.php file. Alternatively, you can use the Custom Hooks add-on, or a code snippets plugin. More info
add_action( 'wp_head', function() { ?> <script> document.addEventListener('facetwp-loaded', function() { FWP.hooks.addAction('facetwp/set_label/slider', function($this) { var facet_name = 'my_time_slider'; // Replace "my_time_slider" with the name of your Slider facet if ( $this.attr('data-name') == facet_name ) { var min = FWP.settings[facet_name]['lower']; var max = FWP.settings[facet_name]['upper']; var prefix = FWP.settings[facet_name]['prefix']; var suffix = FWP.settings[facet_name]['suffix']; var minutesToTime = function( totalMinutes ) { var h = Math.floor( totalMinutes / 60 ); var m = totalMinutes % 60; return ( h < 10 ? '0' + h : h ) + ':' + ( m < 10 ? '0' + m : m ); }; var from = minutesToTime( min ); var to = minutesToTime( max ); var label = ( min === max ) ? prefix + from + suffix : prefix + from + suffix + ' — ' + prefix + to + suffix; $this.find('.facetwp-slider-label').html(label); } }); }); </script> <?php }, 100 );
If you want to output AM and PM times, use the following snippet instead. Also here, make sure to replace my_time_slider in line 7 with the name of your Slider facet.
How to use custom PHP code?
PHP code can be added to your (child) theme's functions.php file. Alternatively, you can use the Custom Hooks add-on, or a code snippets plugin. More info
add_action( 'wp_head', function() { ?> <script> document.addEventListener('facetwp-loaded', function() { FWP.hooks.addAction('facetwp/set_label/slider', function($this) { var facet_name = 'my_time_slider'; // Replace "my_time_slider" with the name of your Slider facet if ( $this.attr('data-name') == facet_name ) { var min = FWP.settings[facet_name]['lower']; var max = FWP.settings[facet_name]['upper']; var prefix = FWP.settings[facet_name]['prefix']; var suffix = FWP.settings[facet_name]['suffix']; var minutesToTime = function( totalMinutes ) { var h = Math.floor( totalMinutes / 60 ); var m = totalMinutes % 60; var period = h < 12 ? 'AM' : 'PM'; h = h % 12; if ( h === 0 ) h = 12; // midnight (0) and noon (720) both display as 12 return h + ':' + ( m < 10 ? '0' + m : m ) + ' ' + period; }; var from = minutesToTime( min ); var to = minutesToTime( max ); var label = ( min === max ) ? prefix + from + suffix : prefix + from + suffix + ' — ' + prefix + to + suffix; $this.find('.facetwp-slider-label').html(label); } }); }); </script> <?php }, 100 );
Customize the slider
FacetWP uses a JavaScript library called noUiSlider. The available slider options can be used to customize the slider. Not all options that the noUISlider library offers are supported though. For example, FacetWP only supports sliders with two handles.
Set a custom range
By default, the slider facet uses the indexed data to set the beginning and end of the slider range and start handle positions.
The following code sets a custom range with the range setting, and sets the initial handle positions to the min and max of that range, with the start setting. You could also use the start setting to set the handles to a different start position:
How to use custom PHP code?
PHP code can be added to your (child) theme's functions.php file. Alternatively, you can use the Custom Hooks add-on, or a code snippets plugin. More info
// replace yoursliderfacetname with the name of your slider facet (3x) add_filter( 'facetwp_render_output', function( $output, $params ) { if ( isset( $output['settings']['yoursliderfacetname'] ) ) { $output['settings']['yoursliderfacetname']['range'] = array( 'min' => [0], 'max' => [4000] ); $output['settings']['yoursliderfacetname']['start'] = [0, 4000]; } return $output; }, 10, 2 );
Hide the Slider’s Reset button
To hide the Slider’s Reset button, add the following snippet to your (child) theme’s functions.php:
How to use custom PHP code?
PHP code can be added to your (child) theme's functions.php file. Alternatively, you can use the Custom Hooks add-on, or a code snippets plugin. More info
add_action( 'wp_head', function() { ?> <style> .facetwp-slider-reset { display: none !important; } </style> <?php }, 100 );
Customize or translate the slider handles’ aria-labels
Since FacetWP v4.4, Slider facet handles have an aria-label attribute for accessibility. The label value is lower for the lower handle and upper for the upper handle.
These two labels can be changed or translated with the facetwp_18n hook.
Set extra attributes on the slider handles
Using the handleAttributes option, it is possible to add one or more extra attributes to the slider handle div elements.
For example, to add a title="Set lower/upper limit" attribute to both handles, add the following snippet to your (child) theme’s functions.php. The script makes sure other attributes are retained:
How to use custom PHP code?
PHP code can be added to your (child) theme's functions.php file. Alternatively, you can use the Custom Hooks add-on, or a code snippets plugin. More info
add_action( 'facetwp_scripts', function() { ?> <script> document.addEventListener('DOMContentLoaded', function() { if ('undefined' !== typeof FWP && 'undefined' !== typeof FWP.hooks) { FWP.hooks.addFilter('facetwp/set_options/slider', function(opts, facet) { // Set extra 'title' attribute for both handles var newHandleAttributes = [ { 'title': 'Set lower limit' }, // Left handle { 'title': 'Set upper limit' } // Right handle ]; // Check if opts.handleAttributes already exists if (opts.handleAttributes) { // Merge new handle attributes with existing attributes for (var i = 0; i < opts.handleAttributes.length; i++) { for (var key in newHandleAttributes[i]) { opts.handleAttributes[i][key] = newHandleAttributes[i][key]; } } } else { // If opts.handleAttributes doesn't exist, set it to the new attributes opts.handleAttributes = newHandleAttributes; } return opts; }); } }); </script> <?php }, 100 );
Customize the slider labels
Using the facetwp/set_label/slider hook, it is possible to customize how the slider labels below the slider itself are displayed.
The following example demonstrates multiple customizations to the various elements of the labels:
- Trailing zeros are removed from the label values.
- The
—icon between the min and max label is replaced with a→icon. <span>tags with class “slider-min” and “slider-max” are placed around the min and max labels, so they can be styled separately.
How to use custom PHP code?
PHP code can be added to your (child) theme's functions.php file. Alternatively, you can use the Custom Hooks add-on, or a code snippets plugin. More info
add_action( 'wp_head', function() { ?> <script> document.addEventListener('facetwp-loaded', function() { FWP.hooks.addAction('facetwp/set_label/slider', function($this) { // Replace 'my_slider_facet_name' with the name of your Slider facet. var facet_name = 'my_slider_facet_name'; if ( $this.nodes[0].attributes['data-name'].value == facet_name ) { // Get all settings. var min = FWP.settings[facet_name]['lower']; var max = FWP.settings[facet_name]['upper']; var format = FWP.settings[facet_name]['format']; var opts = { decimal_separator: FWP.settings[facet_name]['decimal_separator'], thousands_separator: FWP.settings[facet_name]['thousands_separator'] }; var from = nummy(min).format(format, opts); var to = nummy(max).format(format, opts); // Remove trailing zeros from the value strings, see: https://stackoverflow.com/a/24295147 from = from.replace(/^0+(\d)|(\d)0+$/gm, '$1$2'); to = to.replace(/^0+(\d)|(\d)0+$/gm, '$1$2'); // Put the label back together, and add spans with class "slider-min" and "slider-max" around the min and max labels. var label = '<span class="slider-min">' + FWP.settings[facet_name]['prefix'] + from + FWP.settings[facet_name]['suffix'] + '</span>' + ' → ' // Replace the — icon with a right arrow icon + '<span class="slider-max">' + FWP.settings[facet_name]['prefix'] + to + FWP.settings[facet_name]['suffix']; + '</span>' $this.find('.facetwp-slider-label').html(label); } }); }); </script> <?php }, 100 );
Advanced slider customizations
The following advanced customizations use the facetwp/set_options/slider hook.
The code below shows three examples:
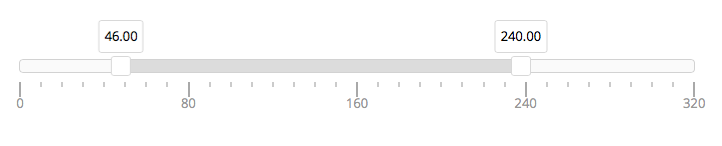
- Add tooltips to the handles of a specific slider facet.
- Change the number of decimals in the tooltip handles of a specific slider facet.
- Add a scale/pips along the slider of a specific slider facet. For the available
rangeoptions see the documentation. Note that FacetWP only supports sliders with two handles.
This image shows an example of handle tooltips and a scale/pips:
How to use custom PHP code?
PHP code can be added to your (child) theme's functions.php file. Alternatively, you can use the Custom Hooks add-on, or a code snippets plugin. More info
add_action( 'facetwp_scripts', function() { ?> <script> document.addEventListener('DOMContentLoaded', function() { if ('undefined' !== typeof FWP && 'undefined' !== typeof FWP.hooks) { if ('undefined' !== typeof FWP) { FWP.hooks.addFilter('facetwp/set_options/slider', function(opts, facet) { // Example 1: Add tooltips to handles of a slider facet with the name 'price_slider' if (facet.facet_name == 'price_slider') { // Change 'price_slider' to your slider facet's name // Option 1a: Set tooltip to 'true' for handle one and handle two: opts.tooltips = [true, true] // Option 1b: Give both tooltips a format. In this case the 'suffix' from the facet's settings: var suffix = ' ' + FWP.settings[facet.facet_name]['suffix']; // adds a space + the suffix, e.g. m2 opts.tooltips = { to: function(value) { return value + suffix; }, from: function(value) { return value; } }; } // Example 2: Set 3 decimals for tooltip handle values of a slider facet with the name 'price_slider' if (facet.facet_name == 'price_slider') { // Change 'price_slider' to your slider facet's name opts.format = { to: function(value) { return nummy(value).format('0.000'); }, from: function(value) { return value; } }; } // Example 2 + 3 combined: if you need formatting of the tooltips (like example 1b) AND decimals (like example 2), be aware that tooltip formatting is only used in the tooltip handles and not in the values in the URL, so you need both: var suffix = ' ' + FWP.settings[facet.facet_name]['suffix']; // adds a space + the suffix, e.g. m2 if (facet.facet_name == 'price_slider') { // Change 'price_slider' to your slider facet's name opts.tooltips = { to: function(value) { return nummy(value).format('0.0000') + suffix; }, from: function(value) { return value; } }; opts.format = { to: function(value) { return nummy(value).format('0.0000'); }, from: function(value) { return value; } }; } // Example 3: Add a scale / 'pips' to a slider facet with the name 'surface_area_slider' if (facet.facet_name == 'surface_area_slider') { // Change 'surface_area_slider' to your slider facet's name // Option 1: // Set FIXED ranges, choose 'min' and 'max' according to your lowest and highest possible value var surface_area_slider_range_static = { 'min': 0, '25%': 80, '50%': 160, '75%': 240, 'max': 320 }; opts.range = surface_area_slider_range_static; // End Option 1 // Option 2: // Set DYNAMIC ranges, based on the slider's dynamic minimum and maximum values, which change when facets are interacted with. // This example calculates 3 pips in between min and max values. var min = FWP.settings['surface_area_slider'].range.min; var max = FWP.settings['surface_area_slider'].range.max; var half = (min + max) / 2; var quarter = (min + max) / 4; var threequarter = quarter * 3; var surface_area_slider_range_dynamic = { 'min': min, '25%': quarter, '50%': half, '75%': threequarter, 'max': max }; opts.range = surface_area_slider_range_dynamic; // End Option 2 // Set the pips options opts.pips = { mode: 'range', density: 3 } } return opts; }); } } }); </script> <?php }, 100 );