Customize marker info windows
The Map facet is highly customizable. This page gives an overview of possible customizations of Advanced Marker info windows, among which:
- What is a marker info window?
- Add or customize marker info window header content
- Add or customize marker info window content with the “Info window content” setting
- Style marker info window content added with the “Info window content” setting
- Customize or overwrite the marker info window content with a hook
- Add marker info window content from ACF custom fields
- Add content from ACF repeater fields to the info window content
- Add content from ACF repeater fields to the info window header content
- Display the post distance in the marker info window content
- Display the post distance in the marker info window header content
- Translate the marker info window content
- Customize marker info window options
- Change the marker info window width or height with CSS
- Disable marker info windows
- How to use InfoWindow methods and pass custom post data
To customize the map features, see this page:
To customize the Advanced Markers, and read about how to use JavaScript map marker hooks and functions, see this page:
To customize the behavior and icons of the built-in marker clusterer and Overlapping Marker Spiderfier features, see these pages:
What is a marker info window?
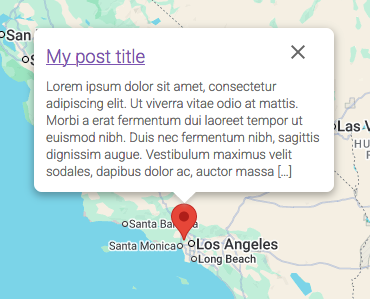
A marker info window is a standard feature that comes with the Google Maps API. It is basically an overlay that looks like a rounded speech bubble. Its content consists of text/HTML that is related to the marker’s post, and a close (‘X’) icon in the top right. The text/HTML content can be entirely customized, as explained below.
By default, each Advanced Marker will have an info window that automatically pops up directly above it when you click the marker. If you don’t want or need info windows, this can be prevented by making the marker(s) unclickable.
Info windows will automatically adapt their size to the amount of content they contain. The size can be customized by setting certain info window options, or with CSS. The map itself will automatically pan to make room for an opening info window, on click of a marker. So if you click a marker that is near the left edge of the map, the map will pan to the right when clicking the marker, making sure the info window is fully visible, while remaining centered above the clicked marker.
To close an info window, click its close icon. Info windows will also close automatically if you click another marker, or the map itself. By default, only one info window will be open at a time.
The Google Maps API’s InfoWindow class has a range of options, methods and events that can be used to influence how the info windows look and behave.
Some of the info window options, like the minimum and maximum width, can be set/customized using the facetwp_map_marker_args hook. To a certain extent, you can also style the info windows themselves and their content with CSS.
Info windows have two types of content. To the left of the close (“X”) icon is the info window header content. And below it is its “regular” content. If there is no header content, the space to the left of the close icon will remain empty: the regular content will always appear below the close icon. You can add and customize both the info window header content and the regular content.
Add or customize marker info window content
The info window header content can only be added with a hook, which is available since FacetWP v4.5.1.
The “regular” marker info window content can be added with the Map facet’s “Info window content” setting, or – for more flexibility – with a hook.
Add or customize marker info window header content
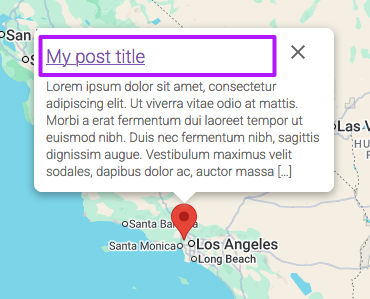
There is currently no setting for the info window header content, like there is for the regular content. The info window header content can only be added with the facetwp_map_marker_header_content hook, as shown in the following snippet. This hook is available in FacetWP v4.5.1+.
As the $post_id is available in this hook, you can add the content conditionally, only for specific posts. The $facet_name is also available, which you can use to target a specific Map facet name.
In this example, we set the info window header content to the linked post title, styled as an <h3> heading:
How to use custom PHP code?
PHP code can be added to your (child) theme's functions.php file. Alternatively, you can use the Custom Hooks add-on, or a code snippets plugin. More info
// Needs FacetWP 4.5.1+ add_filter( 'facetwp_map_marker_header_content', function( $headercontent, $post_id, $facet_name, $args ) { // if ( $post_id == 4567 ) { // Optionally add a condition to check for specific post IDs $headercontent = '<h3><a href="'. get_the_permalink() . '">' .get_the_title() . '</a></h3>'; // Create your custom marker info window header content. Set it to anything you want. // } return $headercontent; }, 10, 4 );
Add or customize marker info window content with the “Info window content” setting
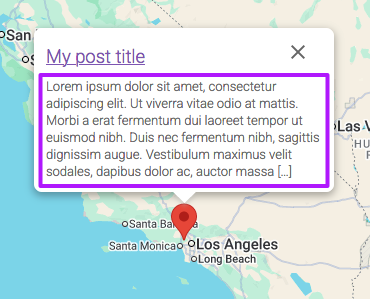
The “Info window content” Map facet setting can be used to create the “regular” content of the info windows.
The setting’s field accepts HTML and PHP code, and is aware of the marker’s post data. You can use data from $post, like $post->ID.
The following example outputs the title, link, and excerpt:
<h3>
  <a href="<?php the_permalink(); ?>" title="<?php the_title_attribute(); ?>">
    <?php the_title(); ?>
  </a>
</h3>
<?php the_excerpt(); ?>
If the “Info window content” setting field is too limiting, or if you can’t reach certain data with it, you can use the facetwp_map_marker_content hook to output/overwrite the content.
Style marker info window content added with the “Info window content” setting
If you want to use CSS to style the content that you added with the “Info window content” setting, just add a container <div> with a custom class, and use that to target your elements within the info window:
<div class="infowindow">
  <h3>
    <a href="<?php the_permalink(); ?>" title="<?php the_title_attribute(); ?>">
      <?php the_title(); ?>
    </a>
  </h3>
  <?php the_excerpt(); ?>
</div>
For example, to style the <h3>:
How to use custom CSS?
CSS code can be placed in your (child) theme's style.css file. Alternatively, you can add it manually between
<style>tags in the<head>section, in your (child) theme's header.php file. You can also load it with a hook in your (child) theme's functions.php file, or in the Custom Hooks add-on. To load the code only on pages with facets, use thefacetwp_scriptshook. To load it on all pages, usewp_headorwp_footer. Or you can use a code snippets plugin. More info.facetwp-type-map .infowindow h3 { font-size: 18px; font-weight: bold; }
Alternatively, you can target the gm-style-iw class of the parent info window element, as shown below.
Customize or overwrite the marker info window content with a hook
The “regular” marker info window content can be created in the “Info window content” setting field.
If this field is too limiting, or if you can’t reach certain data with it, you can use the facetwp_map_marker_content hook to customize the info window content. This hook is available in FacetWP v4.5.1+. Note that this will overwrite anything you have in the “Info window content” setting field.
As the $post_id is available in this hook, you can create or overwrite the content conditionally, only for specific posts. The $facet_name is also available, which you can use to target a specific Map facet name.
In this example, we set the info window content to the post excerpt. The excerpt length (in number of words) and “more” cut-off text can be customized:
How to use custom PHP code?
PHP code can be added to your (child) theme's functions.php file. Alternatively, you can use the Custom Hooks add-on, or a code snippets plugin. More info
// Needs FacetWP 4.5.1+ add_filter( 'facetwp_map_marker_content', function( $content, $post_id, $facet_name, $args ){ // if ( $post_id == 4567 ) { // Optionally add a condition to check for specific post IDs $content = get_the_excerpt(); // Create your custom marker info window content. Set it to anything you want. // Optional trim the excerpt $excerpt_length = 10; // Set the number of words in the excerpt $excerpt_more = apply_filters( 'excerpt_more', ' ' . '[…]' ); $content = wp_trim_words( $content, $excerpt_length, $excerpt_more ); // } return $content; }, 10, 4 ); // Optionally customize the excerpt 'more' cut-off text add_filter( 'excerpt_more', function() { return ' ...'; } );
One specific use case for this hook is if you use ACF Repeater fields to support multiple locations per post. With the “Info window content” setting field you can only get post data, but not the data for the separate locations within the repeater. This snippet shows how to get and output the repeater field data with the facetwp_map_marker_content hook.
Note that the above-used facetwp_map_marker_content hook is only available in FacetWP v4.5.1+. For older versions, you can use the facetwp_map_marker_args hook to output the info window content to the args['infoWindowContent'] marker argument:
How to use custom PHP code?
PHP code can be added to your (child) theme's functions.php file. Alternatively, you can use the Custom Hooks add-on, or a code snippets plugin. More info
add_filter( 'facetwp_map_marker_args', function( $args, $post_id ){ // if ( $post_id == 5647 ) { // Optionally add a condition to check for specific post IDs $content = get_the_excerpt( $post_id ); // Create your custom marker info window content. Set it to anything you want. // Optional trim the excerpt $excerpt_length = 10; // Set the number of words in the excerpt $excerpt_more = apply_filters( 'excerpt_more', ' ' . '[…]' ); $content = wp_trim_words( $content, $excerpt_length, $excerpt_more ); $args['infoWindowContent'] = $content; // } return $args; }, 10, 2 ); // Optionally customize the excerpt 'more' cut-off text add_filter( 'excerpt_more', function() { return ' ...'; } );
Be aware that using facetwp_map_marker_args like this will overwrite anything you set with the facetwp_map_marker_content hook.
Add marker info window content from ACF custom fields
If your posts have custom fields made with Advanced Custom Fields, you can get the custom field contents with ACF’s get_field() function, and echo it.
The following example (which can be added to the “Info window content” Map facet setting field) will display the full_address, phone and email fields under the linked post title. The email address is displayed as an email link, only if it is available:
How to use custom PHP code?
PHP code can be added to your (child) theme's functions.php file. Alternatively, you can use the Custom Hooks add-on, or a code snippets plugin. More info
<h4> <a href="<?php the_permalink(); ?>" title="<?php the_title_attribute(); ?>"> <?php the_title(); ?> </a> </h4> <?php $address = get_field('full_address'); $phone = get_field('phone'); $email = get_field('email'); if ( !empty( $address ) ) { echo '<p>' . $address . '</p>'; } if ( !empty( $email ) ) { $email_address = ' | <a href="mailto:' . $email .'">' . $email . '</a>'; } if ( !empty( $phone ) || !empty( $email_address ) ) { echo '<p>' . $phone . $email_address . '</p>'; }
Add content from ACF repeater fields to the info window content
If you are using ACF repeater fields to index and display multiple locations per post, you may also want to retrieve content from other custom fields within the repeater field, to display in the marker/location’s info window.
If you try to do this with the “Info window content” setting, you’ll run into trouble, because there, only post data can be retrieved, not the data for the separate locations within the repeater.
Fortunately, there is the facetwp_map_marker_content hook, with which you can set the info window content dynamically. Be aware that this overwrites anything you have set in the “Info window content” setting.
How to use custom PHP code?
PHP code can be added to your (child) theme's functions.php file. Alternatively, you can use the Custom Hooks add-on, or a code snippets plugin. More info
// Needs FacetWP 4.5.1+ // Change 'map-repeaterfield' to the name of the ACF repeater field // Change 'map-repeaterfield-location' to the name of Google Map field within the repeater field. // This field should be chosen as the Map facet's 'Data source' setting. Make sure to choose the field under the “ACF” heading in the Data Source dropdown. // Change 'map-repeaterfield-name' to the name of another field within the repeater field // Add other fields or content as needed to $args['infoWindowContent'] add_filter( 'facetwp_map_marker_content', function( $content, $post_id, $facet_name, $args ){ // Get the marker's 'lat' value. $latitude = $args['position']['lat']; // Get the post's repeater field values. $locations = get_field( 'map-repeaterfield', $post_id ); foreach ( $locations AS $location ) { // Check if the 'lat' value of one of the repeater locations matches the marker's 'lat' value. if ( (string)$location['map-repeaterfield-location']['lat'] == (string)$latitude ) { // If so, get the value of another field within that repeater field. $content = $location['map-repeaterfield-name']; // Add more fields data to $content if needed. break; } } return $content; }, 10, 4 );
Note that the above-used facetwp_map_marker_content hook is only available in FacetWP v4.5.1+. For older versions, you can use the facetwp_map_marker_args hook to output the info window content to the args['infoWindowContent'] marker argument:
How to use custom PHP code?
PHP code can be added to your (child) theme's functions.php file. Alternatively, you can use the Custom Hooks add-on, or a code snippets plugin. More info
// Change 'map-repeaterfield' to the name of the ACF repeater field // Change 'map-repeaterfield-location' to the name of Google Map field within the repeater field. // This field should be chosen as the Map facet's 'Data source' setting. Make sure to choose the field under the “ACF” heading in the Data Source dropdown. // Change 'map-repeaterfield-name' to the name of another field within the repeater field // Add other fields or content as needed to $args['infoWindowContent'] add_filter( 'facetwp_map_marker_args', function( $args, $post_id ){ // Get the marker's 'lat' value. $latitude = $args['position']['lat']; // Get the post's repeater field values. $locations = get_field( 'map-repeaterfield', $post_id ); foreach ( $locations AS $location ) { // Check if the 'lat' value of one of the repeater locations matches the marker's 'lat' value. if ( (string)$location['map-repeaterfield-location']['lat'] == (string)$latitude ) { // If so, get the value of another field within that repeater field. // $args['infoWindowContent'] is the string representing the marker info window content. $args['infoWindowContent'] = $location['map-repeaterfield-name']; // Add more fields data to $args['infoWindowContent'] if needed. break; } } return $args; }, 10, 2 );
Add content from ACF repeater fields to the info window header content
If you want to add content from ACF repeater fields to the info window header content, you can do it in the same way as for the regular info window content, but with the facetwp_map_marker_header_content hook:
How to use custom PHP code?
PHP code can be added to your (child) theme's functions.php file. Alternatively, you can use the Custom Hooks add-on, or a code snippets plugin. More info
// Needs FacetWP 4.5.1+ // Change 'map-repeaterfield' to the name of the ACF repeater field // Change 'map-repeaterfield-location' to the name of Google Map field within the repeater field. // This field should be chosen as the Map facet's 'Data source' setting. Make sure to choose the field under the “ACF” heading in the Data Source dropdown. // Change 'map-repeaterfield-name' to the name of another field within the repeater field // Add other fields or content as needed to $args['infoWindowContent'] add_filter( 'facetwp_map_marker_header_content', function( $headercontent, $post_id, $facet_name, $args ) { // Get the marker's 'lat' value. $latitude = $args['position']['lat']; // Get the post's repeater field values. $locations = get_field( 'map-repeaterfield', $post_id ); foreach ( $locations AS $location ) { // Check if the 'lat' value of one of the repeater locations matches the marker's 'lat' value. if ( (string)$location['map-repeaterfield-location']['lat'] == (string)$latitude ) { // If so, get the value of another field within that repeater field. $headercontent = $location['map-repeaterfield-name']; // Add more fields data to $headercontent if needed. break; } } return $headercontent; }, 10, 4 );
Display the post distance in the marker info window content
If you are using a Proximity facet together with a Map facet, it is possible to show the post distance in the info window that appears when a marker is clicked.
To do so, open your Map facet’s settings, and add the following PHP code to the “Info window content” setting field:
How to use custom PHP code?
PHP code can be added to your (child) theme's functions.php file. Alternatively, you can use the Custom Hooks add-on, or a code snippets plugin. More info
<?php // Get the distance as a float value. $distance = facetwp_get_distance(); // Round distance to 2 decimals and append ' mi' or ' km'. if ( false !== $distance ) { echo round( $distance, 2 ) . ' mi'; } ?>
Note that the post distance will only display when it is available: when a Proximity facet is in use on the page, and has a location entered.
If you want to combine this with other customized info window content, using the facetwp_map_marker_content hook, you can also add the post distance like this:
How to use custom PHP code?
PHP code can be added to your (child) theme's functions.php file. Alternatively, you can use the Custom Hooks add-on, or a code snippets plugin. More info
// Needs FacetWP 4.5.1+ add_filter( 'facetwp_map_marker_content', function( $content, $post_id, $facet_name, $args ){ // Get the distance as a float value. $distance = facetwp_get_distance(); // Round distance to 2 decimals and append ' mi' or ' km'. if ( false !== $distance ) { $content = round( $distance, 2 ) . ' mi'; } return $content; }, 10, 4 );
Display the post distance in the marker info window header content
To display the post distance in the info window header instead, you can use the same code in the facetwp_map_marker_header_content hook, like this:
How to use custom PHP code?
PHP code can be added to your (child) theme's functions.php file. Alternatively, you can use the Custom Hooks add-on, or a code snippets plugin. More info
// Needs FacetWP 4.5.1+ add_filter( 'facetwp_map_marker_header_content', function( $headercontent, $post_id, $facet_name, $args ) { // Get the distance as a float value. $distance = facetwp_get_distance(); // Round distance to 2 decimals and append ' mi' or ' km'. if ( false !== $distance ) { $headercontent = round( $distance, 2 ) . ' mi'; } return $headercontent; }, 10, 4 );
Translate the marker info window content
If you are using WPML or Polylang to translate your content, and you have the FacetWP Multilingual add-on installed, you can translate the marker info window content as follows.
You could do this directly in the “Info window content” setting. But for a bit more flexibility, in this example we’ll use the facetwp_map_marker_args hook, which lets you override the marker info window content.
The code gets the current language for WPML in line 5. If you use Polylang, use line 8 instead.
Based on the detected language, you can now write your custom code to output the info window content for each language, as shown in lines 13-31:
How to use custom PHP code?
PHP code can be added to your (child) theme's functions.php file. Alternatively, you can use the Custom Hooks add-on, or a code snippets plugin. More info
add_filter( 'facetwp_map_marker_args', function( $args, $post_id ) { // Get the current language // For WPML use: $lang = ( ! empty( FWP()->facet->http_params['lang'] ) ) ? FWP()->facet->http_params['lang'] : apply_filters( 'wpml_current_language', null ); // For Polylang use: // $lang = ( ! empty( FWP()->facet->http_params['lang'] ) ) ? FWP()->facet->http_params['lang'] : pll_current_language(); // Start output buffering ob_start(); if ( 'en' == $lang ) { // Output for English language posts ?> <h3> <a href="<?php echo esc_url( get_permalink() ); ?>" title="<?php echo esc_attr( get_the_title() ); ?>"><?php echo esc_html( get_the_title() ); ?></a> </h3> <?php } elseif ( 'nl' == $lang ) { // Output for Dutch language posts ?> <h3> <a href="<?php echo esc_url( get_permalink() ); ?>" title="<?php echo esc_attr( get_the_title() ); ?>"><?php echo esc_html( get_the_title() ); ?></a> </h3> <?php } $args['infoWindowContent'] = ob_get_clean(); return $args; }, 10, 2 );
Customize marker info window options
Since FacetWP v4.5.1, the facetwp_map_marker_args hook (which also can be used to customize Advanced Markers) can now be used to set and customize each marker’s infoWindowOptions.
Note that not all Google Map’s offical InfoWindowOptions are supported, as noted in below snippet.
The hook, which runs for each marker, has access to the marker’s $post_id. This makes it possible to add a check to customize only the info windows of specific posts.
How to use custom PHP code?
PHP code can be added to your (child) theme's functions.php file. Alternatively, you can use the Custom Hooks add-on, or a code snippets plugin. More info
// Needs FacetWP 4.5.1+ add_filter( 'facetwp_map_marker_args', function( $args, $post_id ){ // if ( $post_id == 5647 ) { // Optionally add a condition to check for specific post IDs. $args['infoWindowOptions'] = [ //'headerDisabled' => true, // Disable the whole header row in the info window. The header will be removed so that the header content and the close button will be hidden. //'disableAutoPan' => true, // Disable panning the map to make the info window fully visible when it opens. 'ariaLabel' => 'Click to view: '. get_the_title(), // Set an aria-label attribute on the info window. 'minWidth' => 300, // Set min-width of the info window in px. 'maxWidth' => 200, // Set max-width of the info window in px. 'zIndex' => 999, // Set z-index on the info window. 'pixelOffset' => [-20,-20], // Set an info window anchor offset. In this example: 20px to the left and 20px above orginal anchor point. // Not recommended: //'headerContent' => 'my header content', // Using only text (without HTML) works, but using the facetwp_map_marker_header_content hook to set info window header content is recommended // Not supported: //'headerContent' => '<h2>my header content one</h2>', // Not supported: HTML is not parsed. Use the facetwp_map_marker_header_content hook instead. //'content' => 'my content', // Not supported: use the facetwp_map_marker_content hook instead. //'position' => '' // Not supported: info windows will always open at their anchor position. ]; // } return $args; }, 10, 2 );
Change the marker info window width or height with CSS
Using the facetwp_map_marker_args, you can set the info windows’ minimum and maximum width as an option.
To change other CSS properties, like setting a fixed width or a min-height, or other styles, you can target the info window’s gm-style-iw class.
The following example sets it to a fixed width of 300px and a min-height of 150px. Add the CSS directly to your theme CSS, or add it to the <head> section, by adding the following code to your (child) theme’s functions.php:
How to use custom PHP code?
PHP code can be added to your (child) theme's functions.php file. Alternatively, you can use the Custom Hooks add-on, or a code snippets plugin. More info
add_action( 'wp_head', function() { ?> <style> .gm-style-iw { width: 300px; min-height: 150px; } </style> <?php }, 100 );
If you want to keep the info window’s width flexible and use max-width instead of width, you’ll need to override the map’s default inline CSS value with !important. The same is true for min-width and max-height:
How to use custom PHP code?
PHP code can be added to your (child) theme's functions.php file. Alternatively, you can use the Custom Hooks add-on, or a code snippets plugin. More info
add_action( 'wp_head', function() { ?> <style> .gm-style-iw { max-width: 300px !important; /* Override the inline CSS value set by Google */ /* if needed: */ /* min-width: 200px !important; */ /* max-height: 150px !important; */ } </style> <?php }, 100 );
Disable marker info windows
By default, all markers have an info window that opens when the marker is clicked, including the Proximity marker.
If needed, this info window can be disabled by making the marker unclickable. For the Proximity marker, you can do it like this.
It’s also possible to check if a marker’s info window content is empty, and if so, make the marker unclickable.
How to use InfoWindow methods and pass custom post data
The Google Maps API’s InfoWindow class has a range of methods that can be used to influence how the marker info windows look and behave.
The following snippet gives a few examples of how to use these methods on the FWP_MAP.infoWindow object.
As shown in the code, you could use these methods within the facetwp_map/marker/click, facetwp_map/marker/mouseover or facetwp_map/marker/mouseout marker event hooks, which need to run within a facetwp-maps-loaded event listener.
In this example we get and set info window header content and “regular” content, which you would normally do with a setting or hook. See Google’s InfoWindow method overview for all other available methods.
The marker event hooks’ args parameter contains some useful post data: the marker’s position (lat, lng), the post_id, the infoWindowContent, and theinfoWindowHeaderContent.
It is also possible to pass any custom post data to the args parameter, via the facetwp_map_marker_args hook. This custom post data can then be used in the methods or code used within the marker event hooks. See this section of our Advanced Marker customization page for some examples of how to do that exactly.
How to use custom PHP code?
PHP code can be added to your (child) theme's functions.php file. Alternatively, you can use the Custom Hooks add-on, or a code snippets plugin. More info
add_action( 'facetwp_scripts', function() { ?> <script> // Wrap the click/mouseover/mouseout marker events hooks in a `facetwp-maps-loaded` event listener: document.addEventListener('facetwp-maps-loaded', function() { FWP.hooks.addAction('facetwp_map/marker/click', function(marker, args) { // Or: // FWP.hooks.addAction('facetwp_map/marker/mouseover', function(marker, args) { // FWP.hooks.addAction('facetwp_map/marker/mouseout', function(marker, args) { // See all InfoWindow methods here: // https://developers.google.com/maps/documentation/javascript/reference/info-window#InfoWindow-Methods // For example, get and set info window header content: const headercontent = FWP_MAP.infoWindow.getHeaderContent(); // Get the info window header content. console.log(headercontent); FWP_MAP.infoWindow.setHeaderContent('x'); // Set the info window header content. // Or, get and set info window 'regular' content: const content = FWP_MAP.infoWindow.getContent(); // Get the info window content. console.log(content); FWP_MAP.infoWindow.setContent('y'); // Set the info window content . // The `args` object contains the marker's `position` (lat, lng), `post_id`, `infoWindowContent`, and `infoWindowHeaderContent`. // It can also contain custom post data, which can be passed to `args` via the `facetwp_map_marker_args` hook. console.log(args); }); }); </script> <?php }, 100 );