How to make your website load faster
We often get questions like: “Why are my facets and results loading so slowly?” or “Why is my caching solution not speeding up my facet page?” The answer can be complicated, but FacetWP itself is super fast and so highly optimized that it is rarely the cause of slow loading pages.
Most often the problem is that the page/website itself is slow, because of a myriad of reasons, ranging from limited server resources to heavy plugins, and from code inefficiencies to slow loading queries.
Adding to this, common page caching solutions don’t help on pages with facets, because FacetWP uses AJAX for filtering. AJAX requests are uncached by default and require all of WordPress to load. So the slowness you see is the “true” uncached speed of your site.
This leads to the follow-up question: “What can I do to make my uncached pages load faster?” This article was written to answer that question. There are so many things you can do to increase performance, the list is near endless. The idea is to start making changes, test them, improve, rinse and repeat.
How to use this guide
This article is not meant as a definitive guide and is certainly not complete. It tries to give an overview of things you can look into further.
The subjects are arranged from server level to WordPress, to your plugins, your theme, and the user’s browser. You can use it as a checklist to see if you overlooked any possible ways to increase performance. Some things are simple to implement and can increase page loading speeds tremendously, certainly combined. Others are only useful to tune performance for high-traffic or content-heavy sites.
At the bottom we listed a range of tools to check, analyse, profile, debug and improve performance.
One tool we want to highlight is the Query Monitor plugin. It can be very helpful in analyzing and improving the speed of uncached pages, mainly by optimizing your queries. Check out our separate tutorial on how to use Query Monitor to optimize performance.
Before you start scrolling, a disclaimer:
Choose a fast(er) server
A lot of your website’s performance depends on the server it is running on. Speed, performance and scalability are determined by both the server’s software, settings, available bandwidth, and the hardware: the amount and speed of its CPU cores, the amount of RAM (memory), and the amount and type of storage (e.g. SSD drives).
There are several types of hosting, all with their pros and cons and different price levels. Generally speaking, you will get what you pay for. But that does not mean that fast hosting has to be expensive. For context, facetwp.com runs on a 4GB, 2CPU AMD Digital Ocean droplet (cloud VM), which at the time of writing is only $24/month.
The most commonly used hosting solutions are:
Shared hosting
The cheapest, slowest, and most common type is shared hosting. As the name implies, with shared hosting you share a physical or virtual server with often many hundreds of other users’ websites. This means the server’s resources (memory, CPU) are shared too, and your account will have access to only a limited amount of storage and bandwidth. With a shared hosting plan, the ability to control server and account settings will be limited and often determined by what the hosting panel used has to offer. In general, there will be more downtime and incidents where the server is slowed down because of problematic sites of other users.
If your budget and time allows it, try to move on to a VPS. Or, if the idea of having to (learn to) maintain your own server is too daunting, go for a managed VPS or dedicated, managed WordPress hosting.
VPS (Virtual Private Server) hosting
A good and relatively cheap way to get much more performance, flexibility and control is to upgrade to a VPS / cloud VM (Virtual Machine). You will still share the physical server with other users, but your virtual machine is a “walled garden” with its own secure and private disk space and dedicated server resources (memory, CPU cores, bandwidth).
On a VPS you can run any type of (server) software, and you can usually choose (and quickly change) the amount of disks, disk space, RAM and CPU cores you need. You will have root access and as much control over software and server settings as when you’d have a real physical (“dedicated”) server. You can also restart all server software like PHP, MySQL or Apache/Nginx any time you want, and control the settings for each. What other users do on the (physical) server will have no or very limited impact.
If you opt for a (cheaper) unmanaged VPS, the downside is that you have to update and maintain the software and configuration yourself. You have to be tech-savvy and like to tinker. But most tasks are very well documented and some setups come with install- and maintenance scripts and dashboards which are not too difficult to learn. There are also more costly managed VPS plans, where the host takes care of all common housekeeping tasks like software updates and security measures.
Most hosting providers offer (cloud) VPS services, which you can have up and running in minutes. Cloud VPS setups are often very scalable, it is easy to start simple and add extra CPU cores, more memory or disk space later. Well-known providers are DigitalOcean, Linode and Vultr.
Dedicated server hosting
As the name implies, you get exclusive (rental) rights over a physical server. You have full root access and can run anything you want. The full server resources and disk space are available to you. You can determine the drive and memory setup, add more SSDs, change the RAID setup, etc. Obviously maintaining a dedicated server is not beginner friendly and you need a lot of technical know-how. Some hosts offer (semi) managed solutions.
Managed (WordPress) hosting
With managed WordPress hosting, all the hassle of managing a (VPS) server and making sure your WordPress site runs optimally is done for you. Performance, security, server software updates, WordPress and plugin updates, backups and premium support are often part of the plan. It can be a pricy solution but it can also save a lot of time and headaches.
Aside from the price, the downside is that you often have less or no control over server settings, and for performance or security reasons some settings and options may be unavailable, limited or even forbidden. Choosing to not update WordPress, or a specific plugin for a while may be impossible and there often is a list of disallowed plugins.
Some popular managed WordPress hosts are WP Engine, Kinsta, and Flywheel, Pagely, but there are many more.
Note that managed WordPress hosting providers often have their own caching layers and other settings. Which can come with their own set of issues related to FacetWP. If you are using WP Engine, make sure to read this page about WP Engine-related issues and fixes. For Pressable hosting, see this page. Other hosting providers can have similar setups and issues.
Choose a server close to your site visitors
The location of your server can play a big role in network latency and TTFB (Time To First Byte). Network latency is the time it takes for a data packet to go from one point to another. TTFB is how long the browser has to wait for the first byte of data to arrive.
Both these metrics need to be as close to zero as possible, which can be achieved by reducing the distance to your website visitors. Premium managed WordPress hosting providers like Kinsta or WP Engine have many servers around the globe to achieve this.
Using a CDN is also a good way to reduce network latency, because your (cached) assets will always be served from a CDN server closest to the visitor.
One way to determine where most of your visitors come from would be by checking the geolocation data of your visitors in Google Analytics.
Choose a host that uses Nginx
Every WordPress site runs on a server with either Apache or Nginx as web server software. For smaller WordPress websites with little traffic, Apache is perfectly fine. But especially for heavy websites with static content or high concurrent requests, it is generally recommended to choose Nginx.
Nginx has its roots in performance optimization under scale and it often outperforms Apache in benchmark tests. For that reason, premium managed WordPress hosting services like Kinsta use Nginx on their servers.
Nginx is a bit harder to configure than Apache and it does not use .htaccess. But running WordPress on Nginx is well documented, for example on the Nginx website and in tutorials like this one on SpinupWP.com.
Use HTTP/2 or better: HTTP/3
Ensure your server is using HTTP/2 or, even better, HTTP/3. These modern protocols drastically improve site load speed compared to HTTP/1.1. Using HTTP/2 is generally 50-70% faster than HTTP/1.1.
With HTTP/2, when a visitor makes a request for a webpage, the server sends several streams of data to the browser in parallel. This method of data delivery is known as multiplexing. Developers can assign each of these data streams a different weighted value, and the value tells the browser which data stream to render first. In contrast, HTTP/1.1 loads all resources one after the other, so if one resource cannot be loaded, it blocks all the other resources behind it.
HTTP/3 further enhances this by utilizing QUIC, which largely eliminates head-of-line blocking at the connection level. This makes it much faster and more reliable, especially on unstable networks like mobile.
Many hosts now offer HTTP/2 by default, and HTTP/3 adoption is growing. Given these significant speed and reliability gains, confirm your server supports and uses these newer protocols, particularly if your hosting setup is older.
You can check if your server is using HTTP/2 here. And here is an online HTTP/3 check.
Adopting HTTP/2 and HTTP/3 changes previously recommended optimization practices. Some old techniques can actually harm your site’s speed:
Don’t combine your CSS or JavaScript files
With HTTP/2 and HTTP/3, the need to concatenate (combine) your JavaScript and CSS files is gone. Both protocols allow multiple files to download concurrently.
As HTTP/2 and HTTP/3 allow for multiple downloads without multiple server requests, the number of files is less important when optimizing for speed. Separate files are actually better when using HTTP/2 or HTTP/3. This means that it is no longer advisable to concatenate (combine) your JavaScript and CSS files. Separate files also allow for more efficient caching: only changed files need re-downloading, leveraging browser caches more effectively.
Don’t inline scripts in HTML
As with combining CSS or JavaScript files, inlining scripts was considered best practice with HTTP/1.1 in order to reduce the number of file and server requests. When using HTTP/2 or HTTP/3, inlining scripts in HTML will reduce your page speed optimization from caching, by removing a browser’s ability to cache assets individually. It will also break any improvements from HTTP/2 / HTTP/3 “stream prioritization”, as all embedded scripts and content will get the same priority level as your HTML content. In short, keep your resources separate and as small as possible.
Stop using CSS image sprites
To reduce server requests, using combined images (“image sprites”) for use in CSS background-image rules was advisable with HTTP/1.1. With HTTP/2, smaller files will download faster and more efficiently and you can safely use separate images without negatively affecting your page load speed.
Don’t use domain sharding
“Domain sharding” is the technique of splitting website resources across multiple sites or (sub)domains to get around the simultaneous download limitation in HTML/1.1. With HTTP/2, domain sharding is no longer necessary and is even detrimental because browsers cannot take advantage of multiplexing and parallel downloads. Sharding will also break HTTP/2’s stream prioritization, further reducing the benefits of using HTTP/2.
Take advantage of server push
In HTTP/1.1, when the browser requests a page, the server will send the HTML document first. The browser will then start parsing this, and separately request all CSS, JavaScript, and media files referred to in the document. In HTTP/2, “server push” enables a server to push all required resources to a browser without a separate request for them, including CSS and JavaScript, and media files. This will reduce HTTP requests and speed up page loading.
This Smashing Magazine article is a good guide on HTTP/2’s server push with insight into how it works and how to enable it.
Cloudflare also supports HTTP/2 Server Push. It can be enabled for stylesheets and scripts using Cloudflare’s WordPress plugin.
Use faster DNS
Looking up DNS records and directing traffic takes time, even if it’s just a matter of milliseconds. The free DNS you get from your domain name registrar usually is much slower than premium DNS services like for example Amazon Route 53. As a middle-ground, Cloudflare DNS is a free service that still offers many of the benefits of premium DNS.
DNS performance can be measured with online tools like DNSperf.
Use the latest PHP version
While not all plugins or themes will always support the latest PHP version, using the latest supported version can bring many performance improvements.
Each PHP version is significantly faster than the previous one. According to Kinsta’s 2022 PHP + WordPress benchmark testing, PHP 8.1 is 47.10% faster than PHP 8.0. And if you compare it to PHP 7.2, it can handle more than 50% requests (or transactions) per second. WooCommerce stores running on PHP 8.1 are 11.47% faster than on PHP 7.2.
You can use the free Query Monitor plugin and check its Environment section to see which PHP version your site is running on. Most hosting panels offer a setting to change the PHP version used for your account.
Set WordPress and server memory limits
Depending on your server, type of website, and the installed plugins, increasing the amount of server RAM (memory) your website is allowed to use can increase performance, or it can help to work around the constraints of the server.
If you have nothing set, WordPress by default enforces a memory limit of 40MB (64M for Multisite installs). This means a single PHP script on the front-end is allowed to use up to 40M of RAM. In a lot of situations this is not enough to prevent problems.
Memory recommendations
If you are using many or heavy plugins (for example WooCommerce, WPML, Yoast SEO, SearchWP or Gravity Forms) it is advisable to increase WordPress’ memory limit. A higher memory limit can also be needed to prevent FacetWP’s indexer from stalling if you have a very large site, or if your pages need to run a lot of queries to fetch all data.
If you are using WPML, know that its minimum requirements are 128M, and 256M is recommended. Below that, all kinds of issues can happen, like disappearing post items, terms, etc.
Be aware that setting a higher memory limit doesn’t necessarily increase your site’s performance. Since WP’s memory setting sets a limit per script, it’s actually better to set it as low as possible (but high enough for individual scripts) to reduce the chance of one script saturating the RAM in your server. Setting the WP memory limit at 128M is a good starting point. When your site is large with a lot of heavy plugins, you could start with 256M.
How to see WordPress and the server’s current memory limits
You can install the free Query Monitor plugin and check its Environment section to see what is currently set as memory limit for WordPress and the server. It also displays the Peak Memory Usage for a page load, which can help determine what is needed on heavy pages.
If you are using WPML, you can see how much memory is currently set by going to WPML > Support. In the WordPress section, you’ll see what is set for WordPress. This has to be lower or equal to what is available on the server, which you can see in the PHP section under “Memory limit”. This section also displays the current “Memory usage”.
How to change WordPress memory limits
The WordPress memory limit can be defined with the WP_MEMORY_LIMIT constant. Add the following line in your wp-config.php file to allow WordPress to use up to 256M of RAM for each PHP script:
How to use custom PHP code?
PHP code can be added to your (child) theme's functions.php file. Alternatively, you can use the Custom Hooks add-on, or a code snippets plugin. More info
define( 'WP_MEMORY_LIMIT', '256M' ); // For the front-end. Default: 40M
This setting will work as long as the server’s (user) memory_limit setting in your php.ini / user.ini file is the same or higher than the WordPress limit (256M in this example). You can also set WP’s memory limit to the server’s memory limit, like this:
How to use custom PHP code?
PHP code can be added to your (child) theme's functions.php file. Alternatively, you can use the Custom Hooks add-on, or a code snippets plugin. More info
define( 'WP_MEMORY_LIMIT', ini_get( 'memory_limit' ) );
In some cases, you may want to have a different amount of memory set for the front- and backend. This can be done with WP_MAX_MEMORY_LIMIT, which allows you to set a separate memory limit for WordPress Admin. The default is 256M or the original memory_limit php.ini value if that is higher.
Below is an example of how you can use WP_MEMORY_LIMIT and WP_MAX_MEMORY_LIMIT together:
How to use custom PHP code?
PHP code can be added to your (child) theme's functions.php file. Alternatively, you can use the Custom Hooks add-on, or a code snippets plugin. More info
define( 'WP_MEMORY_LIMIT', '128M' ); // For the front-end. Default: 40M define( 'WP_MAX_MEMORY_LIMIT', '512M'); // For the back-end. Default: 256M
How to change the server’s memory limit
The memory_limit is a server setting that can be set server-wide and separate for each user on a server. Depending on your hosting plan and server, the php.ini file (or its separate settings) can be changed directly in the hosting panel, by adding a .ini or .user file to our user account, or in .htaccess:
memory_limit = 512M // maximum memory per script
Check with your host if you are unsure how to change it.
Other php.ini settings
Besides the above-mentioned memory_limit, there are other php.ini settings worth looking into, especially if you have a large website or are running into pages or scripts stalling, time-outs or even fatal errors:
memory_limit = 512M // maximum memory per script
max_input_vars = 3000 // maximum amount of POST variables submitted
max_execution_time = 60 // time in seconds a script is allowed to run before being terminated
max_input_time = 1000 // maximum time in seconds a script is allowed to parse input data, like POST and GET
upload_max_filesize = 64M // maximum size of a single uploaded file
post_max_size = 256M // maximum size of the entire body of the request. Must be higher than upload_max_filesize and lower than memory_limit
You can see what the current value for most of these settings is in Query Monitor’s Environment panel. If you are using WPML, a number of these values are listed in the PHP section on the WPML > Support page.
Optimize your MySQL database
There can be significant performance gains by optimizing and cleaning your database tables and making sure MySQL is tuned and running as smoothly as possible.
First of all, make sure your server is capable enough. If your CPUs, memory, and network connection are not sufficient for their tasks, MySQL tuning maybe will make the situation slightly better, but you’ll reach the limits of the hardware capacity before the changes matter.
Choose the right database storage engine
A lot of older sites are still using the MyISAM storage engine in their database tables. Over recent years, InnoDB has proved to perform better and be more reliable. One of the technical reasons to use InnoDB over MyISAM is that MyISAM has full table-level locking while InnoDB has row-level locking, allowing queries to process faster.
If you are running a fairly new WordPress site you are probably already using InnoDB. But with older WordPress sites you may want to check if this is the case. You may also have some tables using InnoDB and others MyISAM.
You can check which storage engine is used with phpMyAdmin: first, select your database on the left and then check the “Type” column in the list of tables on the right:

If you find that you still have MyISAM tables, you can convert them manually, with phpMyAdmin, with WP-CLI, or with a plugin.
Optimize, repair and clean MySQL database tables
It is recommended to regularly optimize and repair and clean your database tables. The “Optimize Table” MySQL command is a built-in method to reduce the excess space taken up by the database. There are several ways to do this:
Database optimizing with phpMyAdmin
In phpMyAdmin, first select a database on the left. Then select the tables you are planning to improve (you can check all of them with the checkbox below the list of tables). You will see the “Optimize table” command you need in the “With selected” menu:

Database optimizing with WordPress itself
WordPress has a built-in WP Database Repair Tool with which you can optimize and repair either MyISAM or InnoDB, so it doesn’t matter which storage engine you are using. In order to use this tool, first (temporarily) add the following line to your site’s wp-config.php:
How to use custom PHP code?
PHP code can be added to your (child) theme's functions.php file. Alternatively, you can use the Custom Hooks add-on, or a code snippets plugin. More info
define('WP_ALLOW_REPAIR', true);
Then visit the WP Database Repair Tool via the following URL:
https://yoursite.com/wp-admin/maint/repair.php
You will see two buttons, “Repair Database” and “Repair and Optimize Database”:
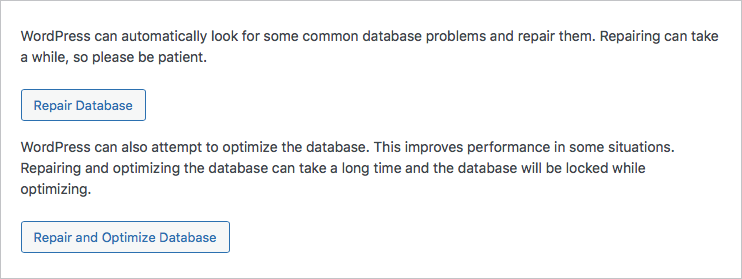
When you click either button, WordPress will attempt to repair/optimize all tables in your database. If there are tables that cannot be repaired, WordPress will let you know. Any failures will be reported on the results screen.
If you find this all too tedious, there is always a plugin for that.
Database optimizing with plugins
There are many plugins that you can use for optimizing, repairing and cleaning your database tables:
WP Optimize can optimize and clean database tables, remove unused tables from inactive/deleted plugins, and schedule regular maintenance. (You can also use it for image optimization, caching and minifying). Note that WP Optimize does not optimize InnoDB tables by default. (The WP Database Repair Tool mentioned above, does.)
WP Sweep, Advanced Database Cleaner and ODAR are other plugins you can use to optimize tables and clean up unused, orphaned or duplicate data.
Make sure to always make a database backup before running any of these plugins.
Enable WooCommerce High Performance Order Storage (HPOS)
If you are using WooCommerce, make sure that High Performance Order Storage (HPOS) is enabled in its settings. With HPOS enabled, WooCommerce will store its order data in custom tables instead of as custom WordPress post types or post meta records.
Note that From WooCommerce 8.2, released on October 2023, HPOS is enabled by default for new installations.
MySQL tuning
This is an advanced topic, and not for the faint-hearted. We mention it briefly here so you know it exists. MySQL itself can be tuned with hundreds of settings in its configuration file my.cnf. You can access this file if you have root access to your server / VPS. The location varies.
A handful of these settings (called server variables) can have a significant impact on MySQL performance for data-heavy sites. There is a lot written about how to tune MySQL. The mysql.com site chapter on optimization is a good starting point.
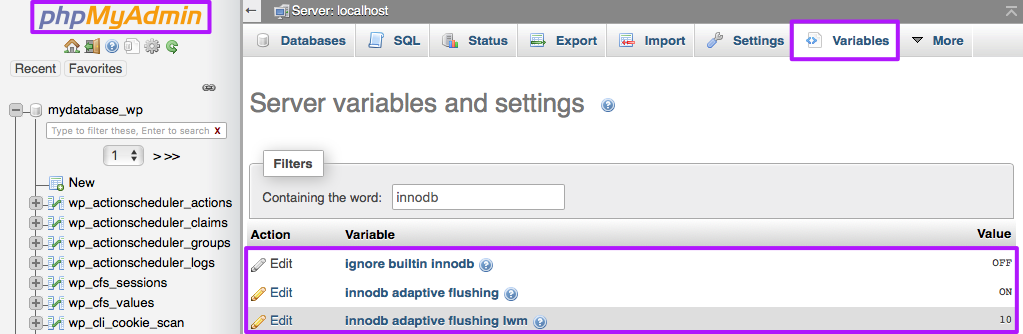
Besides changing the my.cnf file, you can use phpMyAdmin to view and change all MySQL server variables: click on the phpMyAdmin logo, then on the “Variables” tab:
Tools like Mysqltuner can help in determining the optimal adjustment of settings to increase performance and stability.
Always make sure to restart MySQL after changing any server variables.
Test and reconsider your plugins
A lot of performance can usually be gained by (re)considering the plugins you are using, de-activating unnecessary or heavy plugins, and making sure the remaining ones are configured to work well together. Too many active plugins can slow your site to crawl.
De-activate any plugins you are not actively and continuously using, like WP All Import, Query Monitor, and other profiling/debugging plugins.
To get more insight into how much each plugin is slowing down your site, you can use the Code Profiler plugin, which creates an overview of plugin and theme performance. The detailed reports about script performance is only available in the Pro version.

Another good option (at least in in theory) is the free P3 Plugin Performance Profiler plugin which give more detailed insight than Code Profiler. However, be warned that it seems to be causing fatal errors for lots of users lately, which we also experienced in testing. If you need to remove it, you also need to remove the plugin parts in wp-content/mu-plugins.
Last but not least we recommend installing the free Query Monitor plugin. You can use it to profile your plugins with the the Queries by Component feature.
Eliminate blocking HTTP requests
Plugins, your theme and WordPress Core continually make external HTTP requests to API’s or their home base, for example to check for updates, licensing information, or other data. These request can happen at scheduled intervals (triggered by WP Cron) and can coincide with (or are triggered by) visitors’ page requests.
Some of these API calls can happen simultaneously or take a very long time to run. Sometimes they time out if the server they are calling is temporarily busy or unavailable. If the request’s timeout setting is long (e.g. 10 seconds), the server is unresponsive and the request tries to contact the server multiple times, you can be waiting 20-30 seconds or even longer. All that time these requests can be blocking the normal page load. This is also the reason that logging into WordPress Admin or opening the Plugins page can sometimes take a very long time.
A good plugin to see these HTTP requests and API calls is the free Query Monitor plugin (you can read more about how to do this in our tuturial on using Query Monitor). Be aware that Query Monitor will show these HTTP requests only as they happen. But because these requests happen infrequently or on a cron schedule, you don’t always see them.
A solution for this problem is the Log HTTP Requests plugin. It logs all WP Core, plugin, theme and AJAX-based WP_HTTP requests and stores their run time, so you can later diagnose potentially blocking requests.
If you find any blocking requests that are running on a cron schedule, you could look into replacing WP’s built-in cron with server (“real”) cron:
Control your cron jobs
Cron jobs (controlled by WP-Cron) are used by WordPress and many plugins to schedule repetitive tasks like plugin checks and updates. However, over time, these can sometimes cause performance and page load issues.
WP-Cron is only triggered when there is some activity on the site. On less visited sites this can slow down page loads for users and admins because all scheduled cron jobs start running on the first user visit after some time of inactivity. Another possible issue is that if a site doesn’t have enough PHP workers, sometimes a request will come in, WordPress will “spawn” (initiate) the cron, but the cron has to wait for the worker, and then just sits there.
You can use the free WP Crontrol plugin to view and manage all the cron jobs scheduled on your site. Another helpful plugin to discover potentially blocking web requests is Log HTTP Requests, which logs all WP_HTTP requests and how long they take.
Replace WP-Cron with server cron
To prevent the issues described above, it is possible to disable WP’s WP-Cron, and use server cron (also called “real” cron) to initiate all scheduled cron jobs. With this approach, also described in WP’s Plugin handbook, crons will run on a pre-defined schedule by your own choosing, for example every 30 minutes, instead of randomly on front-end page load (after inactivity).
To accomplish this, you need to first disable WP’s default WP-Cron, and then schedule a cron job on your server that loads wp-cron.php on a fixed schedule. How you can do this depends on your hosting panel.
In most hosting panels like cPanel and DirectAdmin it is very easy to manually add a cron job. Plesk has its own dedicated settings to take over WP-Cron.
Set up WP-Cron take over with a custom cron job
First, you need to disable WP’s default WP-Cron, by adding the following code to your wp-config.php file:
How to use custom PHP code?
PHP code can be added to your (child) theme's functions.php file. Alternatively, you can use the Custom Hooks add-on, or a code snippets plugin. More info
define('DISABLE_WP_CRON', true);
Then, create a custom cron job that triggers wp-cron.php. The following command, set to a schedule of every 30 minutes (twice per hour), will do the job:
How to run server commands?
Commands need to be entered in a command line interface, like Terminal. To run server commands, you first need to log in to the server with SSH. WP-CLI commands can only be run when you are in the website's WordPress directory. More info about using WP-CLI
wget -q -O - https://www.yourdomain.com/wp-cron.php?doing_wp_cron >/dev/null 2>&1
In DirectAdmin it looks like this:

And in cPanel it looks like this:

The >/dev/null 2>&1 part of the above command disables email notifications.
If you’re familiar with SSH, you can also manage server cron jobs from the command line with the crontab command. See for example this article for a good introduction to setting up a basic cron job. The Crontab Generator can help with getting the syntax right.
Another option is to manage them with WP-CLI.
Set up WP-Cron take over in Plesk
If your host is using Plesk, you can set up WP-Cron take over as follows:
- In Plesk, go to WordPress.
- Choose the WordPress installation where you want to disable the default
wp-cron.phpexecution. - Enable the “Take over wp-cron.php” setting:
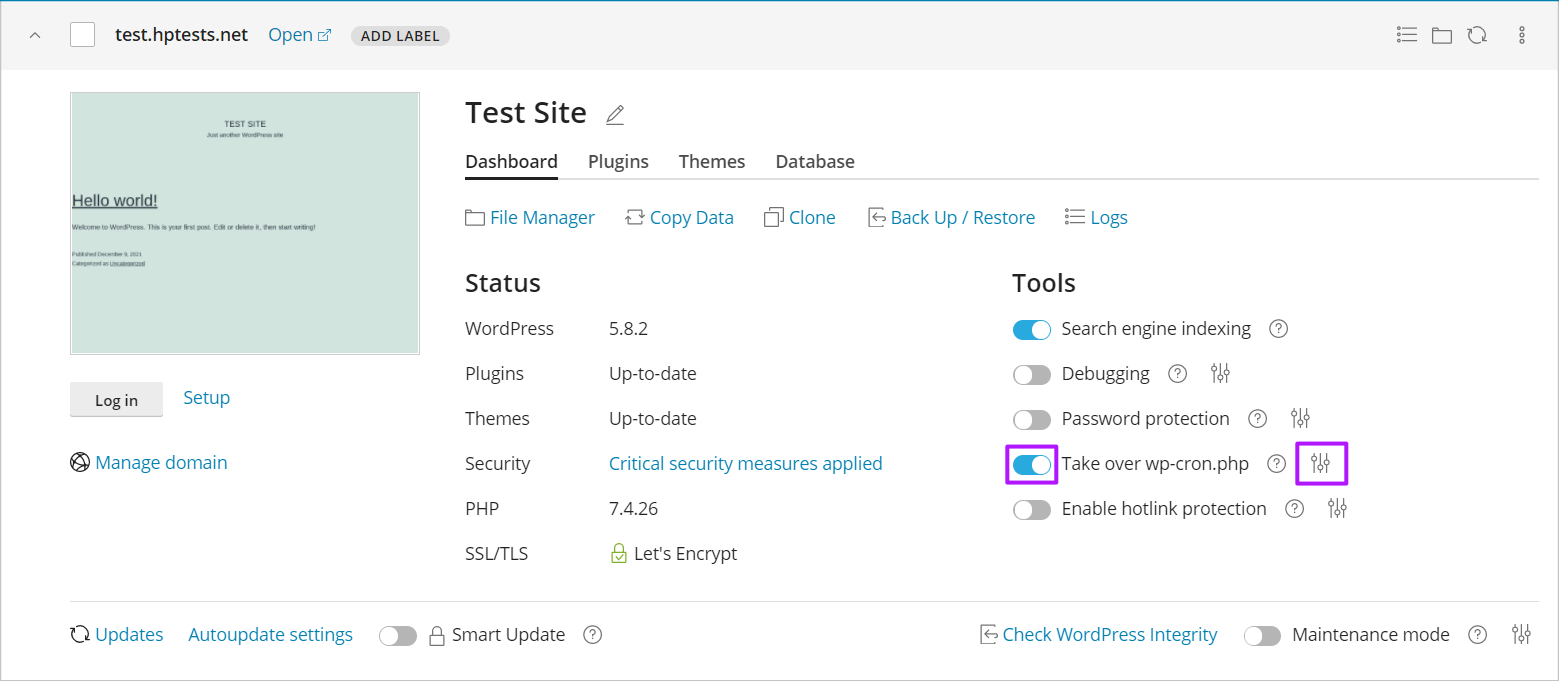
Enable “Take over wp-cron.php”. The default
wp-cron.phpexecution is now disabled. There is no need to setDISABLE_WP_CRON(like above). Plesk will do this for you. -
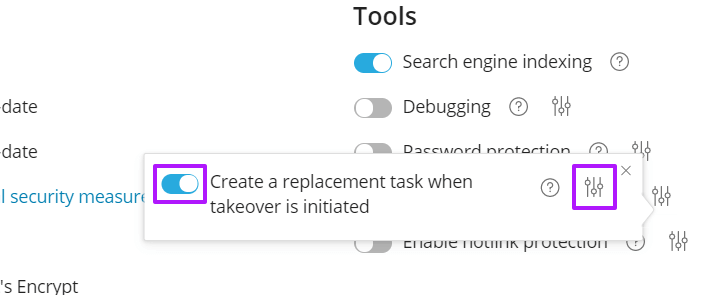
Enable “Create a replacement task when takeover is initiated”. Plesk’s WordPress Toolkit will now automatically create a replacement scheduled task that will run
wp-cron.phpevery 30 minutes. To check this, click the settings icon to the right of “Take over wp-cron.php”, and make sure that “Create a replacement task when takeover is initiated” is enabled. - Then click the icon to the right of that setting to see the schedule settings. By default it will be set to
0,30 * * * *which means it runs twice an hour: at minute :00 and :30 of every hour, every day of the month, every month and every day of the week:
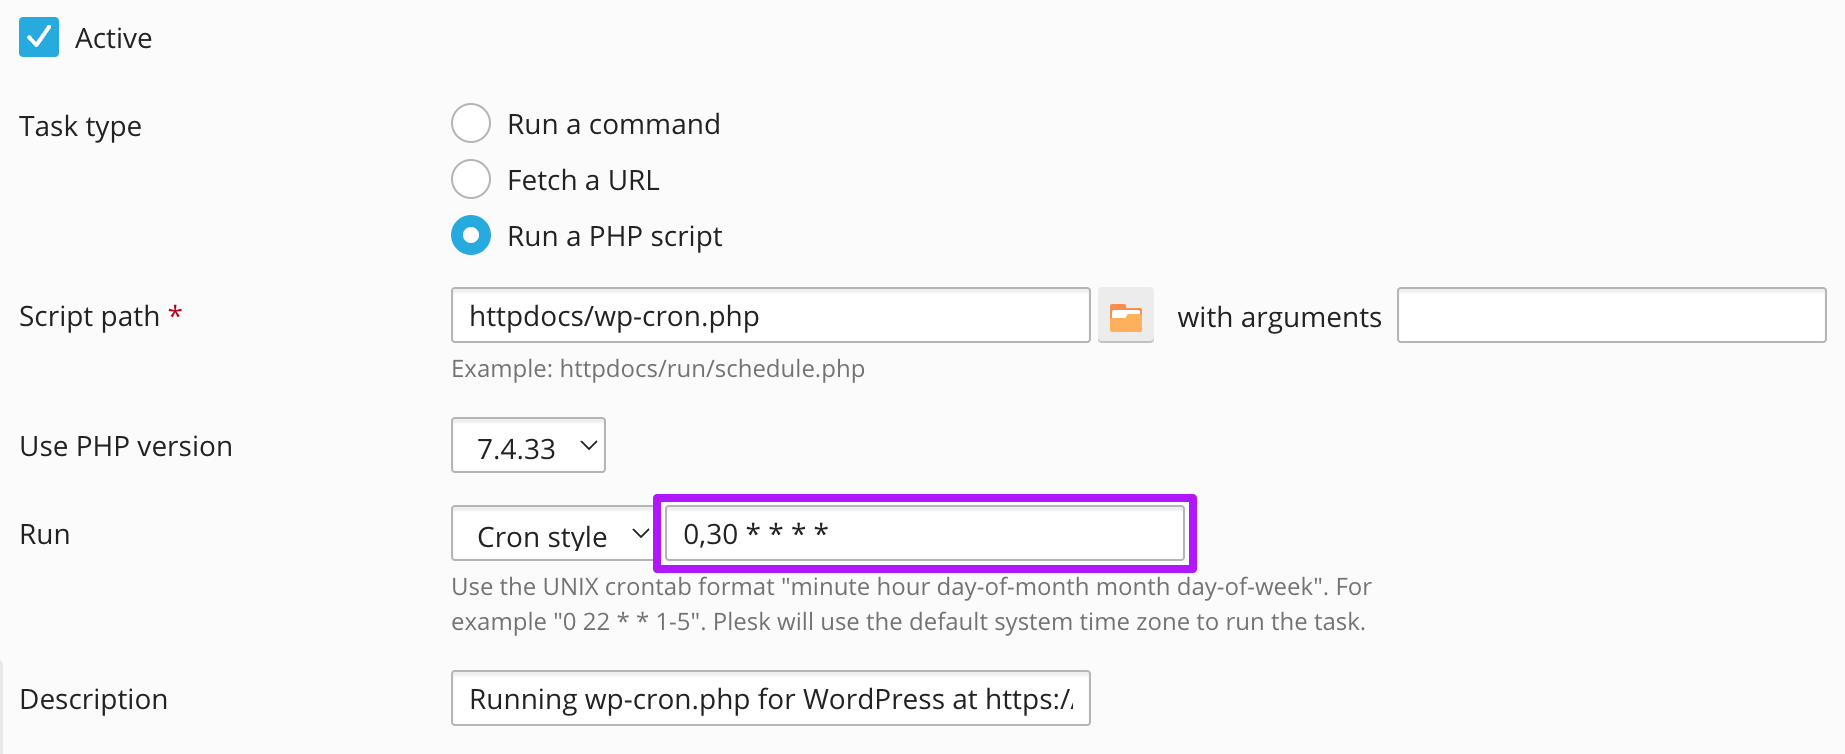
Set or customize a schedule for wp-cron.php. - Adapt this schedule as needed. Twice an hour is fine for WP-Cron.
- You can always recreate a replacement task if you’ve removed it by mistake. To do this, click the settings icon, turn off, then turn back on “Create a replacement task when takeover is initiated”.
- Use the free WP Crontrol plugin to see all the WP-cron events scheduled on your site, if and when they are scheduled to run, if they ran, etc.
FacetWP Indexing with crons
You can also use cron jobs to trigger FacetWP’s indexing process. With the Schedule Indexer add-on, it is possible to schedule a periodic WP-Cron event for indexing. Or – for example if you disabled WP-Cron – you could use a server cron with a WP-CLI indexing command to run the indexing process at specific intervals.
Disable Emojis in WordPress
WordPress by default loads emoji support, adding an additional HTTP request to the wp-emoji-release.min.js javascript file.
You can disable emoji’s with the Disable Emojis plugin, or manually with some hooks in functions.php. Some optimization plugins like WP Rocket also have a built-in setting to disable emoji’s.
Enable Gzip or Brotli compression
Gzip is a file format used for file compression and decompression. It helps improve performance by reducing the size of downloaded files. The compression ratio can be dramatic, sometimes up to 90%, even on already minified files like CSS and JavaScript files. Note that Gzip does not compress images.
All modern browsers support Gzip and automatically ask for it when making HTTP requests. However, Gzip needs to be enabled on your server. You can use online tests like this one or this one to check if Gzip is already enabled.
On Nginx servers, Gzip is enabled by default. To make sure you can open the main nginx.conf configuration file to confirm that the gzip section entries are uncommented.
Apache supports Gzip compression through its mod_deflate module, which should be enabled on by default. Gzip compression can be enabled in several ways: in the server’s configuration file (httpd.conf), in .htaccess, or with a plugin. Most caching and optimization plugins, like WP Rocket and W3 Total Cache, have an option to enable Gzip compression. Managed WordPress hosting services will have Gzip enabled by default. Kinsta has an extensive article on enabling Gzip to get you started.
Brotli compression
Also most CDNs, like Cloudflare and KeyCDN use Gzip or Brotli compression. In benchmarks, Brotli compression performs better in compression ratio than Gzip, but the compression/decompression speed depends on its settings.
You can check if you server sends Brotli compressed files with this tool or this one that also tests Gzip support.
Leverage browser caching
Browser caching lets your website tell a visitor’s browser to save downloaded files (HTML, CSS, JavaScript, images, and font files) on the visitor’s computer and load those local files for subsequent visits instead of downloading them from the server again. With browser caching, the repeat view of a page will be much faster because the files will not have to be fetched again.
It’s important to understand that browser caching is happening for each visitor’s browser or device independently. This is something else than page caching, which is done by storing complete static HTML pages on the server.
Set Expires and Cache-control headers
As a website developer, you need a way to tell when exactly a visitor’s browser needs to fetch a given resource again from the server because there may be a new version. This is what Expires or Cache-control response headers are for.
Expires headers let you tell a visitor’s web browser after how much time the resource has “expired” and needs to be fetched anew. Expires headers are set in .htaccess for Apache, and in the server configuration file for Nginx. They are set for each file type individually, so you can choose a different duration for each file type, depending on the type of site you have, and how often resources change.
Longer durations will make browser caching more efficient because fewer visits will require new downloads. But durations that are too long will prevent browsers to show the newest versions of files, so you need to find the right balance for each file type.
There is an alternative (newer) technique called “Cache-control” headers. Both Expires and Cache-control headers can be used, even at the same time (though our Cache-control headers will take precedence in most situations). If you’re using both, make sure that you set the same time values in each.
Kinsta has a nice overview of how to set Expires headers and Cache-control for Apache and Ngix.
Setting one of two additional response headers can also help: either ETag or Last-Modified. ETag and Last-Modified both serve the same purpose: determining if the browser needs to re-download a cached file that has expired. ETag is the recommended approach because it’s more accurate. See this web.dev article for more information.
Cache busting with query strings
If you make changes to resource files on your website, for example to your style.css, you need a way to make sure the visitor’s browser does not use the cached local version but downloads the new version. You can do this by “busting” the cache, by adding a query string to the filename. For example style.css?ver=1.2. This makes the browser treat this file as a new file that has to be downloaded.
Some caching plugins (like W3 Total Cache) can do all this for you. They can set Expires or Cache-control headers (also by adding them to .htaccess), add query strings to your files, and – very handy – have a button to bust the browser cache by changing the query string. See this page on how WP Rocket implements Expires headers.
You can check if your Expires or Cache-control headers are set correctly with one of the common speed testing tools. Note that some of these tools give you the recommendation to “remove query strings from static resources”. Realize that if you do that, you’ll lose the only way to communicate to each user’s browser that a file has been updated. Clearing your caching plugin’s (page) cache does not help to bust the browser cache: the cached files are on the user’s computer, not on the server.
Enable server caching
Caching works by saving content to the server’s memory, database, or caching files the first time it’s needed for a page load. On each subsequent page load, the stored content is retrieved and re-used. Because all database queries and PHP parsing have already been done the first time, cached content is displayed a lot faster.
There are many types of server caching you can look into.
PHP OPcode caching
When a PHP file or script is processed on the server, it first has to be compiled into machine-readable OPcode. PHP’s built-in OPcode cache (Zend OPcache) stores the converted OPcode so that PHP will be able to skip the compilation step the next time that specific file or script is needed. Using OPcache significantly improves the performance of PHP. For medium to large sites, it can speed up WordPress threefold.
For PHP’s OPcode cache to work, the Zend OPcache extension needs to be installed and enabled in php.ini. In the Query Monitor plugin’s Overview panel, you can check if your server is already running OPcode cache.
The OPcode cache’s exact behavior is determined by several server settings, which you can set in php.ini too. WP Rocket has a good page on enabling and configuring PHP OPcache.
When you have OPcode enabled, changes to PHP files are not reflected immediately. When you’ve changed any PHP code or added new scripts, you need to flush the OPcode cache. You can do this via terminal or with the opcache_reset() function (just put it in a PHP file and call that file each time you need to flush the OPcode cache). WP Rocket and W3 Total Cache both have a built-in option to purge OPcache with the click of a button.
There are also PHP extensions with which you can manage OPcache features through a graphical interface. Two of the most recommended extensions are OpCacheGUI and opcache-gui.
Object caching
Object caching stores the results of database queries so that the next time that data is needed it can be served from the cache, without querying the database. This speeds up PHP execution times and reduces the load on your database.
WordPress has a built-in object cache: WP_Object_Cache, which by default is “non-persistent”, meaning that it stores objects only for a single page load. The purpose of this cache is to make sure the database isn’t queried in the exact same way multiple times during a single page load. However, cached objects aren’t used anymore after that single page load. While this is useful, object caching can be much more powerful if the cached objects can be used between multiple page loads.
You can do this by switching to an external solution that offers “persistent” object caching. A few solutions are:
- Redis with the Redis Object Cache or WP Redis plugins.
- Memcached with the Memcached Object Cache plugin.
- W3 Total Cache plugin.
- Litespeed cache on a Litespeed webserver.
In the Query Monitor plugin’s Overview panel, you can check if your server is already running an 0bject caching solution.
Page caching
When you load a page on a WordPress site, the server has to process a large number of PHP files and query the database a number of times. For pages that aren’t constantly updated, this is wasted effort. It is much more effective to generate a static HTML of each page only once, basically like taking a snapshot. Then store that page in the cache on the server, and serve the cached page to each subsequent visitors.
The benefits of page caching are much faster page loads and dramatically reduced server loads with the ability to handle more traffic as a result.
Page caching can be implemented using a caching plugin such as WP Rocket or W3 Total Cache, or directly on the server if you are using Nginx.
Don’t confuse page caching with browser caching, which stores cached resources on the visitor’s computer.
Priming the page cache
Visiting a page URL is the only way to build the cache for that URL. As long as URLs are not visited, there is no cached paged. Short of manually visiting a page, the other option would be to have a script visit all URLs of your site. This is exactly what most caching plugins do to “preload”, “warm” or “prime” the cache. WP Rocket for example has a Preload Cache button.
Flushing the page cache
If you have a caching plugin installed, and you edit and save a page, it will be flushed (removed) from the page cache automatically. All caching plugins also have an option to manually clear the cache of a single page or to empty/flush the entire page cache.
Nginx FastCGI page caching
If you are using a VPS with Nginx you don’t need a plugin to enable page caching because Nginx has a built-in page caching system with its FastCGI module. SpinupWP has a nice article about how to set it up.
Caching and optimization plugins
There are many WordPress caching plugins that each offer a range of different caching solutions, often combined with code optimization features like script minification, concatenation and deferring, image optimization, CDN image storage solutions, etc.
FacetWP has built-in support for WP Rocket, a popular (paid) caching plugin. A good free alternative is W3 Total Cache. And a lot of our users are using Cloudflare with the Cloudflare plugin. See our tools section for some alternatives.
If you’re using a caching plugin with FacetWP, in general, make sure that HTML minification and script deferring is disabled. HTML minification is often problematic because – depending on the settings – it removes HTML comments, including the <!--fwp-loop--> comments that FacetWP uses to automatically detect the query results. This often happens when users turn on Cloudflare’s Auto Minify feature. Sometimes you can exclude HTML comment from the minification process, which could prevent this (but test to make sure FacetWP is still working correctly). Script deferring is often problematic because of script timing issues.
The FacetWP Caching add-on
For extra filtering speed you can enable FacetWP’s Caching add-on, which caches FacetWP’s own AJAX requests in the database. The Caching add-on can help speed up high-traffic pages with commonly used facet combinations because it prevents FacetWP from having to calculate the choices for each facet on each page load.
Each unique facet filter combination that is used will be cached and retrieved from the cache the next time someone chooses that combination. If you have many users selecting a lot of different unique combinations (e.g. entering their own location or making random assortments of facet selections), then caching the AJAX requests isn’t going to help much because those combinations will not have been cached yet. So the Caching add-on will only be effective on frequently visited pages (like landing pages) with only a few facets and facet options/combinations that are used often.
The FacetWP Cache add-on doesn’t cache anything else than its own AJAX requests, so it will not negatively affect other caching systems you are using. It can be used side-by-side with other caching plugins like WP Rocket because most of them intentionally ignore AJAX requests.
Depending on how often your content changes, you may also want to experiment with the cache expiration time. By default, the cache expires after 1 hour (3600 seconds) but if your content only changes weekly or monthly, it would make sense to increase the cache lifetime as well. If your content rarely changes you could set the cache to a really long expiration, then manually clear it when necessary. That’s actually what we do on facetwp.com because our demo content almost never changes.
Caching and the Pods plugin
If you are using the Pods plugin (which has built-in caching), experiment with the Pods Alternative Cache add-on plugin, especially if you are hosting your site on WP Engine.
Pods Alternative Cache is a good addition if your site already uses object caching. It provides better performance of Pods sites on hosting plans where object cache sizes are limited or object caching is unavailable. It was developed for and tested on the WP Engine platform to improve the performance of cached objects generated from Pods, but it works on other hosting providers too.
For large Pods installations with hundreds of Pods and fields, having them all stored in the object cache can cause the object cache itself to become ineffective because it will constantly run out of space and trash Pods objects (or other useful cached objects from WordPress, the theme, or plugins). The add-on allows Pods to use more consistent persistent caching without affecting other plugins and WordPress caching objects.
More info about Pods Alternative Cache add-on can be found here.
For even further optimization of Pods on your site, you could look into leveraging Pods Alternative Cache by using partial page caching.
CDN caching
A CDN (Content Delivery Network) is a network of servers located around the globe. Its purpose is to host and deliver copies of your WordPress site’s static assets such as CSS, JavaScript, images, fonts and video. Using a CDN can improve performance by making sure the assets are always loaded from a location closest to the visitor, which improves latency, making images load super fast around the world. A CDN will also save a lot of bandwidth on high-traffic sites.
A “tradional” CDN caches a copy of your assets, but requests are still made directly to your server. Examples are KeyCDN or CDN77.
A “reverse proxy” CDN intercepts all incoming requests and acts as intermediary between the visitor’s browser and your server. The benefit of this type of CDN is that it also adds a layer of security, by blocking bad traffic to your server. Examples are Cloudflare (and its WordPress plugin), and Sucuri.
Most caching plugins like WP Rocket have their own CDN integrated in the plugin, or offer integration with other CDN services like KeyCDN. Some CDNs have their own WordPress plugins, like KeyCDN’s CDN Enabler.
Optimize your theme
Your choice for a WordPress theme matters a lot for performance. Most themes come with a lot of features like Google fonts, icon fonts, sliders, galleries, video, parallax scripts, etc.
Try to find a theme that is fast and lightweight and does only come with features you actually use. If you are familiar with theme development choose a theme you can easily adapt by disabling any features you are not using. Strip out unused scripts and CSS. Some themes come with pre-compiled SCSS/Sass CSS source files making it easier to exclude parts you don’t use and recompile the CSS.
If you want page load times in the ~1s range, the best approach would be to code your own theme from scratch, with as little overhead as possible. Or maybe start with a bare-bones theme built for performance.
Optimize your database queries
If you want to optimize the performance of your site’s uncached pages, reducing the total database query time is one of the most important things you can do.
The total query time of a page will be determined by the number of queries and the time each of them needs to run. So logically the goal of optimizing your queries is to reduce both. You can do this by eliminating queries and removing duplicate queries. Whether you do this by making code optimizations in your theme, and/or by deciding to remove certain components or even plugins does not matter: as long as the total query time goes down, your total page loading speed will increase.
When you are using FacetWP, reducing the total query time is even more important. This is because FacetWP uses AJAX calls for filtering results, and AJAX requests are uncached by default.
You can read more about optimizing your database queries in our tuturial on how to use Query Monitor to optimize performance.
Minify your CSS, JavaScript and HTML
To reduce the amount of data the browser has to download, it is good practice to minimize your CSS, JavaScript and HTML files. You can do this with online minification/compression tools for JavaScript and CSS or in your code editor.
Caching and optimization plugins like WP Rocket or Autooptimize have code minification options too.
You can also concatenate (combine) CSS and JavaScript files to reduce the number of files, but if your server uses HTTP/2, be careful with that.
Be careful with HTML minification on pages with facets, because – depending on the settings – it removes HTML comments, including the <!--fwp-loop--> comments that FacetWP uses to automatically detect the query results. This often happens when users turn on Cloudflare’s Auto Minify feature. If you can’t exclude HTML comments or these pages, make sure to turn off HTML minification if you are using FacetWP.
Optimize your web fonts
If you are using your own custom fonts in your theme, make sure to limit the number of font families and font weights (regular, italic, bold, etc.). Each font weight has its own file, and font files are relatively heavy, depending on the type.
Most WordPress themes offer a way to choose Google Fonts from within the theme’s settings. It’s tempting to select a whole range of font families, types and weights. But loading too many fonts can hurt performance. It may be a better idea to entirely disable Google font loading in your theme and add the Google fonts manually, so you have more control over which font files you actually load.
An even better approach would be to host your (Google) fonts locally, on your own server. For this to work, you have to download and convert them to web font files first. A great tool that does this for you, and also creates the CSS you need to include the fonts is Google-webfonts-helper.
When hosting Google fonts locally, make sure to test performance and consider using a CDN. Google Fonts (and other services like Adobe Fonts) use CDNs to deliver their fonts. You’ll lose this advantage when serving them from your own server. If you use locally hosted fonts on a website with visitors across the globe, without a CDN, you might even be slowing your site down for certain users. So unless your site users are coming all from the same geographical area, using a CDN to host your own fonts is recommended.
Two other ways to speed up the loading of your font files are preloading your fonts, and setting proper Expires or Cache-control headers with a long max-age expiry to leverage browser caching.
For further optimization of font loading and rendering, look into optimizing webfont loading itself, for example with Font Face Observer. Using the font-display CSS property can give you more control over the font rendering process, which can help with the visitor’s perceived speed of the page rendering.
Optimize your icon fonts
If your theme is using icon font libraries like Fontawesome, be aware that the font files for those icon sets can be quite large and hurt performance. In some themes, even multiple icon font libraries are loaded.
Often you end up using only a handful of icons from the loaded font set. If this is the case, the Icomoon app is a fantastic tool to create a custom, minimized font icon set. You can select only the icons you are actually using, combine icons from different sets, and/or upload your own icons. Then you can download the slimmed-down custom-generated icon font file and use that in your theme, instead of the full set. Of course, make sure you remove or dequeue the font icons loaded by the theme.
Just like with web fonts, preloading your icon font files, and making sure you set long living Expires or Cache-control headers are recommended for performance.
Optimize your images
Images often make up 30% or more of the total weight of a page. Large images or a large number of images on your website can slow down your page load significantly.
Image optimization is a vast topic in itself with many aspects. A few pointers to get you started:
Choose the right file type
JPG / JPEG vs WebP
For photographic images, JPG is the default choice. JPGs can be compressed greatly, but it is a not a lossless format, so be careful to choose a compression factor that is a good balance between file size and image quality.
For performance reasons, you could consider switching (certain) images in your theme from JPG to WebP, which can be 25-35% smaller than a comparable JPG. Most modern browsers and WP5.8+ support WebP.
You can also serve WebP to browsers that support it, and use JPGs as a fallback. For images in HTML you can do this with the srcset attribute:
<picture>
    <source srcset="/wp-content/uploads/WebPImage.webp" type="image/webp">
    <source srcset="/wp-content/uploads/JPGFallbackImage.jpg" type="image/jpeg">
    <img src="/wp-content/uploads/JPGFallbackImage.jpg" alt="Alt Text">
</picture>
For WebP as CSS background image, you’ll have to rely on feature detection like Modernizr, which adds a class webp to the <html> tag when WebP is supported, which you can then use to apply the background rule conditionally when the browser supports it:
How to use custom CSS?
CSS code can be placed in your (child) theme's style.css file. Alternatively, you can add it manually between
<style>tags in the<head>section, in your (child) theme's header.php file. You can also load it with a hook in your (child) theme's functions.php file, or in the Custom Hooks add-on. To load the code only on pages with facets, use thefacetwp_scriptshook. To load it on all pages, usewp_headorwp_footer. Or you can use a code snippets plugin. More info.webp .element { background-image: url("/wp-content/uploads/WebPImage.webp"); }
For more information, this CSS-Tricks article gives a good overview of all aspects of using WebP.
You can also use images optimization plugins that support automatic WebP conversion with JPG fallback.
PNG
For more graphical images with fewer colors, PNG is often a much better format if you want to reduce file size. Mostly graphic illustrations, logos, etc. are good candidates for PNGs. Besides being a lossless format, the advantage of PNGs is that they can be partially transparent. Make sure to optimize your PNGs to reduce their size even further.
SVG
Logos and other vector-based images (created in vector image programs like Adobe Illustrator, Affinity Designer, Sketch, or Figma) can best be served as SVG. SVGs are very lightweight and because they are vector-based, infinitely scalable. SVGs are supported in all major browsers but using them properly on the web is a whole topic in itself.
Optimize your images before uploading
The first step in reducing image file weight is to prepare your images properly before uploading. First, determine the largest size (mostly width) that an image is used on the page (in pixels) and crop your image to that size. Then compress the image to an acceptable quality level. Photoshop and Affinity Photo are the most versatile tools, but there are also many online photo editors to do this with. For JPGs choose a quality level of less than 100%. Generally, somewhere between 60 – 75% is a good base level to retain visual quality and reduce the file size enough. For small images, the quality level can be set lower.
PNGs can be optimized dramatically with tools like TinyPNG (which also optimizes JPEGs and WebP). TinyPNG also has good desktop client apps, like TinyPNG4Mac (for macOS) and tinyPNG.app (for macOS, Windows and Linux). You can also drop a whole directory of images in these apps, and upload the optimized and weigh-reduced set.
You can also use images optimization plugins to do this automatically on every image upload and/or on your whole image library (or a selection) after upload.
Use the optimal image size in your templates
When you upload your rightly sized and optimized image to WordPress, WordPress creates different file size for that image. By default it creates four different sizes:
- Thumbnail size: 150px (square). Parameter name:
thumbnail - Medium size: Max width and height of 300px. Parameter name:
medium - Large size: Max width and height of 1024px. Parameter name:
large - Full size: The original size of your image. Parameter name:
full
The different sizes can be used in your theme’s templates. For example, it would make sense to use the above default “medium” size for featured images of posts in a grid (if they are never more than 300px wide). In your templates and loops, you can specify the name of the size to use as a size parameter of the function, in for example the_post_thumbnail().
If the above default values are not working for your layouts, the width and height of these four sizes can be changed in WordPress Settings > Media, so if you need Medium images to be 400px, that is a simple change to make.
Be aware that if you change the size, or add additional custom sizes, WordPress does not automatically change the size of already uploaded images or add the new custom size. But as always, there is a plugin for that: Regenerate Thumbnails or Image Regenerate & Select Crop. You can also regenerate images with WP-CLI.
If the default four WordPress image sizes do not cover every scenario in your theme, or you need more control, like fine-tuning the way images are cropped to the defined width and height, you can use WordPress’ built-in add_image_size() function. Some themes also offer settings to add additional custom image sizes.
Use responsive images with the srcset attribute
In version 4.4, WordPress added support for responsive images with the srcset attribute.
What this comes down to is that the browser is given the option to select and display the optimal image size for the layout in the viewport of the device the page is displayed in.
By default, WordPress generates the srcset attribute for every image used in the content area of pages and posts (or any content run through the the_content filter), based on the available image sizes.
In the HTML source this results in something like this:
<img src="image-1024x696.jpg" width="1024" height="696" class="alignnone size-large"
        srcset="image-300x204.jpg 300w,
        image-768x522.jpg 768w,
        image-1024x696.jpg 1024w"
        sizes="(max-width: 1024px) 100vw, 1024px"
        alt="Alt text">
If you want to use srcset outside the body content, you need to either customize the theme you’re using or find a theme that implements it. If this is not documented, you can check it manually by looking at the source of a page with images.
To manually implement the srcset attribute for images outside the editor, you can use the wp_get_attachment_image_srcset function together with get_the_post_thumbnail_url() or get_post_thumbnail_id() to construct your <img> tags:
How to use custom PHP code?
PHP code can be added to your (child) theme's functions.php file. Alternatively, you can use the Custom Hooks add-on, or a code snippets plugin. More info
<?php $post_thumbnail_id = get_post_thumbnail_id(); // Returns the attachment id $post_thumbnail_srcset = wp_get_attachment_image_srcset( $post_thumbnail_id, 'medium' ); // The first argument is the attachment id and the second is the lowest size that will be included in the the srcset. ?> <img src="<?php echo esc_url( get_the_post_thumbnail_url() ); ?>" srcset="<?php echo esc_attr( $post_thumbnail_srcset ); ?>" alt="My post thumbnail" >
Note that by default wp_get_attachment_image_srcset() will not return an image larger than 1600px.
For more control and refinement, you could even go further and use the HTML5 picture element, with which you can use mediaqueries to tell the browser when to use which image size. The <picture> HTML element is well-supported in all modern browsers.
For a good overview on how srcset works, see this article on alistapart. And see for example this Smashing Magazine article to learn about how to leverage srcset for image performance optimization in WordPress.
Serve images with lazy loading
Lazy loading is a technique that loads the visible content but delays the downloading and rendering of content that appears out of view, “below the fold”. It can have a profound impact on page loading speed if you have lots of images below the fold. You can use plugins like a3 Lazy Load and Lazy Load by WP Rocket to implement lazy loading in WordPress.
Over the years, native lazy loading is slowly being adopted in browsers themselves. Native lazy loading doesn’t rely on JavaScript like the above mentioned plugins. You can add native lazy loading to your templates and content simply by adding a loading="lazy" attribute to <img> and <iframe> tags.
The good news is that since version 5.5, WordPress adds the lazy loading attribute automatically (which can be disabled with the “wp_lazy_loading_enabled” filter).
Use image optimization plugins
There are a lot of good image optimization plugins that combine several or more of the above techniques for resizing, compressing, converting formats and regenerating of image sizes in your Media library. For a few suggestions see our tools section below.
Eliminate Render-Blocking JavaScript and CSS
Advanced page optimization can be achieved by loading specific JavaScript and CSS files “asynchronously” or “deferred”, meaning later in the page loading process because they are not needed right away or only for content “below the fold”. This way they are not blocking the rendering process of the visible part of the page.
Render-blocking JavaScript
For JavaScript files this can be achieved by adding either the defer or the async attribute to the script elements.
The defer attribute tells the browser to wait with downloading the file until HTML parsing is completed. Once the browser is finished with the HTML it will then download and render all deferred scripts in the order in which they appear in the document.
The async attribute tells the browser to start downloading the resource immediately, at the same time, without slowing down HTML parsing. Once the resource file is available, HTML parsing is paused so the resource can be loaded.
Render-blocking CSS
Eliminating render-blocking CSS is a more complicated topic. It can be tricky because you have to be careful not to delay CSS that is needed to render the visible, “above the fold” content. The idea of this technique is to render above-the-fold content with CSS that is delivered inline in the HTML. Then use the “media” attribute on the CSS link elements to identify CSS files that should be conditonally loaded, only for specific devices or situations. The remaining CSS files should then be loaded asynchronously, by adding them with deferred or asynchronous JavaScript.
Diagnosing render-blocking issues
This can all get very complicated quickly. Fortunately, optimization plugins like WP Rocket and Autooptimize offer settings to defer and async scripts and CSS. But be aware that loading scripts with async or defer can change the loading order and timing of scripts, which can lead to problems with other scripts or plugin not working correctly anymore. So use this with caution and make sure to test all functionality after you implement this.
You can check if your page has render-blocking resources with Google PageSpeed Insights or one of the alternative tools mentioned below.
To read more about testing for and eleminating render-blocking resources check for example this Kinsta article.
Use resource hints and directives
Resource hints and directives such as preload, dns-prefetch and preconnect can offer performance benefits by prefetching and preloading certain resources.
Preload
Preload offers control on how certain resources are fetched. It allows resources initiated via CSS or JavaScript to be preloaded and defines when each resource should be applied. Generally it is best to preload your most important resources such as images, CSS, JavaScript, web fonts and icon fonts.
Here is an example of preloading a font. If you are preloading links with CORS-enabled resources you need to include the crossorigin attribute:
<link rel="preload" href="https://example.com/fonts/font.woff" as="font" crossorigin>
Prefetch vs preload
Prefetch is a hint to the browser that a resource might be needed, but delegates deciding whether and when loading it is a good idea or not to the browser.
The difference with preload is that preload is a declarative fetch, allowing you to force the browser to make a request for a resource without blocking the document’s onload event, whereas prefetch is more a suggestion. This Medium article goes into the exact differences.
DNS-prefetch
DNS prefetch performs a DNS lookup in the background before a user clicks on a link, which can help improve performance. It is only effective for DNS lookups on cross-origin domains. You can enable this by adding a link tag with a rel="dns-prefetch" attribute in the head of your WordPress site for resources like your CDN’s URL, Google Fonts, or Google Analytics:
<link rel="dns-prefetch" href="//cdn.domain.com/">
<link rel="dns-prefetch" href="//fonts.googleapis.com/">
<link rel="dns-prefetch" href="//google-analytics.com">
Preconnect
Preconnect allows the browser to make an early connection, before an HTTP request, eliminating round-trip latency and saving time. Preconnect can be implemented by adding a link tag with a rel="preconnect" attribute to linked resources in the head of your WordPress site. You can use this for example for your CDN’s URL or Google Fonts. It can safely be used together with dns-prefetch:
<link rel="dns-prefetch" href="https://fonts.googleapis.com/">
<link rel="preconnect" href="https://fonts.googleapis.com/" crossorigin>
Browser support for resource hints varies.
KeyCND has a good overview of all types resource hints.
Diagnostic and optimization tools
There are many tools that can help you diagnose and optimize above mentioned page loading and performance issues. Below is an overview of tools mentioned above:
Server and DNS tools
Tools to test server features like HTTP/2, Gzip/Brotli compression, and DNS performance:
- KeyCDN HTTP/2 test: check if you server has HTTP/2 enabled.
- DNSperf: benchmark the performance of your DNS provider
- Gzip compression test: test if your server sends Gzip compressed files.
- Gzip + Brotli compression test: test if your server sends Gzip or Brotli compressed files.
- KeyCDN Brotli compression test: test if your server sends Brotli compressed files.
WordPress, theme and query tools
Tools to test the performance of WordPress, your theme and database queries:
- Query Monitor plugin (website): diagnose, debug and test PHP warnings and errors, page load speed, database queries, slow and duplicate queries, API calls and much more. See our tutorial on how to use Query Monitor to optimize performance.
- Debug Bar plugin: adds a debug menu to the admin bar that shows query, cache, and other helpful debugging information. Also tracks PHP warnings and notices, and MySQL queries. Warning: remove the required “SAVEQUERIES” constant from wp-config.php when finished, as it can have a performance impact.
- Log HTTP Requests plugin: discover and eliminate blocking HTTP requests by checking the log of all WP Core, plugin, theme and AJAX based WP_HTTP requests (like update checks) and see how long they take to run.
- Xdebug: Xdebug is an extension for PHP you can use to debug your PHP code and analyze performance of your scripts. Read this article for a thorough introduction.
- WP Crontrol plugin: view and manage all cron jobs scheduled on your site.
- Crontab Generator: generate correct cron job syntax.
- String locator plugin: search and find strings in your themes, plugins and WordPress core. You can also make file edits directly in your browser.
- Disable Emojis plugin: disable WordPress emoji support.
Plugin performance profiling tools
Tools to test the performance of your plugins:
- Code Profiler plugin: test execution time and performance of your plugins.
- P3 Plugin Performance Profiler plugin: alternative to test execution time and performance of your plugins.
Database optimization and MySQL tools
Tools to manage, optimize, repair and clean your database tables from unused, orphaned or duplicate data:
- Database My Admin: a database browser or manager tool for (MySQL and MariaDB). An alternative to using phpMyAdmin.
- Enable Database Tools plugin: enables optimization and repair of InnoDB and MyISAM tables using WordPress’ built-in database tools.
- WP Optimize plugin: performance plugin for cleaning your database, caching and compressing your images.
- WP Sweep plugin: clean your database tables of unused, orphaned or duplicate data.
- Advanced Database Cleaner plugin: clean your database tables of unused, orphaned or duplicate data.
- ODAR plugin: clean and optimize your database.
- Mysqltuner: tool to determine the optimal MySQL server variables to increase performance and stability.
- Simple MyISAM to InnoDB plugin: convert your database storage engine type from MyISAM to InnoDB.
Code compressing tools
Tools for compressing/minimizing your CSS, JavaScript and HTML:
- JavaScript compression/minification
- CSS compression/minification
- Autooptimize plugin: concatenates, minifies and compresses scripts and styles, minifies HTML, adds expires headers, caches them, moves styles to the page head, and scripts (optionally) to the footer.
Fonts and icon tools
Tools for optimizing your web fonts and icon fonts:
- Google-webfonts-helper: converts Google fonts to self-hostable web fonts plus CSS needed.
- Icomoon app: a tool to create custom, minimized font icon sets.
- Font Face Observer: optimize font loading.
Image optimization tools
Tools and plugins that combine several or more of the above image optimization techniques for resizing, compressing, converting and regenerating of images in your Media library, or before uploading:
- Imagify: resize and compress images, and convert images to WebP.
- ShortPixel Image Optimizer: versatile image compression plugin.
- Optimole: image optimization, lazy-loading and free CDN.
- WP Smush: image optimization and lazy-loading.
- Regenerate Thumbnails: regenerate all thumbnail sizes for one or more images uploaded to the Media Library.
- TinyPNG: optimize PNGs online (also optimizes JPEGs and WebP).
- TinyPNG4Mac: TinyPNG desktop client app (for macOS).
- tinyPNG.app: TinyPNG desktop client app (for macOS, Windows and Linux).
Caching and optimization plugins
Plugins that handle a combination of many of the above mentioned optimizations, including caching, in one interface:
- WP Rocket plugin: a (paid) all-in-one caching and optimization plugin, including CDN.
- WP Optimize plugin: performance plugin for cleaning your database, caching and compressing your images.
- W3 Total Cache plugin: very advanced all-in-one plugin for page caching, minification, object caching and browser caching. Also integrates with many CDNs.
- WP Super Cache plugin: offers page caching with CDN support.
- WP Fastest Cache plugin: offers page caching with CDN support, file compression and minification, adding Gzip and Expires headers.
- Cache Enabler plugin: offers page caching, minification and enabling Gzip.
Speed and performance testing tools
Services that test your website’s overall speed and performance, and give recommendations: