Advanced map customizations
The Map facet is highly customizable. This page gives an overview of possible customizations of map features, among which:
- Customize Google Maps API loading, or localize your map
- Change the map type
- Turn off specific map controls
- Reposition the map controls
- Customize map gestures behavior
- Set a custom zoom level or location/center, or Restrict the map viewport
- How to add a map to single posts or pages
To customize the Advanced Markers, and read about how to use JavaScript map marker hooks and functions, see this page:
To customize the behavior and icons of the built-in marker clusterer and Overlapping Marker Spiderfier features, see these pages:
Customize Google Maps API loading
FacetWP loads the Maps JavaScript API asynchronously, using Dynamic Library Import. The loading parameters can be customized or overwritten, with the facetwp_gmaps_params hook.
Of the required and optional parameters, FacetWP only uses key (the Google Maps API key and v, the version of the API to load. Both can be set/overwritten with the facetwp_gmaps_params hook, as shown below.
Optional parameters you can add, include language and region, preloaded map IDs, and some others.
Set your Google Maps API key programmatically
Your Google Maps API key can be set programmatically (instead of using the FacetWP setting) as follows:
How to use custom PHP code?
PHP code can be added to your (child) theme's functions.php file. Alternatively, you can use the Custom Hooks add-on, or a code snippets plugin. More info
add_filter( 'facetwp_gmaps_params', function( $params ) { if ( isset( $params['key'] ) ) { $params['key'] = 'your-api-key'; // Your Google Maps API key. Overwrites the FacetWP setting. } return $params; } );
Note that the Google API key can also be added in wp-config.php.
Set the Maps JavaScript API version to load
To customize the version (the version number or release channel) of the loaded Maps JavaScript API, use the v parameter.
FacetWP uses the quarterly release channel by default because it is the most predictable and thus stable/safe.
How to use custom PHP code?
PHP code can be added to your (child) theme's functions.php file. Alternatively, you can use the Custom Hooks add-on, or a code snippets plugin. More info
add_filter( 'facetwp_gmaps_params', function( $params ) { if ( isset( $params['v'] ) ) { $params['v'] = 'weekly'; // default = 'quarterly' } return $params; } );
Localize your map
By default, the Maps JavaScript API uses the user’s preferred language setting as specified in the browser. However, if you want to explicitly set a fixed language and/or region for the map, you can use the language and region parameters.
If you explicitly set a specific language parameter, it will affect the names of map controls as well as the responses to API service requests. See the list of supported languages you can use.
The region parameter makes the map serve different map tiles and bias the map application (such as biasing geocoding results towards the region). The region parameter accepts Unicode region subtag identifiers which (generally) are the same as the country code Top-Level Domains (ccTLDs). There are exceptions, like for the UK, for which the region identifier is “GB”.
It is recommended to use the language and region parameters together, as it will give better results for all Google Maps services.
The following example sets the map’s language to Dutch, and its region to The Netherlands:
How to use custom PHP code?
PHP code can be added to your (child) theme's functions.php file. Alternatively, you can use the Custom Hooks add-on, or a code snippets plugin. More info
add_filter( 'facetwp_gmaps_params', function( $params) { $params['language'] = 'nl'; // Set Dutch as language $params['region'] = 'NL'; // Set The Netherlands as region return $params; } );
Preload Map ID configuration
To tune network performance, it is possible to pass your Map ID(s) to the map parameters, causing the configuration for the specified Map ID(s) to be preloaded.
Note that this parameter is only for preloading the Map ID configuration. If you want to programmatically set your Map ID (instead of setting it in the Map facet’s “Map ID” setting), see this section.
How to use custom PHP code?
PHP code can be added to your (child) theme's functions.php file. Alternatively, you can use the Custom Hooks add-on, or a code snippets plugin. More info
add_filter( 'facetwp_gmaps_params', function( $params ) { $params['mapIds'] = 'your-map-id'; // Your map ID. Use a comma-separated string to preload multiple Map IDs return $params; } );
Use your own Google Maps JavaScript API script
If your theme or another plugin already loads the Google Maps JavaScript API, you’ll have to choose which instance to use: that one or FacetWP’s instance.
We recommend using FacetWP’s (asynchronously loading) instance, and disabling the non-FacetWP instance. But you may have reasons to want to use the other instance instead.
If the non-FacetWP instance loads first on the page, the map will still work in most cases, but you’ll see this warning in the browser Console, indicating that FacetWP’s instance is ignored:
The Google Maps JavaScript API only loads once. FacetWP's instance is ignored.
To get rid of this warning, you can prevent FacetWP’s instance from loading entirely, by using the facetwp_load_gmaps hook, like this:
How to use custom PHP code?
PHP code can be added to your (child) theme's functions.php file. Alternatively, you can use the Custom Hooks add-on, or a code snippets plugin. More info
add_filter( 'facetwp_load_gmaps', '__return_false', 10 );
If you do this, and the non-FacetWP instance uses a legacy (non-async) direct script loading tag, make sure it loads the Places API (that FacetWP needs for the Proximity facet), by including the libraries=places parameter like this:
How to use custom JavaScript code?
JavaScript code can be placed in your (child) theme's main JavaScript file. Alternatively, you can add it manually between
<script>tags in the<head>section of your (child) theme's header.php file. You can also load it with a hook in your (child) theme's functions.php file, or in the Custom Hooks add-on. To load the code only on pages with facets, use thefacetwp_scriptshook. To load it on all pages, usewp_headorwp_footer. Or you can use a code snippets plugin. More info<script src="https://maps.googleapis.com/maps/api/js?libraries=places&key=AIzaSyBFbgc6KDTw2tlcFO3fYHx91fFHtaUDpYs&v=quarterly"></script>
Note that if the non-FacetWP instance uses the above legacy way of loading, you’ll see this warning in the Console:
Google Maps JavaScript API has been loaded directly without loading=async. This can result in suboptimal performance. For best-practice loading patterns please see https://goo.gle/js-api-loading
Despite this warning, at the time of writing, this legacy way of loading still works fine with the Map facet add-on in our tests. But be aware that FacetWP itself loads the Maps JavaScript API the recommended way, which is asynchronously, using Dynamic Library Import.
Change the map type
Google maps can be displayed in four different basic map types:
roadmapdisplays the default road map view.satellitedisplays Google Earth satellite images (see warning banner below).hybriddisplays a mixture of normal and satellite views.terraindisplays a physical map based on terrain information.
The default map type is roadmap, which the user can change to the other map types with a Map Type Control (see below) in the left top corner of the map. You can set any of the four map types as default. The following code sets the map type to terrain:
How to use custom PHP code?
PHP code can be added to your (child) theme's functions.php file. Alternatively, you can use the Custom Hooks add-on, or a code snippets plugin. More info
add_filter( 'facetwp_map_init_args', function ( $args ) { $args['init']['mapTypeId'] = 'terrain'; // valid options are: roadmap, satellite, hybrid, terrain return $args; });
Customize the map controls
Turn off the map controls
Google Maps display several UI elements to allow user interaction with the map. These elements are known as “controls”.
The default controls can be individually, or all removed with the following code. To enable only some controls, set disableDefaultUI to true, then enable the desired controls individually after that by setting them to true.
How to use custom PHP code?
PHP code can be added to your (child) theme's functions.php file. Alternatively, you can use the Custom Hooks add-on, or a code snippets plugin. More info
add_filter( 'facetwp_map_init_args', function ( $args ) { $args['init']['zoomControl'] = false; // Disable +- Zoom control. The default in the quarterly channel *before* end of May 2025 (v.3.59 and earlier). $args['init']['cameraControl'] = false; // Disable camera control (pan + zoom). Replaced the Zoom control from end of May 2025 in the quarterly channel (v.3.60+), see explanation below. $args['init']['mapTypeControl'] = false; // Disable Roadmap / Satellite toggle $args['init']['streetViewControl'] = false; // Disable Street view / yellow man / pegman icon $args['init']['fullscreenControl'] = false; // Disable Full screen icon // This overwrites all five lines above and will disable ALL of the default ui icons instead of the individual icons above. $args['init']['disableDefaultUI'] = true; // Disable the default ui return $args; } );
Use the new Camera control
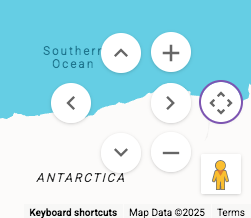
The new Camera control makes panning and zooming the map accessible with a single gesture. This new control features buttons for panning and zooming the map in and out, effectively being a single control to guide the map’s viewport.
This new Camera control replaced the Zoom control (the stacked square + and - buttons) as the default control. This change was introduced in version 3.60 of the Google Maps JavaScript API, which was the default version at the end of May 2025 for the quarterly channel (which FacetWP uses by default). If you need more time to adapt to the new Camera control, change the version to 3.59, which will be available until February 2026.
Notes about using the cameraControl option (see above for how to set these):
- If you set
zoomControlexplicitly totrue, both the Zoom control and the Camera control will be displayed. Consider choosing one to save on map space. - If you set
zoomControlexplicitly tofalse, you may also want to disable the Camera control by settingcameraControltofalse - If you set
zoomControlexplicitly totruewhile also settingdisableDefaultUItotrue), only the Zoom control will be displayed. For better accessibility, consider enabling the Camera control instead.
Reposition the map controls
Besides turning them off, you can also reposition the map controls, with the code below.
You have to reposition each control separately, using its name in the option, as shown in line 3 of the snippet below. Use the control names from the code example above, or check the controls documentation.
It does not work to pass the documented control positions directly to the Map facet. You have to pass the number of which it is an alias:
TOP_LEFT: 1,
TOP_CENTER: 2,
TOP: 2,
TOP_RIGHT: 3,
LEFT_CENTER: 4,
LEFT_TOP: 5,
LEFT: 5,
LEFT_BOTTOM: 6,
RIGHT_TOP: 7,
RIGHT: 7,
RIGHT_CENTER: 8,
RIGHT_BOTTOM: 9,
BOTTOM_LEFT: 10,
BOTTOM_CENTER: 11,
BOTTOM: 11,
BOTTOM_RIGHT: 12,
CENTER: 13
The following example moves the “Zoom Control” (the plus-minus buttons) to the left bottom position:
How to use custom PHP code?
PHP code can be added to your (child) theme's functions.php file. Alternatively, you can use the Custom Hooks add-on, or a code snippets plugin. More info
add_filter( 'facetwp_map_init_args', function ( $args ) { $args['init']['zoomControl'] = true; $args['init']['zoomControlOptions']['position'] = 6; // 6 = LEFT_BOTTOM return $args; } );
Customize map gestures behavior
To influence how scrolling and touch events influence zooming and panning the map, you can use the gestureHandling map option.
If you set it to cooperative, scroll events and one-finger touch gestures scroll the page, and do not zoom or pan the map. Two-finger touch gestures will still pan and zoom the map.
How to use custom PHP code?
PHP code can be added to your (child) theme's functions.php file. Alternatively, you can use the Custom Hooks add-on, or a code snippets plugin. More info
add_filter( 'facetwp_map_init_args', function ( $args ) { $args['init']['gestureHandling'] = 'cooperative'; // Default: 'auto' return $args; } );
See this Google Map section on gestureHandling for code examples and demo of all options.
Set a custom zoom level or location/center
To determine the map center and correct zoom level, the map uses Google Maps’ fitBounds function. On every refresh, the map automatically pans to the center of all found markers, and zooms to the zoom level where all found markers fit within the bounds of the map. There is no easy way to change the zoom level that fitBounds ends up using after a page load or refresh.
The Map facet does have a setting called “Fallback lat / lng / zoom” where you can enter a custom center (lat/lng) and/or zoom level. These values are only used as a fallback, when no results/markers are found. In all other situations, these settings have no effect because the map uses the fitBounds function.
However, with a bit of custom code, this behaviour can be overwritten, so you can actually use the “Fallback lat / lng / zoom” setting to set a custom center and zoom level on initial page load, or on every facet refresh.
First, set a custom lat/lng and zoom level in the Map facet settings.
Then add one of the following two code snippets to your (child) theme’s function.php:
Set a custom zoom level and location/center on initial page load only
To disable fitBounds and force the custom lat/lng and zoom settings on the initial page load only:
How to use custom PHP code?
PHP code can be added to your (child) theme's functions.php file. Alternatively, you can use the Custom Hooks add-on, or a code snippets plugin. More info
add_action( 'facetwp_scripts', function() { ?> <script> document.addEventListener('facetwp-refresh', function() { if ('undefined' !== typeof FWP && 'undefined' !== typeof FWP.hooks) { let loaded = FWP.loaded; FWP.hooks.addFilter('facetwp_map/fit_bounds', function(fit_bounds) { return loaded; // force the custom lat/lng/zoom only on initial page load }); } }); </script> <?php }, 100 );
Set a custom zoom level and location/center on every refresh
To disable fitBounds and force the custom lat/lng and zoom settings on initial page load and every facet refresh:
How to use custom PHP code?
PHP code can be added to your (child) theme's functions.php file. Alternatively, you can use the Custom Hooks add-on, or a code snippets plugin. More info
<?php add_action( 'facetwp_scripts', function() { ?> <script> document.addEventListener('facetwp-refresh', function() { if ('undefined' !== typeof FWP && 'undefined' !== typeof FWP.hooks) { FWP.hooks.addFilter('facetwp_map/fit_bounds', function(fit_bounds) { return false; // force the custom lat/lng/zoom on every refresh }); } }); </script> <?php }, 100 );
If you combine one of the above code snippets with Google Map’s restriction parameter, you can also restrict the map’s viewport to specified bounds.
To only set a custom zoom level on page load, see the two sections below:
Set a custom zoom level on initial page load only
If you want to only set a custom zoom level, and leave the lat/lng determined by the fitBounds function (as explained above) intact, the above solutions that use the “Fallback lat / lng / zoom” setting, will not work. This is because if you leave the fallback lat/lng empty, it will default to 0,0 and your map will load with that location as its center.
The following code will only set a custom zoom level, only on initial page load:
How to use custom PHP code?
PHP code can be added to your (child) theme's functions.php file. Alternatively, you can use the Custom Hooks add-on, or a code snippets plugin. More info
add_action( 'facetwp_scripts', function() { ?> <script> function setCustomZoom() { google.maps.event.addListenerOnce(FWP_MAP.map, 'tilesloaded', function(){ FWP_MAP.map.setZoom(5); // Custom zoom level, set only on first page load. document.removeEventListener('facetwp-maps-loaded', setCustomZoom); }); } document.addEventListener('facetwp-refresh', function() { if( ! FWP.loaded ) { // On first page load only. document.addEventListener('facetwp-maps-loaded', setCustomZoom); } }); </script> <?php }, 100 );
Set a custom zoom level on every refresh
The following code will (re)set a custom zoom level on every facet refresh of the map:
How to use custom PHP code?
PHP code can be added to your (child) theme's functions.php file. Alternatively, you can use the Custom Hooks add-on, or a code snippets plugin. More info
add_action( 'facetwp_scripts', function() { ?> <script> document.addEventListener('facetwp-maps-loaded', function() { google.maps.event.addListenerOnce(FWP_MAP.map, 'tilesloaded', function(){ FWP_MAP.map.setZoom(5); // Custom zoom level, set on each refresh. }); }); </script> <?php }, 100 );
Set a dynamic minimum zoom level to let the map always cover its container
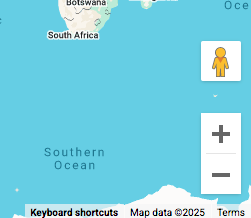
Depending on the size of the container that your map is in, it is possible that the blue “world” part of the map is not able to cover the whole map area. In this situation, you’ll see gray horizontal bars above and below the map, like in the image on the right.
This mostly happens if you have set the Map facet’s height to something much larger than its width, or if you are using a responsive map height, and the viewport gets smaller.
The only way to make sure that your map always covers its entire container is to zoom in. The easiest way to do this is to set a minimum zoom level in the Map facet’s settings. In most cases, setting the minimum zoom to 2 or 3 will fix the issue.
The more elaborate solution is to set the minimum zoom level dynamically, using the following script.
The code calculates the minimum zoom level needed to always cover the whole map container. It does this on first page load and on each resize of the map.
In line 7, you can optionally set a limit to the automatically calculated minimum zoom level. Make sure to use a value between 1 and 20. Note that in most situations, the dynamically calculated minimum zoom level needed to cover the whole map container will be somewhere between 1 and 4.
How to use custom PHP code?
PHP code can be added to your (child) theme's functions.php file. Alternatively, you can use the Custom Hooks add-on, or a code snippets plugin. More info
add_action( 'facetwp_scripts', function() { ?> <script> document.addEventListener('facetwp-maps-loaded', function() { const MAX_ZOOM = 20; // Optionally set a limit to the automatically calculated minimum zoom level. Use a value between 1 and 20. function getMinZoomToFill(map) { const container = map.getDiv(); const width = container.offsetWidth; const height = container.offsetHeight; const tileSize = 256; const zoomForWidth = Math.ceil(Math.log2(width / tileSize)); const zoomForHeight = Math.ceil(Math.log2(height / tileSize)); return Math.min(Math.max(zoomForWidth, zoomForHeight), MAX_ZOOM); } google.maps.event.addListenerOnce(FWP_MAP.map, "idle", () => { const minZoom = getMinZoomToFill(FWP_MAP.map); FWP_MAP.map.setOptions({ minZoom }); if (FWP_MAP.map.getZoom() < minZoom) FWP_MAP.map.setZoom(minZoom); let initialResize = true; // Re-compute on resize const resizeObserver = new ResizeObserver(() => { if (initialResize) { initialResize = false; return; } // Skip double re-zoom on page load (when resize fires too) const minZoom = getMinZoomToFill(FWP_MAP.map); FWP_MAP.map.setOptions({ minZoom }); if (FWP_MAP.map.getZoom() < minZoom) FWP_MAP.map.setZoom(minZoom); }); resizeObserver.observe(FWP_MAP.map.getDiv()); }); }); </script> <?php }, 100 );
Restrict the map viewport
Instead of using the “Fallback lat/lng/zoom” in the Map facet’s settings, it is also possible to restrict the map’s viewport with Google Map’s restriction parameter. With this parameter set, the user cannot pan or zoom out beyond the specified viewport bounds. Manually zooming in is still possible, within the range set with the Zoom min/max setting.
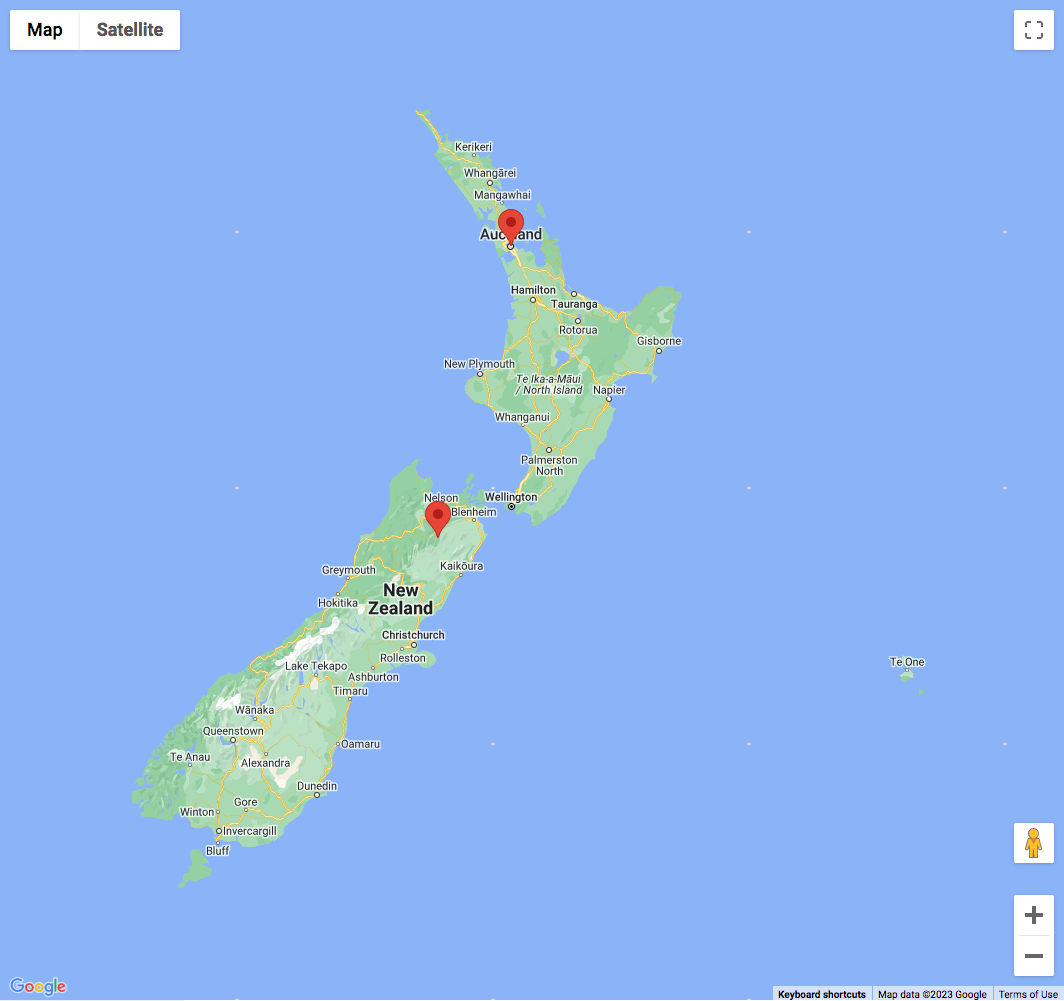
The following code example restricts the map’s viewport to the bounds of New Zealand, and sets the center to Auckland.
To make this code work, it must be combined with the above snippet to disable the fitBounds function on every refresh, otherwise the map will still try to pan and scroll when using facets, which will lead to unexpected behavior.
How to use custom PHP code?
PHP code can be added to your (child) theme's functions.php file. Alternatively, you can use the Custom Hooks add-on, or a code snippets plugin. More info
add_filter( 'facetwp_map_init_args', function( $args ) { // Auckland New Zealand $args['init']['center'] = [ 'lat' => -36.8598108, 'lng' => 174.2117363 ]; // New Zealand bounds $args['init']['restriction'] = [ 'latLngBounds' => [ 'north' => -34.36, 'south' => -47.35, 'west' => 166.28, 'east' => -175.81 ], 'strictBounds' => false ]; $args['init']['zoom'] = 6; // Is used if no Fallback lat/lng and zoom are set in the Map facet settings. See explanation below. return $args; } );
There are a few settings that determine the zoom level that is used when the map loads with a restricted viewport: the zoom parameter in line 20 of above code, and the Fallback lat/lng/zoom setting in the Map facet settings. They influence each other as follows.
If you want the map to use the exact restricted viewport when it loads, don’t use the zoom parameter and leave the fallback zoom setting empty. Or, if you use any or both of them, make sure the zoom level is lower (zoomed out more) than the equivalent of the restricted viewport: the map will never zoom out more than the restricted viewport.
To zoom into the restricted viewport on page load, you can set a higher zoom level in one or both of these settings. Be aware that they override each other as follows:
- Without the
zoomparameter set, a fallback zoom level will determine the zoom parameter, also if no fallback lat/lng is set. - With the
zoomparameter set, a fallback zoom level will override the zoom parameter, but only if a fallback lat/lng is also set.
How to add a map to single posts or pages
We often get the question if it is possible to use the Map add-on to show a map on a single page, post, or custom post type post. A use case would be to show the location of a store, hotel, restaurant, or event.
This is possible, and actually not very complicated. Just follow the steps described in this tutorial.