How to add a Map facet to single posts or pages
We often get the question if it is possible to use the Map add-on on a single page, post, or custom post type post, to display a map that only shows the location(s) of the page/post that it is on. A use case would be to show the location of a store, hotel, restaurant, or event on its own – single – page.
This is possible, and actually not very complicated, as you’ll see in this tutorial.
Overview
What is important to understand, is that a Map is technically a facet. And for any facet to work, there needs to be a FacetWP-enabled listing template on the page. Without it, facets will just not show up, because FacetWP does not have a query to “latch onto”.
So besides a Map facet, we’re going to need a listing template. Single posts/pages normally do not have a listing template or an inherent/built-in query that FacetWP can recognize and use, like WP archive templates have. But we can easily create a listing template and add it directly to one or more specific posts/pages. Or we can add it to the theme’s single post/page template, so it will show up on all posts/pages (if needed conditionally, for example by category).
In the example setup described below, we are going to use a Listing Builder listing, but you can use any of the other supported listing template types.
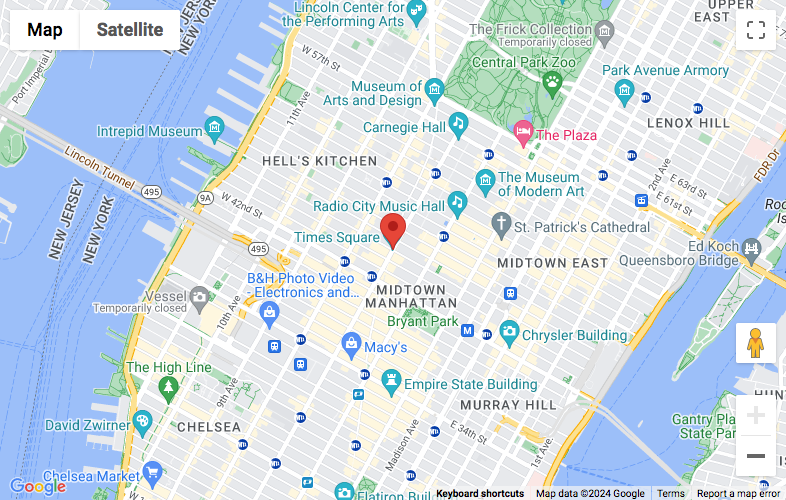
The end goal: a map with a single marker and no listing
Our end goal is a single post/page that only shows the map, with only one marker that represents the location of the post/page that the map is on:
To accomplish this, read along with the following steps:
- Create a Map facet.
- Create a listing template that retrieves only one post: the current post/page.
- Add both the Map facet and the listing to the single post/page or its template.
- Hide the listing and the map’s filtering button.
Step 1: Create a Map facet
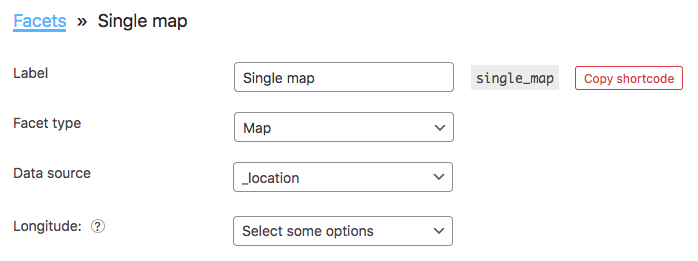
Go to Settings > FacetWP > Facets, and click “Add new” at the top. Let’s name this new Map facet “Single map”, so the grey box with the technical name becomes single_map.
The following assumes that your posts/pages have a custom field that contains the latitude,longitude value of the location you want to show on the map. If your posts/pages do not have such a field yet, you can create one. For example using Advanced Custom Fields, which has a Google Map field type specifically for this purpose. But it could also be a simple text field.
In the “Data source” setting of the Map facet, select the custom field that contains the latitude,longitude value. This can be one, comma-separated value, or – if you have both values in separate custom fields – you can use the “Data source” setting for the latitude and the “Longitude” setting for the longitude.
With a single (example) _location custom field, containing both values, the settings now should look like this:
You can set up the rest of the Map facet settings however you like. Make sure to click the Re-index button afterward.
After re-indexing, check if your Map facet has rows indexed. If not, check if you selected the correct custom field in the “Data source” setting’s dropdown (choose the one under the “ACF” heading if you are using an ACF field), and make sure your posts actually have a latitude,longitude value saved for the chosen custom field.

Because the map will show only one marker (the location of the current post/page), the map’s fitBounds() behavior will automatically zoom it in all the way to that marker. In most scenarios, this is undesirable as you’ll lose all context for the location. To prevent this, reduce the “Zoom max” setting to a number below 20.
Step 2: Create a listing
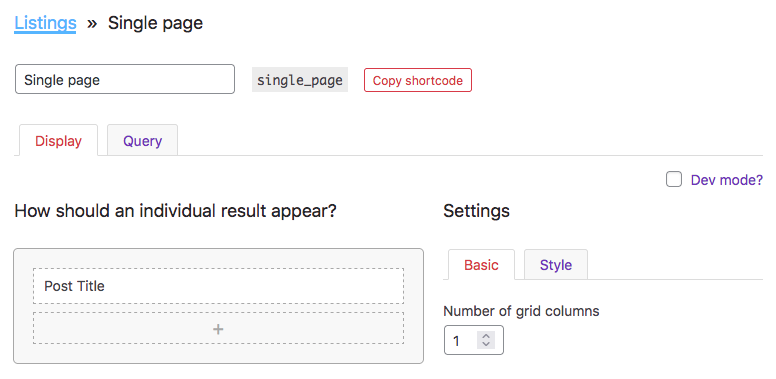
Go to Settings > FacetWP > Listings, and click “Add new” at the top. Let’s name this new listing “Single page”, so the grey box with the technical name becomes single_page.
In the “Display” tab, create only one item that shows the Post Title. Don’t add any other items, and certainly not the post content, because that will throw the server in a loop, leading to a fatal error.
You can ignore all styling settings on the right. These are irrelevant because we will hide this listing in Step 4.
After this, the “Display” tab should look like this:
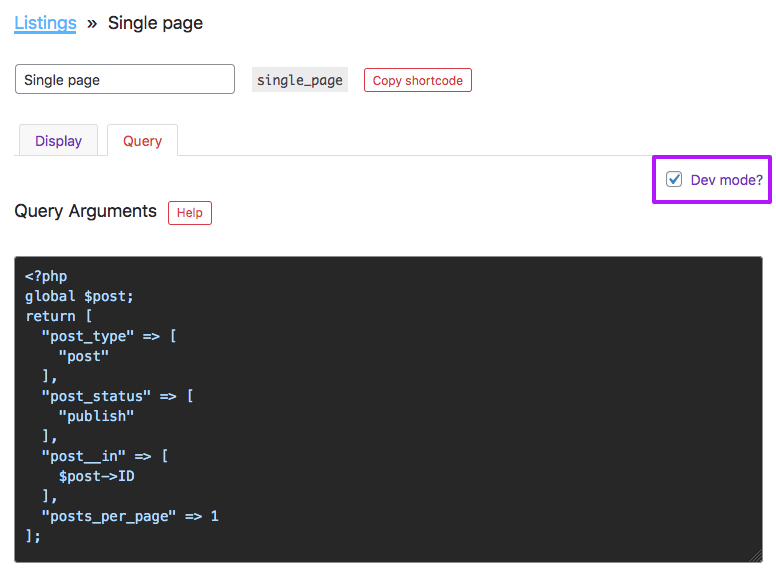
Set the query arguments in Dev mode
Next, click the “Query” tab, and the select the “Dev mode” checkbox at the top right. Copy the following code and add it to the “Query Arguments” code field:
How to use custom PHP code?
PHP code can be added to your (child) theme's functions.php file. Alternatively, you can use the Custom Hooks add-on, or a code snippets plugin. More info
<?php global $post; return [ "post_type" => [ "post" ], "post_status" => [ "publish" ], "post__in" => [ $post->ID ], "posts_per_page" => 1 ];
Make sure the post_type in line 4 reflects the post type of your single post, page or custom post type (for example product when using WooCommerce).
These arguments will make sure that this listing query only retrieves one post: the current post/page that this listing is on.
After this, the Query tab should look like this:
Step 3: Add the Map facet and listing to your single post/page
Now we will place the Map facet and listing we just created on your single post/page.
If you want the map to only appear on one specific posts/pages, you can manually add the shortcodes of the Map facet and listing to those pages:
How to use shortcodes?
Shortcodes can be placed directly in post/page edit screens. You can also add them in text/HTML widgets. The WordPress Block Editor has a Shortcode block to place them in. And most Page builders have a dedicated shortcode module/widget. In PHP templates, shortcodes can be displayed with WP's do_shortcode() function:
echo do_shortcode('[my-shortcode]');. More info[facetwp facet="single_map"] [facetwp template="single_page"]
Add these shortcodes directly in the page’s content field, or use a Shortcode block (when using the Block Editor), or a Shortcode widget (when using Elementor, Bricks or Beaver Builder).
If you are using Elementor, you can also use the FacetWP facet widget and listing widget to do this.
If you want the map to appear on all your single posts/pages, open your theme’s single post/page PHP template and add the Map facet and listing with PHP:
How to use custom PHP code?
PHP code can be added to your (child) theme's functions.php file. Alternatively, you can use the Custom Hooks add-on, or a code snippets plugin. More info
echo facetwp_display( 'facet', 'single_map' ); // Display the Map facet echo facetwp_display( 'template', 'single_page' ); // Display the Listing Builder listing with the current post
To do this conditionally, add a conditional tag. For example, to show the Map only on single posts that have a certain category, you can use has_category(), which accepts one or more category slugs or IDs:
How to use custom PHP code?
PHP code can be added to your (child) theme's functions.php file. Alternatively, you can use the Custom Hooks add-on, or a code snippets plugin. More info
if ( has_category( ['my-category-slug'] ) ) { // Change 'my-category-slug' to the slug of your category, or add more to the array. Also accepts category ID(s). echo facetwp_display( 'facet', 'single_map' ); // Display the Map facet echo facetwp_display( 'template', 'single_page' ); // Display the Listing Builder listing with the current post }
Step 4: Hide the listing and the “Enable Map Filtering” button
Last but not least, let’s hide both the listing and the Map facet’s Enable Map Filtering button with CSS, because both do not make sense with only one marker on the map. Add the following snippet to your (child) theme’s functions.php to do so:
How to use custom PHP code?
PHP code can be added to your (child) theme's functions.php file. Alternatively, you can use the Custom Hooks add-on, or a code snippets plugin. More info
add_action( 'wp_head', function() { ?> <style> body.single .facetwp-template, body.single .facetwp-map-filtering { display: none; } </style> <?php }, 100 );
The above CSS works for single posts and single custom post type posts, but not for pages. For pages, you could replace body.single with body.page but that would hide listing templates on all your pages. If you are using this only on one page, you can use the page ID class, for example: body.page-id-68436. Check your page’s <body> classes to find it.