Map
Usage instructions
In FacetWP v4.4 and newer, you can choose between two Map facet types:
- The Legacy Map facet – Needs the Map facet add-on installed.
- The new Map facet – Built into the main FacetWP plugin. Needs the Map facet add-on not installed – as described on this page.
This split was introduced to let existing users decide when to migrate to the new Map facet. Migrating to the new version is optional but recommended.
To learn more about the context of the Map and Proximity facet changes in FacetWP v4.4, and why you should consider migrating to the new versions, read the news article about the release.
How to switch to the new Map facet
In FacetWP 4.4, the Map facet was moved into the FacetWP plugin. The Map Facet add-on will not be updated anymore: version 1.2 will be the last version ever.
Existing users

As long as you keep the Map facet add-on installed, you are still using the Legacy Map facet. To migrate from the Legacy Map facet to the new Map facet, make sure to first update to FacetWP v4.4+. Then carefully follow the migration instructions, as there are many breaking changes.
To future-proof your site, we recommend migrating to the new version. But you can decide to keep using the Legacy Map facet for now, by keeping the Map facet add-on installed. It will keep working until Google decides to discontinue either the legacy (synchronous) direct script loading tag, or legacy markers (which are already deprecated since February 21st, 2024) at an unknown point in the future. We recommend keeping an eye on Google’s legacy and deprecations pages.
New users
If you are a new FacetWP or Map facet user, there is no reason to use the Legacy Map facet. Don’t install the Map facet add-on (or de-install it) and start using the new Map facet (as described on this page) right away.
Create Google maps as (filterable!) facets
The Map facet type displays a Google map on the page. The generated map shows markers that represent geocoded results from a FacetWP-enabled listing on the page. These markers can be filtered by other facets, for example by a Proximity facet. The map will automatically update its zoom/pan to include only the filtered posts.
If enabled, the map’s viewport itself can also act as a facet and filter the results in the listing, by panning or zooming the map manually.
How it works
To get a clear mental picture of how the Map facet works, it is important to understand that the map is not a listing, but a facet. It may look like a listing, as it shows posts (a marker for each), and those posts/markers will be filtered when using other facets, but it is still technically a facet.
For any facet to work, there needs to be a FacetWP-enabled listing on the page. Without it, the map (its markers) and other facets will just not show up, because FacetWP does not have a query to “latch onto”. This listing can be a Listing Builder listing or any of the other supported listing template types. If you don’t want a visible listing, you can hide it with CSS, but it still needs to be on the page for the map to function.
So, the Map facet always needs a listing, it will show a marker for each post in this listing, and these posts/markers can be filtered by using other facets. Why then is the map considered a facet? The answer is that it is not by default, but it can be. As soon as the Enable map filtering button is enabled, the map’s viewport becomes the facet filter. By panning and/or zooming the map, the listing will instantly be refreshed to only display the posts that are in the current map viewport. This feature can also be disabled, by hiding “Enable map filtering” button.
Combine a Map facet with a Proximity facet
A Map facet can be combined with any other facet to filter the posts/markers on the map. A specifically useful facet in combination with a map is the Proximity facet, which returns results within a chosen radius from the user-specified location.
When a location and radius are set (or changed) with the Proximity facet, the map will automatically zoom in or out, showing the locations that are within the radius of the set location.
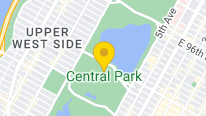
If the Proximity facet is in use, it will display a yellow marker pin at the set location. This marker pin can be customized, disabled, or excluded from marker clustering behavior).
See our Advanced map customization pages for more things you can do with the map and the Proximity facet/marker.
Available options
| Name | Description |
|---|---|
| Data source | The Data source should be a custom field containing a comma-separated latitude, longitude. Or – if you use a separate custom field for the longitude – only a latitude. See below for more info. |
| Longitude | Choose a custom field to use for the longitude value, if stored separately from the latitude (optional). See below for more info. |
| In the legacy Map integration this setting allowed you to choose a map style/design. It was also possible to use custom-made styles, added with a JSON array in a hook. This is not possible anymore. Google replaced JSON-based map styling with cloud-based map styling, based on the Map ID. See below for how cloud-based map styling works. | |
| Map ID | Using a Map ID is optional. Enter your map’s Map ID, as created in the Google Cloud Console’s “Map Management” section (see below for instructions). The Map ID allows you to choose your map’s rendering type (raster or vector), and to change your Map Style. |
| Enable filtering button label | The button text of the “Enable map filtering” button. Note: the default or changed text can be translated with the facetwp_i18n hook, with a translation plugin, or with a gettext filter. |
| Reset button label | The button text of the “Reset” button, which appears after clicking the “Enable map filtering” button. Note: the default or changed text can be translated with the facetwp_i18n hook, with a translation plugin, or with a gettext filter. |
| Marker clustering | This option will group markers that are close to each other into marker clusters, from a certain zoom level. See the “Customize marker clustering” page for more info and customization options. Note that the Map facet also has built-in support for the Overlapping Marker Spiderfier feature, to deal with overlapping markers in (almost) the same location. |
| Marker limit |
|
| Map width / height | Width and height of map. Without units, px is assumed: e.g. 300 is the same as 300px. Use other CSS units if needed, e.g. 100% for responsive full width of the parent container.
Note: don’t use If your map is not covering its whole container and is showing gray bars above and below the actual map, see the solutions below. |
| Zoom min / max | Set the minimum and maximum zoom level. The values must be a number between 1 (minimum zoom) and 20 (maximum zoom). |
| Fallback lat / lng / zoom | Set a fallback location (lat/lng) and/or zoom level. The zoom level must be a number between 1 (minimum zoom) and 20 (maximum zoom). These settings are only used when no results/markers are found. If you leave these fields empty, the default lat/lng is 0,0 and the default zoom level is 1. With some customization, this setting can also be used to set a default custom center and zoom level on load of the map. |
| Info window ajax loading | Enable to dynamically load marker info window content via AJAX, on click of the marker. This can decrease the overall load time of maps with many markers, since it prevents all the info window content from being loaded at once. It can increase the load time of individual info windows though, as their content has to be fetched on click of the marker. |
| Info window content | Enter display code (HTML and/or PHP) to create the post content that displays in the marker info window that pops up when a marker is clicked. For an example, see below.
To further customize the info windows’ content, header content, appearance, styling, width, height, or behavior, see the “Customize marker info windows” page. |
Choose a data source
The chosen Data source should be a custom field containing a comma-separated latitude, longitude value.
You can also use separate custom fields for the latitude and longitude. In this case, select the custom field for the latitude in the “Data source” setting, and the custom field for the longitude in the “Longitude” setting.
The latitude and longitude values must be a number value (technically a float value) with a . (dot) as the decimal character. Valid latitude values must be between (and including) -90.0 and 90.0. And valid longitude values must be between (and including) -180.0 and 180.0.
Using other data sources
The following plugins and themes offer dedicated location/map fields for latitude and longitude that can be used as data sources for the Map facet. Click the links for specific instructions on using these fields:
Using multiple data sources / locations per post
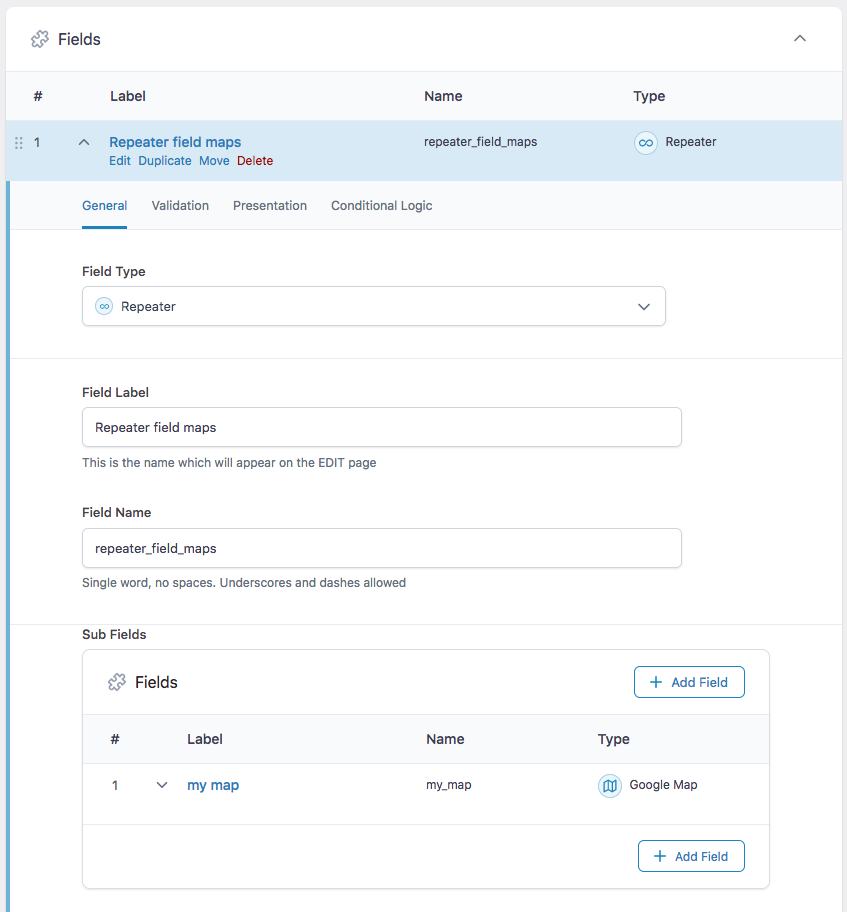
my_map in this example).It is possible to index multiple locations per post, by using a multi-value custom field, like an ACF repeater field, or for example a checkboxes/dropdown field (if you have a select number of locations to choose from).
If you use an ACF Repeater field with a Google Maps sub-field, you need to choose the Google Maps sub-field’s name from the Map facet’s Data source dropdown (my_map in the example on the right).
Make sure to always choose the field under the “ACF” heading in the Data Source dropdown.
Note that if you want to retrieve content from other custom fields within the repeater field, to display in the marker/location’s info window, you cannot do that with the “Info window content” setting. In this setting’s field only post data can be retrieved, not the data for the separate locations within the repeater. The solution is to use the facetwp_map_marker_content hook.
How to get a Google Maps API key
For the Map (and Proximity) facets to work, you need to enter a valid Google Maps API key in the “Google Maps API key” setting in FacetWP’s settings. To get, set and test your API key, follow these steps:
1. Create a Google Maps API key in Google Cloud Console
Set up Google Cloud Console and a project
To get a Google Maps API key, you need a Google Cloud Console account. If you don’t have one, set up a new account.
In your account, create a project for your website, and set up billing.
Set up billing
To be able to use the API key you are going to create, you first need to set up a Billing Account in Google Cloud Console, and add your project to it. You will need a credit card to do so.
Your account will be billed for each request to the three above APIs. However, Google offers free credits, making usage free in practice for sites that are not heavily visited.
Before March 1, 2025, Google offered a free monthly credit of $200. On March 1, 2025, this has changed to a free monthly usage threshold of 10K requests for each product. Check the pricing page and the Pricing Calculator to estimate your costs.
Note that FacetWP optimizes billing costs for the Places API (New), by using session tokens.
Enable the required Google APIs
In your project, enable the following three APIs under APIs & Services > Enable APIs and services:
- Maps JavaScript API: required for the Map / Proximity facets to work.
- Geocoding API: required for the Proximity facet’s “Locate me” button.
- Places API (New): required for the Proximity facet’s autocomplete function.
Create an API key
Next, add a new API key: in your project, go to API's & Services > Credentials, then click Create credentials > API key.
Copy the key so you can add it to the FacetWP settings later.
Click on the key name to go to the key’s settings page. Give it a descriptive name, and add some restrictions:
Restrict your API key
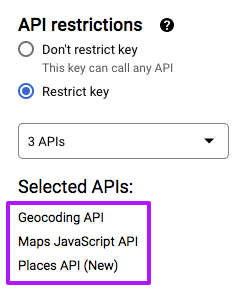
For security and to avoid being billed unexpectedly, it is strongly recommended to restrict your API key to your website’s domain, and to the above three API’s.
To do so, on the Credentials page, click on the key name to go to the key’s settings page. Set up key restrictions as desired. It is recommended to at least restrict the key to your website URL(s). Note that restricting APIs to the website’s/server’s IP address will not work. IP restrictions only work for Google web service APIs, not the JavaScript web APIs that FacetWP uses.
Next, to make sure the key can only use the needed three APIs, scroll to the bottom of the screen to “API restrictions”. Select “Restrict key” and select the above three API services, as shown in the image on the right.
Save your settings. Note that it may take up to 5 minutes for changed settings to take effect.
Control costs by setting quota limits
To avoid being billed unexpectedly, it is strongly recommended to restrict your API key, as described above.
Another way to prevent high costs is to set quota limits on your API usage.
2. Add the Google Maps API key to FacetWP
After generating an API key, add it to: Settings > FacetWP > Settings > Google Maps API key.
Both the Map facet and the Proximity facet need this key.
If the key is incorrect, or if your Google Cloud Console settings prevent your site from using it, your map show the message “This page can’t load Google Maps correctly”, and the Console will display this error: “Google Maps JavaScript API error: ApiProjectMapError”.
To test if you have set up everything correctly in the Google Cloud Console, you can use the “Test Google APIs” feature, located in FacetWP’s settings. This testing feature is available in FacetWP v4.4+.
Add the API key programmatically
Besides in FacetWP’s settings, the API key can also be set with a constant in wp-config.php:
How to use custom PHP code?
PHP code can be added to your (child) theme's functions.php file. Alternatively, you can use the Custom Hooks add-on, or a code snippets plugin. More info
define( 'GMAPS_API_KEY', 'your-api-key' );
Or with the facetwp_gmaps_api_key hook in your (child) theme’s functions.php:
How to use custom PHP code?
PHP code can be added to your (child) theme's functions.php file. Alternatively, you can use the Custom Hooks add-on, or a code snippets plugin. More info
add_filter( 'facetwp_gmaps_api_key', function( $api_key) { return 'your-api-key'; });
Or, you can use the facetwp_gmaps_params hook, which can also be used to overwrite or set other parameters, like the Google Maps update channel, or the map’s language and region.
How to use custom PHP code?
PHP code can be added to your (child) theme's functions.php file. Alternatively, you can use the Custom Hooks add-on, or a code snippets plugin. More info
add_filter( 'facetwp_gmaps_params', function( $params ) { $params['key'] = 'your-api-key'; return $params; } );
Add the Google Maps API key to Advanced Custom Fields
If you are using the Advanced Custom Fields Google Map field as the data source, make sure you pass the same Google Maps API key into ACF. ACF needs the Google Maps API in the backend to geolocate the address entered for each post.
Add the Google Maps API key to Listify, Listable, WP Job Manager
If you are using Listify theme, Listable theme and/or the WP Job Manager plugin, make sure to also add the Google Maps API key to:
(Job) Listings > Settings > Google Maps API Key
The Listify theme itself has a second settings to enter the Google Maps API key, at:
Appearance > Customize > Listings > Map settings
3. Test Google API connection
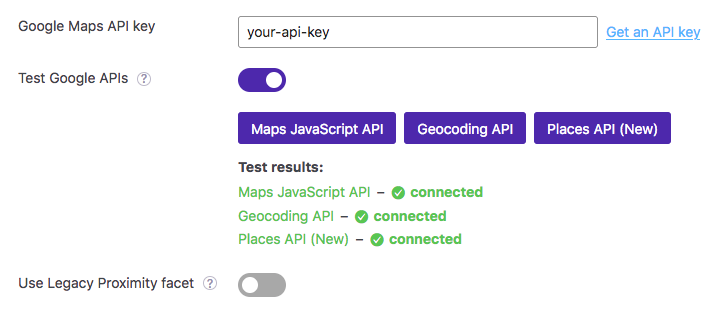
In FacetWP version 4.4+, you can test the correct connection to the above three Google APIs.
To run the test, go to Settings > FacetWP > Settings > Test Google APIs and click the test buttons. All three test results need to be green and say “connected”.
Note that if the “Use Legacy Proximity facet” setting is enabled, you’ll see an extra button to test the legacy “Places API”, which is needed for the Legacy Proximity facet. In this case, the “Places API (New)” test is irrelevant.
If any of the required three test results is red and says “connection failed”, check all API key settings and restrictions in your Google Cloud project. Make sure the three needed APIs are enabled, and available in your project.
It may take up to 5 minutes for changed Google Cloud Console settings to take effect.
Note that the Geocoding API needs the Maps JavaScript API enabled and correctly connected. If the Geocoding API test keeps failing, reload the page and/or clear your browser cache and try again.
To get more information about a failed connection, you can also check the front-end page that contains the Map/Proximity facet(s). Make sure to clear your browser cache first. Then open the browser console, reload the page and check for errors happening before, during or after using the facet(s). If you see any errors, you can look up the meaning of the error message.
Using a Google Map ID
In Google Cloud Console, it is now possible to manage your Google Maps, in the new “Map Management” section. Each map you add there will have a unique “Map ID” and can have its own settings, like a rendering type and Map Style.
If you enter the created Map ID in the “Map ID” setting of your Map facet (which is optional), your FacetWP map can be managed from the Cloud Console, and will take on the selected rendering type and Map Style.
To manage your maps and create a new Map ID, follow these steps:
- Log into Google Cloud Console and open your project. (Or, if you have not done so already, first open an account and set up your project and Google Maps API key.)
- In your project settings go to
API's & Services > Maps JavaScript API
and open “Map Management” in the left navigation column. -
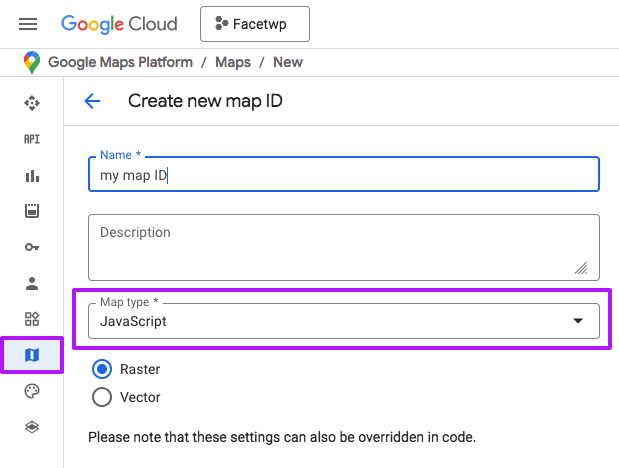
Create a new Map ID in the Map Management section. Set the map type to “JavaScript”, and choose rendering type (Raster or Vector). 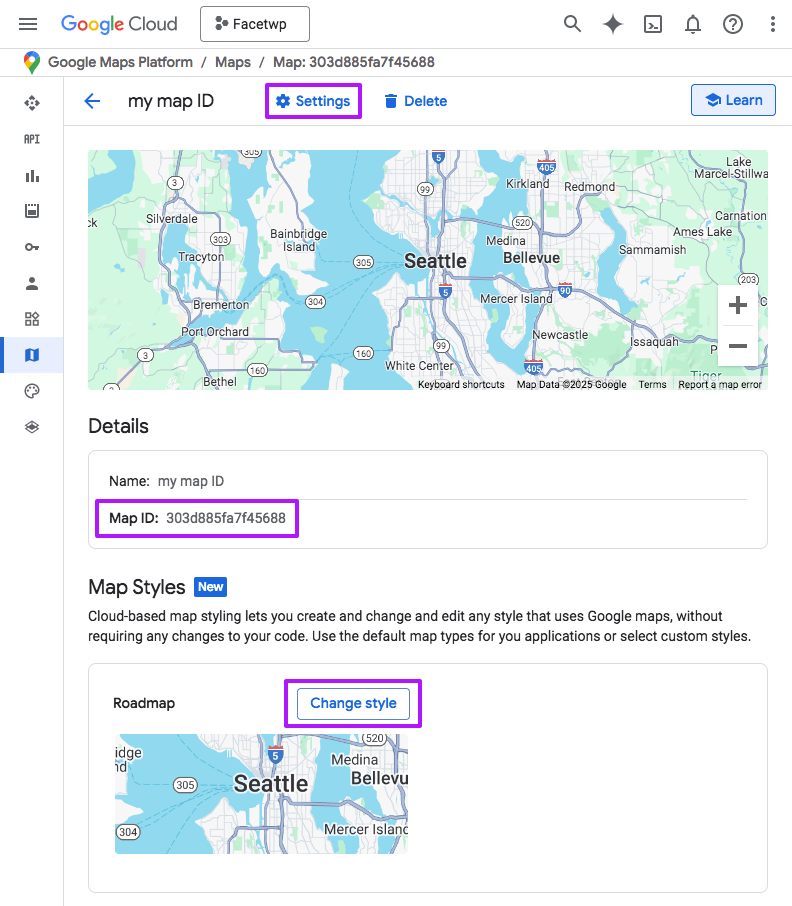
The Map ID settings window with the Map ID. Click the Settings link at the top to set the rendering type. Click “Change style” to select a pre-made Map Style. Click “Create map ID” at the top, choose a descriptive name, and set the “Map type” dropdown to “JavaScript”. This will open a new setting that let’s you choose between “Raster” and “Vector” rendering. See the explanation below for more info about these two rendering types. For now, set to the default “Raster” option (you can change it later), and click Save.
- Now you’ll see your newly created Map ID in the overview screen, with its name and the actual “Map ID” (the string of random letters and numbers).
- If you click the Map ID, its settings window is opened, as shown in the image on the right. At the top is a “Settings” link, which allows you to change the name and Raster/Vector option that you set earlier. And you can select a pre-made Map Style.
- Copy the Map ID (the string of random letters and numbers, not the name), and enter it in the “Map ID” setting of your Map facet. (Or set it programmatically).
- Now your Map facet is managed from the Google Cloud Console, and it will take on the selected rendering settings and chosen Map Style. Note that it may take up to 5 minutes for changed settings to take effect.
Choose a map rendering type
In the Google Cloud Console’s Map ID settings for your map you can choose “Raster” or “Vector” rendering. Raster rendering is the default and safest option.
Vector map rendering is relatively new. It makes map rendering very fast and snappy. It also enables new features like map rotation, tilting, 3D maps features, and Fractional Zoom.
However, vector rendering uses WebGL, which is not supported in older browsers. See the Support page for more info.
If a browser does not support all needed WebGL features, the map will automatically default to raster rendering. So your map will always work, but in unsupported browsers this JavaScript error will display in the Console:
Attempted to load a Vector Map, but failed. Falling back to Raster.
Note that “Raster” or “Vector” rendering (and tilt and rotation) can also be set programmatically.
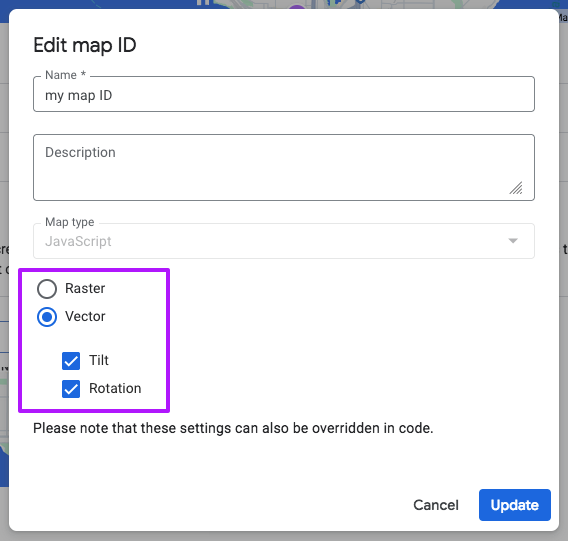
Map tilt and rotation
If you set your Map ID to use Vector rendering, you can enable map tilt and/or totation. When enabled, users can tilt and rotate the map by using Shift + arrow keys, or with gestures on touch devices.
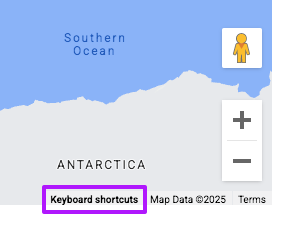
To check if tilt and rotate are enabled correctly, click “Keyboard shortcuts” in the bottom right corner of the map, and check for the four Shift + arrow key shortcuts at the bottom of the list. If you don’t see these shortcut options, be aware that it may take up to 5 minutes for changed settings to take effect.
Map tilt and rotation can also be set programmatically:
Set the Map ID and/or rendering type programmatically
You can also set your map’s Map ID and/or rendering type (Raster or Vector) programmatically, with the facetwp_map_init_args hook.
If you set renderingType to VECTOR, you can enable tilt and rotation programmatically too.
Note that using these arguments will overwrite the “Map ID” setting, and the rendering settings for the Map ID in the Cloud Console’s Map Management section.
How to use custom PHP code?
PHP code can be added to your (child) theme's functions.php file. Alternatively, you can use the Custom Hooks add-on, or a code snippets plugin. More info
add_filter( 'facetwp_map_init_args', function ( $args ) { // Set your Map ID $args['init']['mapId'] = 'my-map-id'; // your Map ID, as set in Google Cloud Console's Map Management section. // Set a rendering type $args['init']['renderingType'] = 'VECTOR'; // valid options are: 'RASTER' (default) and 'VECTOR' // Optional: enable tilt and/or rotation (only available on VECTOR maps) // Use tilt/rotation with the 'keyboard shortcuts' link under the map $args['init']['tiltInteractionEnabled'] = true; // Enable tilt $args['init']['headingInteractionEnabled'] = true; // Enable rotate return $args; });
Preload Map ID configuration
To tune network performance, it is possible to pass your Map ID(s) to the map loading parameters, causing the configuration for the specified Map ID(s) to be preloaded.
Use a custom Map Style
In the Legacy Map facet (with the Map facet add-on installed), you could select a Map design in the settings, or you could create your own map designs, for example with the Google Map style wizard. You could also use JSON styles created by others.
Unfortunately, this is no longer possible. Google replaced JSON-based map styling with cloud-based map styles, which are reusable styles created in the Cloud Console, and associated with one or more Map IDs.
Follow these steps to create a Map Style and attach it to your map’s Map ID:
- Log into Google Cloud Console and open your project. (Or, if you have not done so already, first open an account, set up your project and create a Google Maps API key.)
- In your project settings, go to
API's & Services > Maps JavaScript API
and open “Map Management” in the left navigation column. - Make sure you have set up a Map ID for your map, and have added it to the “Map ID” setting of your Map facet. If you don’t have a Map ID yet, set it up first.
-
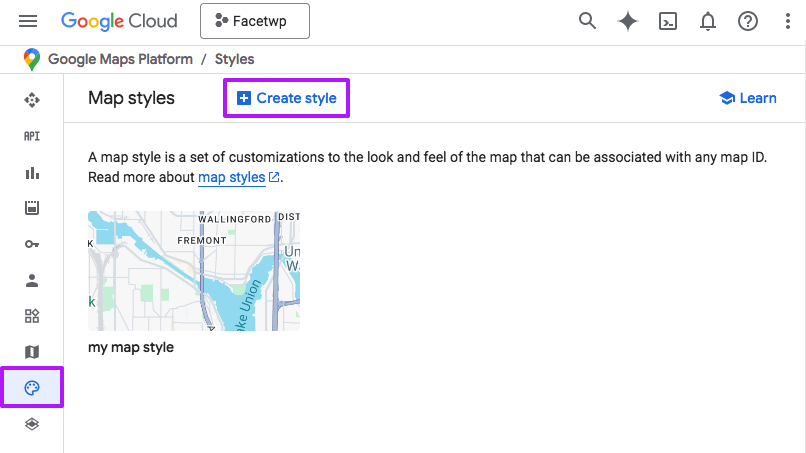
Create a new Map Style in the Map Styles section. In the navigation column on the left, go to the Map Styles section.
- Click “Create style”, select “Roadmap”, then click “Customize”. Now you can Customize the style to your liking, then save and publish it.
-
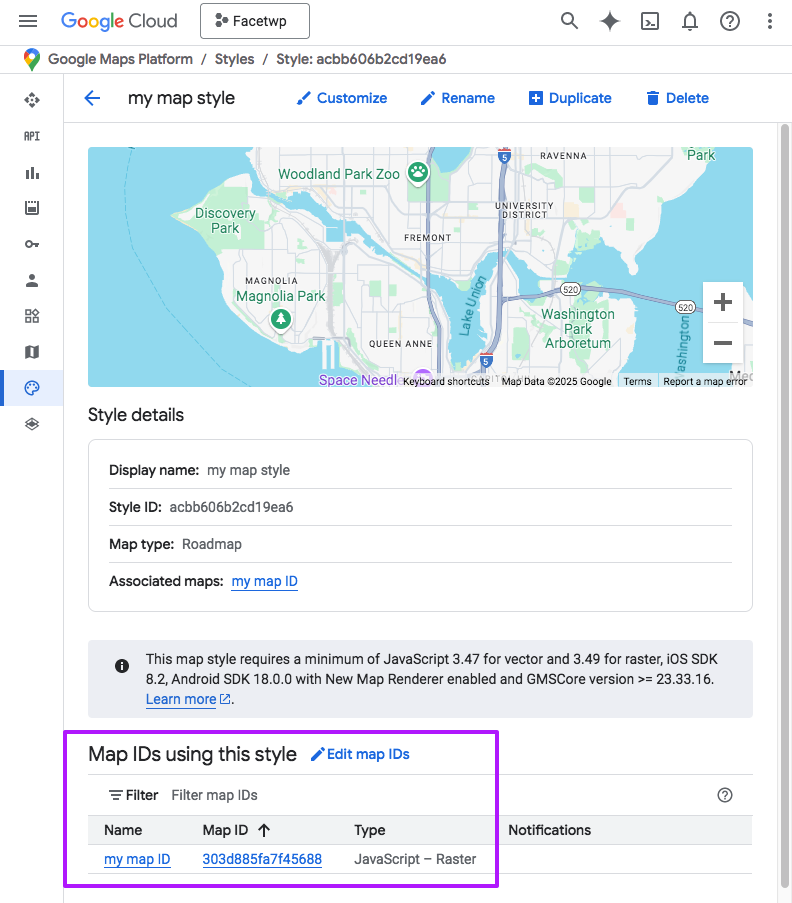
Associate a Map Style with your Map ID(s). Next, associate your Map Style with your Map ID(s). You can do this in two ways:
- In the settings of your newly-created Map Style, click “Add Map IDs” or “Edit Map ID”, and select one or more Map IDs that the style must be applied to, as shown in the image on the right.
- Or you can open the Map Management section, select your map’s Map ID, click “Change style”, and select your pre-made Map Style, as shown in the image above. Note that if you do it in this way, the Map Style must be created first, otherwise there is nothing to choose from.
- Now your Map facet should display in the selected Map Style. If you don’t see it, be aware that it may take up to 5 minutes for changed settings to take effect.
Add or customize marker info window content
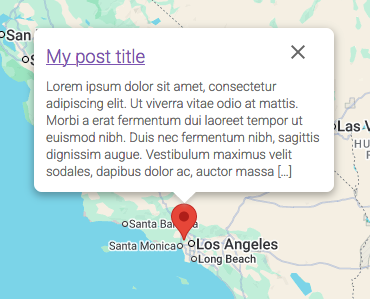
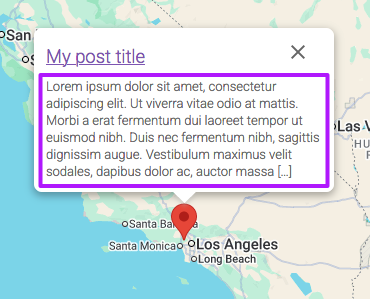
A marker info window is a standard feature that comes with the Google Maps API. It is basically an overlay that looks like a rounded speech bubble. Its content consists of text/HTML that is related to the marker’s post, and a close (‘X’) icon in the top right. The text/HTML content can be entirely customized.
Marker info windows have two types of content. To the left of the close (“X”) icon is the info window header content. And below it is its “regular” content. If there is no header content, the space to the left of the close icon will remain empty: the regular content will always appear below the close icon. You can add and customize both the info window header content and the regular content.
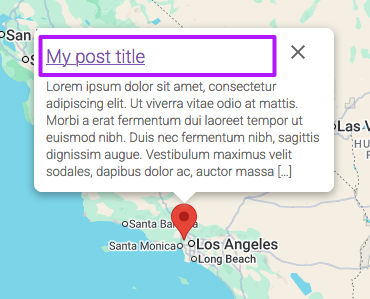
The info window header content can only be added with a hook, which is available since FacetWP v4.5.1.
The “regular” marker info window content can be added with the Map facet’s “Info window content” setting, or – for more flexibility – with a hook.
Below, we only describe the Map facet’s “Info window content” setting. To learn about more advanced ways of adding the info window content and header content, and how to customize other aspects of the info windows’ appearance and behaviour, check out the the “Customize marker info windows” page.
Add or customize marker info window content with the “Info window content” setting
The “Info window content” Map facet setting can be used to create the “regular” content of the info windows.
The setting’s field accepts HTML and PHP code, and is aware of the marker’s post data. You can use data from $post, like $post->ID.
The following example outputs the title, link, and excerpt:
How to use custom PHP code?
PHP code can be added to your (child) theme's functions.php file. Alternatively, you can use the Custom Hooks add-on, or a code snippets plugin. More info
<h3> <a href="<?php the_permalink(); ?>" title="<?php the_title_attribute(); ?>"> <?php the_title(); ?> </a> </h3> <?php the_excerpt(); ?>
If the “Info window content” setting field is too limiting, or if you can’t reach certain data with it, you can use the facetwp_map_marker_content hook to output/overwrite the content.
Customize marker info windows
To further customize the info windows’ content, header content, appearance, styling, width, height, or behavior, see the “Customize marker info windows” page.
The “Enable map filtering” button
When the “Enable map filtering” button is enabled by the user, the map’s viewport will behave like a facet filter: the results in the listing will be instantly updated whenever the map is zoomed or panned by the user. So after clicking the button, then zooming and/or panning the map, only those results (markers) that are within the map’s current viewport are shown in the filtered listing. You can see this in action in the State Parks map demo.
To understand how map filtering works exactly, you can think of the rectangular viewport of the map acting as a facet filter. When map filtering is enabled, you’ll see that the map viewport’s bottom-left, and top-right lat/lng coordinates are present in FacetWP’s URL variables as the active values of the map facet. These coordinates are updated when manually panning or zooming the map, just like any other facet updates its URL variables when making selections.
Hide the “Enable map filtering” button
Currently, there is no setting to disable the ‘Enable map filtering’ button/functionality. If you don’t want this button to show, you can hide the button with CSS:
How to use custom CSS?
CSS code can be placed in your (child) theme's style.css file. Alternatively, you can add it manually between
<style>tags in the<head>section, in your (child) theme's header.php file. You can also load it with a hook in your (child) theme's functions.php file, or in the Custom Hooks add-on. To load the code only on pages with facets, use thefacetwp_scriptshook. To load it on all pages, usewp_headorwp_footer. Or you can use a code snippets plugin. More info.facetwp-map-filtering { display: none; }
Translate the “Enable map filtering” and “Reset” button text
The text of the “Enable map filtering”, and “Reset” buttons can be changed with a setting.
Both texts can be changed or translated with a translation plugin, with the facetwp_i18n hook, or with a WordPress gettext filter:
How to use custom PHP code?
PHP code can be added to your (child) theme's functions.php file. Alternatively, you can use the Custom Hooks add-on, or a code snippets plugin. More info
add_filter( 'gettext', function( $translated_text, $untranslated_text, $domain ) { if ( 'facetwp-map-facet' == $domain ) { if ( $translated_text == 'Enable map filtering' ) { $translated_text = 'Search when moving the map'; } if ( $translated_text == 'Reset' ) { $translated_text = 'Stop searching when moving the map'; } } return $translated_text; }, 10, 3 );
Enable map filtering on load of the map
It’s possible to enable map filtering by default on load of the map, with the following code.
However, be aware that having map filtering enabled will prevent other facets – like a Proximity facet – from automatically zooming or panning the map. This can be confusing for users, even more so if it is unclear that map filtering is enabled. So it’s not a good idea to combine this with hiding the “Enable map filtering” button.
How to use custom PHP code?
PHP code can be added to your (child) theme's functions.php file. Alternatively, you can use the Custom Hooks add-on, or a code snippets plugin. More info
add_action('facetwp_scripts', function () { ?> <script> (function($) { document.addEventListener('facetwp-loaded', function() { if ('undefined' === typeof FWP_MAP) { return; } var filterButton = $(".facetwp-map-filtering"); if (!filterButton.hasClass('enabled') && 'undefined' == typeof FWP_MAP.enableFiltering) { filterButton.text(FWP_JSON['map']['resetText']); FWP_MAP.is_filtering = true; filterButton.addClass('enabled'); FWP_MAP.enableFiltering = true; } }); })(fUtil); </script> <?php }, 100);
Reset the “Enable map filtering” button on facet reset
When using a Reset facet or a User Selections facet to reset facets, Map filtering is not reset by default.
Add the following code to your (child) theme’s function.php to reset the “Enable map filtering” button when the Map facet is reset:
How to use custom PHP code?
PHP code can be added to your (child) theme's functions.php file. Alternatively, you can use the Custom Hooks add-on, or a code snippets plugin. More info
add_action('facetwp_scripts', function () { ?> <script> (function($) { FWP.hooks.addAction('facetwp/reset', function() { $.each(FWP.facet_type, function(type, name) { if ('map' === type) { var $button = $('.facetwp-map-filtering'); $button.text(FWP_JSON['map']['filterText']); FWP_MAP.is_filtering = false; $button.toggleClass('enabled'); } }); }); })(fUtil); </script> <?php }, 100);
Reset a Proximity facet when map filtering is used
If you are using a Map facet together with a Proximity facet, and you want to reset/clear the Proximity facet when the map itself is filtering (when the “Enable map filtering button” is enabled, you can use this code.
Common issues with “Enable map filtering”
If the “Enable map filtering” button is not working, make sure you have not disabled auto_refresh. That also disables the map from auto-refreshing.
Hide the listing
As explained above, the Map facet always needs a listing on the page to function properly. If you don’t want a visible listing, you can easily hide it with CSS:
How to use custom CSS?
CSS code can be placed in your (child) theme's style.css file. Alternatively, you can add it manually between
<style>tags in the<head>section, in your (child) theme's header.php file. You can also load it with a hook in your (child) theme's functions.php file, or in the Custom Hooks add-on. To load the code only on pages with facets, use thefacetwp_scriptshook. To load it on all pages, usewp_headorwp_footer. Or you can use a code snippets plugin. More info.facetwp-template { display: none; }
Be aware that this will hide all FacetWP listings on all pages. If you need it to only hide on a specific page, you need to adapt the CSS selector. For example, to hide the listing only on the page with the ID 68436, you can use the page-id-68436 body class. Check the body classes of your page to find the correct class to use.
How to use custom CSS?
CSS code can be placed in your (child) theme's style.css file. Alternatively, you can add it manually between
<style>tags in the<head>section, in your (child) theme's header.php file. You can also load it with a hook in your (child) theme's functions.php file, or in the Custom Hooks add-on. To load the code only on pages with facets, use thefacetwp_scriptshook. To load it on all pages, usewp_headorwp_footer. Or you can use a code snippets plugin. More infobody.page-id-68436 .facetwp-template { display: none; }
Set a responsive map height
If you want to set different map heights for desktop and mobile, you can use the following CSS to add one or more responsive breakpoints.
The CSS uses min-height: 100% in line 7 to set the map’s height dynamically, depending on its container element.
Line 6 will override the height set in the Map facet’s “Map width/height” setting with auto. Use the height set on the container element in line 11 as a replacement.
Next, add one or more breakpoints for different heights as desired.
If the blue “world” part of the map is not always covering the whole map area, and you see gray horizontal bars above and below the map, see the solutions described below.
How to use custom PHP code?
PHP code can be added to your (child) theme's functions.php file. Alternatively, you can use the Custom Hooks add-on, or a code snippets plugin. More info
add_action( 'facetwp_scripts', function() { ?> <style> .facetwp-type-map #facetwp-map { height: auto !important; /* Overrides the Map facet's "Map width / height" setting. */ min-height: 100%; /* Sets a flexible height that adapts the container's height */ } .facetwp-type-map { height: 1000px; /* Set the default height here instead of in the Map facet's "Map width / height" setting. */ } /* Set responsive heights as desired */ @media (max-width: 960px){ .facetwp-type-map { height: 800px; } } @media (max-width: 768px){ .facetwp-type-map { height: 600px; } } @media (max-width: 480px){ .facetwp-type-map { height: 400px; } } </style> <?php }, 100 );
Let the map always cover its container
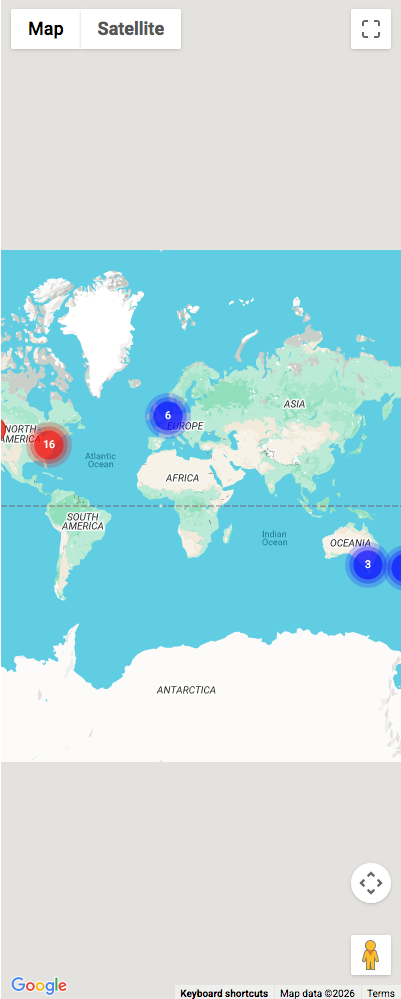
Depending on the size of the container that your map is in, it is possible that the blue “world” part of the map is not able to cover the whole map area. In this situation, you’ll see gray horizontal bars above and below the map, like in the image on the right.
This mostly happens if you have set the Map facet’s height to something much larger than its width, or if you are using a responsive map height, as explained above, and the viewport gets smaller.
The only way to make sure that your map always covers its entire container is to zoom in. The easiest way to do this is to set a minimum zoom level in the Map facet’s settings. In most cases, setting the minimum zoom to 2 or 3 will fix the issue.
The more elaborate solution is to set the minimum zoom level dynamically, using a script that calculates the minimum zoom level needed to always cover the whole container.
Advanced map customizations
Don’t miss our page with advanced map customizations, among which:
- Customize Google Maps API loading, or localize your map
- Change the map type
- Turn off specific map controls
- Reposition the map controls
- Customize map gestures behavior
- Set a custom zoom level or location/center, or Restrict the map viewport
- How to add a map to single posts or pages
To customize the Advanced Markers, and read about how to use JavaScript map marker hooks and functions, see this page:
To customize the content, appearance and behavior of marker info windows, see this page:
To customize the behavior and icons of the built-in marker clusterer and Overlapping Marker Spiderfier features, see these pages: