Advanced Custom Fields
FacetWP includes built-in support for Advanced Custom Fields (ACF). It supports basic field types (Text, Select, Checkbox, etc.), Relationship fields and even Repeater sub-fields.
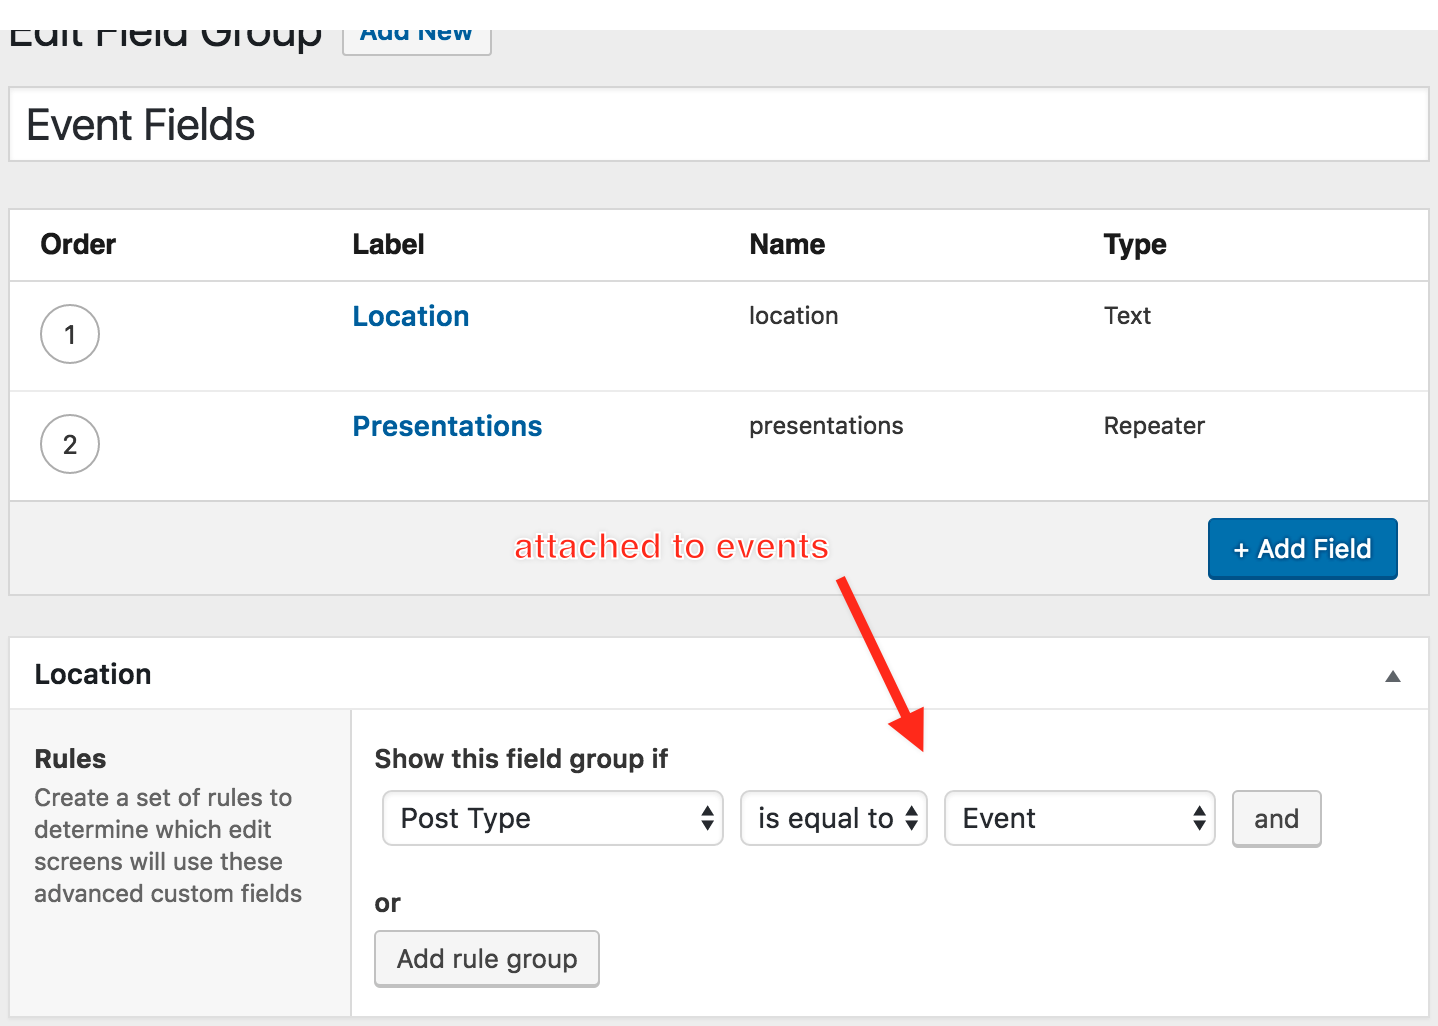
Create your field group
The first step is to create an ACF field group. In the screenshot below, we’re adding a new “Event Fields” group, and attaching it to the Event post type.
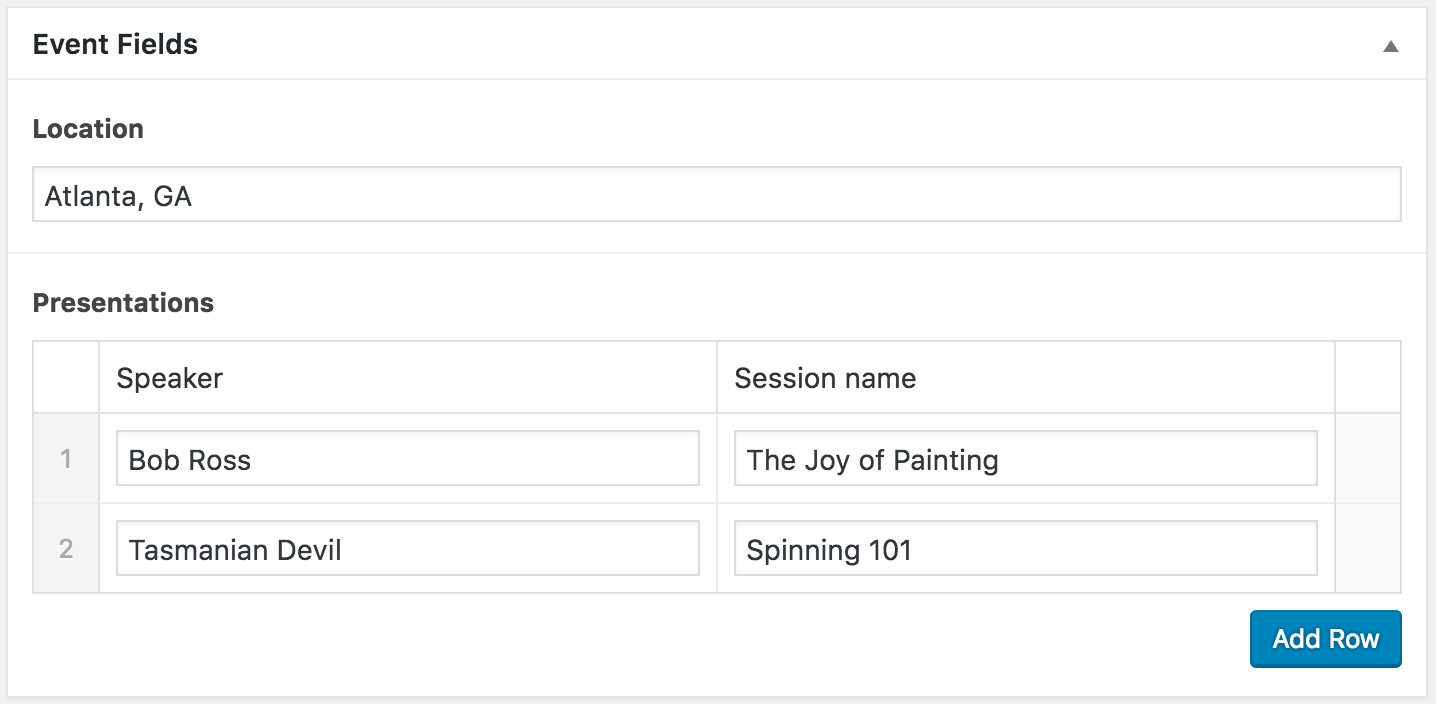
Use your field group
After you’ve added your field group, the next step would be to add some content. Edit some of your posts to make sure that your fields are appearing correctly.
Create your facet
After you’ve added some content using your new custom fields, go to Settings > FacetWP, click the Facets tab, then click the Add New button.
For the facet’s Data source, scroll down until you see the ACF heading, then select the appropriate choice.
Alternatively, use the built-in search box for quickly finding the desired field.

When deciding on an order for the facet choices, using the “Sort by” setting, know that if you choose “Term order”, this will preserve the order of ACF custom fields that have a user-defined list of choices in a specific order, like ACF Select, Checkbox, and Radio Button field types.
Using Repeater fields
Facets can be added using data from repeater sub-fields.
Repeater values are tied back to the parent post. This means that repeater rows aren’t directly filterable.
For example, let’s say you have a “Speakers” facet based on a repeater field:

If the user selects “Jim”, the other choices (Bob, Dan) will remain too. This is because the 3 choices are tied to the parent post.
Using Advanced Custom Fields with a Map facet or Proximity facet
If you are using Advanced Custom Fields with a Map facet or Proximity facet, you can use ACF’s Google Map field type to attach a location to your posts. If you use this ACF field, in the Map / Proximity facet’s “Data source” settings choose this field underneath the “ACF” header.
If your locations don’t show up on the map when using an ACF Google Maps field, make sure the field is directly in the main Field Group, or at most one level deep in a nested Field Group. Google Maps fields in Field Groups that are nested deeper than one level, will not work.
Add your Google API key to Advanced Custom fields
Besides adding the Google Maps API key to the FacetWP settings, also make sure to pass a valid Google Maps API key into ACF. ACF needs the Google Maps API in the backend to geolocate the address entered for each post.
Add your key to one of the methods below, and add the code to your (child) theme’s functions.php:
How to use custom PHP code?
PHP code can be added to your (child) theme's functions.php file. Alternatively, you can use the Custom Hooks add-on, or a code snippets plugin. More info
// Method 1: Filter. function my_acf_google_map_api( $api ){ $api['key'] = 'xxx'; // Add you Google Maps API key here return $api; } add_filter('acf/fields/google_map/api', 'my_acf_google_map_api'); // Method 2: Setting. function my_acf_init() { acf_update_setting('google_api_key', 'xxx'); // Add you Google Maps API key here } add_action('acf/init', 'my_acf_init');
Using multiple data sources / locations per post
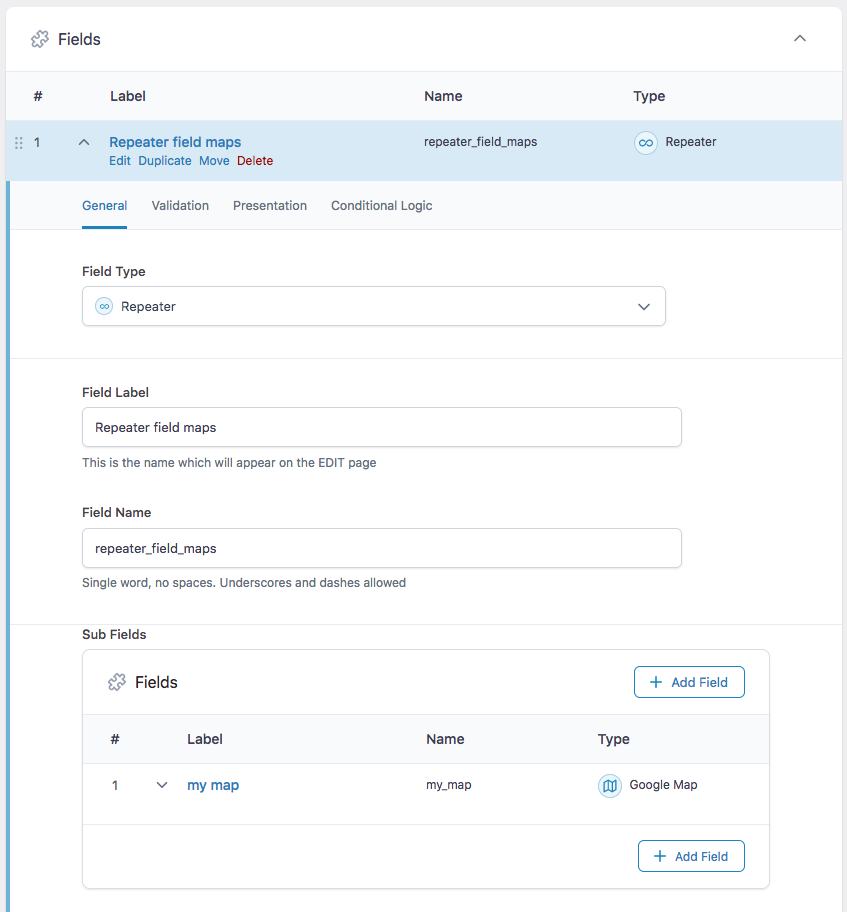
my_map in this example).It is possible to index multiple locations per post, by using a multi-value custom field, like an ACF repeater field, or for example a checkboxes/dropdown field (if you have a select number of locations to choose from).
If you use an ACF Repeater field with a Google Maps subfield, you need to choose the Google Maps subfield's name from the Map facet's Data Source dropdown (my_map in the example to the right).
Make sure to choose the field under the "ACF" heading in the Data Source dropdown.
Using a Google Map field in a related post
Consider a scenario where you have a listing of event posts. For every event post, there's a corresponding venue post connected via an ACF Post Object or Relationship field. And each venue post has an ACF Google Map field that you want indexed as the data source for a Proximity (or Map) facet.
In this case, you can't set the related Google Map field directly as the Proximity facet's data source, so you need a way to reach those values. Check out this code example that shows how to use the facetwp_index_row hook to first retrieve the related post ID, and then with that, the related post's Google Map field's value.
Using an ACF Checkbox field
Using an ACF Checkbox field as meta_query filter
If you are using an ACF Checkbox field to filter your (custom) query by, you will notice that this does not work out of the box. This is because in order to handle multiple values, ACF stores Checkbox values as a serialized string in the database. Serialized values are difficult to do anything with.
In a Listing Builder listing you would probably try to get it working with a query filter, like this:
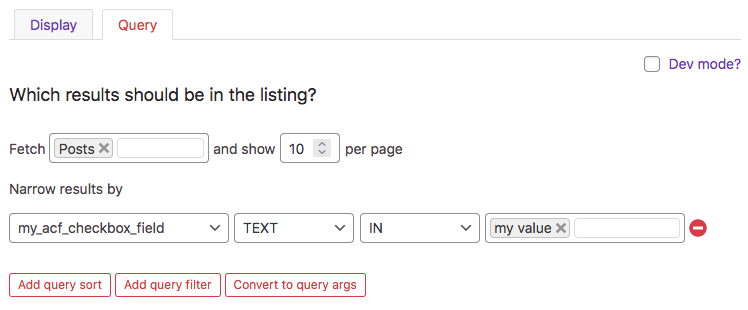
The above will not work with ACF Checkbox fields.
To be able to use a Checkbox field to filter the query, first click the red "Convert to query args" button at the bottom, which will convert the query settings to PHP query arguments. With the above example settings, the arguments will look as follows. Note that this will still not work:
How to use custom PHP code?
PHP code can be added to your (child) theme's functions.php file. Alternatively, you can use the Custom Hooks add-on, or a code snippets plugin. More info
<?php /* THIS DOES NOT WORK, DON'T USE! */ return [ "post_type" => [ "product" ], "post_status" => [ "publish" ], "meta_query" => [ [ "key" => "my_acf_checkbox_field", "compare" => "IN", "type" => "CHAR", "value" => [ "my_value" ] ] ], "orderby" => [ "title" => "DESC" ], "posts_per_page" => 10 ];
To make these arguments work with a serialized Checkbox field value, you need to make three manual changes:
- Change the
comparevalue fromINtoLIKE. - Remove the array brackets surrounding the value.
- Wrap the double-quoted value with single quotes.
The result should look like this:
How to use custom PHP code?
PHP code can be added to your (child) theme's functions.php file. Alternatively, you can use the Custom Hooks add-on, or a code snippets plugin. More info
<?php return [ "post_type" => [ "product" ], "post_status" => [ "publish" ], "meta_query" => [ [ "key" => "my_acf_checkbox_field", "compare" => "LIKE", // Changed to "LIKE" "type" => "CHAR", "value" => '"my_value"' // Removed the array brackets. And wrapped the double quotes with single quotes. ] ], "orderby" => [ "title" => "DESC" ], "posts_per_page" => 10 ];
If you need to filter by multiple Checkbox values, you cannot add them as an array. Each value will need its own meta_query argument. You'll also need to add a relation argument:
How to use custom PHP code?
PHP code can be added to your (child) theme's functions.php file. Alternatively, you can use the Custom Hooks add-on, or a code snippets plugin. More info
<?php return [ "post_type" => [ "product" ], "post_status" => [ "publish" ], "meta_query" => [ 'relation' => 'OR', // Needed for multiple values [ "key" => "my_acf_checkbox_field", "compare" => "LIKE", "type" => "CHAR", "value" => '"my_value"' ], [ "key" => "my_acf_checkbox_field", "compare" => "LIKE", "type" => "CHAR", "value" => '"my_other_value"' ] ], "orderby" => [ "title" => "DESC" ], "posts_per_page" => 10 ];
If you have too many values to do this, it would be better to use a custom taxonomy instead of a Checkbox field.
Fix facet choice order issues when using an ACF Checkbox field and Elementor
If you have a facet that uses an ACF field that has a user-defined list of choices in a specific order, like Checkbox, Radio Button and Select field types, this manual order will be retained in the facet if you use "Term order" in its "Sort by" settings.
In this situation, you may run into the issue that after a facet refresh, the order of the facet's choices is not the same anymore as the manual order. The most likely cause is that you are using Elementor with a Posts or Loop Grid widget, and that you have Elementor's Custom Query Filter hook in use in your functions.php.
This Elementor hook influences ACF's query to get the field choices, and influences its order. To prevent this issue, use an extra check in the Elementor hook, as shown in line 2:
How to use custom PHP code?
PHP code can be added to your (child) theme's functions.php file. Alternatively, you can use the Custom Hooks add-on, or a code snippets plugin. More info
add_action('elementor/query/my_query_id', function($query) { // Replace "my_query_id" with your unique Query ID if ( 0 !== strpos( $query->get( 'post_type'), 'acf' ) ) { // Prevent issues with this hook influencing ACF field based facets // your code here } });
See this section for an explanation of this Elementor hook and more examples.
Using a Date Picker or Date Time Picker field
Using a Date (Time) Picker field as facet data source
FacetWP supports the ACF Date Picker and Date Time Picker fields as facet data source. It will automatically process the way these fields store dates in the wp_postmeta database table (as YYYYMMDD for Date Picker, and as YYYY-MM-DD HH:MM:SS for Date Time Picker). Note that these field types' "Display Format" and "Return Format" settings have no influence on this.
Most facet types can be used to show dates (or months/years) as choices. In most cases, you'll want to change how the dates are formatted in the facet. This can be easily be customized with the facetwp_index_row hook, as explained below.
There are two facet types specifically meant to work with dates:
- The Time Since facet is meant to filter posts by date/time since a specified interval. It can also be used to create a past/future facet.
- The Date Range facet filters posts by start date, end date, or both, with a date picker for the date selection.
Format the dates in the facet
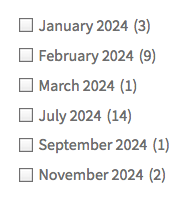
Facets that use a Date Picker field as their data source will by default display their date options in a YYYY-MM-DD format. To reformat this to January 17, 2024 for example, add the following snippet to your (child) theme's functions.php.
Make sure to replace my_date_facet with the name of your facet, and re-index after adding these snippets:
How to use custom PHP code?
PHP code can be added to your (child) theme's functions.php file. Alternatively, you can use the Custom Hooks add-on, or a code snippets plugin. More info
add_filter( 'facetwp_index_row', function( $params, $class ) { if ( 'my_date_facet' == $params['facet_name'] ) { // Replace 'my_date_facet' with the name of your facet $raw_value = $params['facet_value']; $params['facet_display_value'] = date( 'F j, Y', strtotime( $raw_value ) ); // Use "January 17, 2024" format for the facet's display value. For other date formats, see: https://www.php.net/manual/en/function.date.php } return $params; }, 10, 2 );
Facets using a Date Time Picker field will automatically display their date options in a YYYY-MM-DD HH:MM:SS format. To reformat this to January 17, 2024 at 17:15:05 PM for example, you can use the following snippet:
How to use custom PHP code?
PHP code can be added to your (child) theme's functions.php file. Alternatively, you can use the Custom Hooks add-on, or a code snippets plugin. More info
add_filter( 'facetwp_index_row', function( $params, $class ) { if ( 'my_date_facet' == $params['facet_name'] ) { // Replace 'my_date_facet' with the name of your facet $raw_value = $params['facet_value']; $params['facet_display_value'] = date( 'F j, Y \a\t H:i:s A', strtotime( $raw_value ) ); // Use "January 17, 2024 at 17:15:05 PM" format for the facet's display value. For other date formats, see: https://www.php.net/manual/en/function.date.php } return $params; }, 10, 2 );
To use any other date format, see the examples on the PHP.net date() documentation page, and this overview of PHP date formats.
Note that the Date Range facet has a Display format setting to format its date display.
To reverse the order of the date/month/year choices in the facet from ascending to descending, see below.
Create a month/year or future/past facet
The same facetwp_index_row hook that is used to format the dates in the facet, can also be used to create a facet with months and years (or only years or only months) as facet choices, based on an ACF Date (Time) Picker field. See this section for an explanation and examples.
Similarly, it is possible to create a past/future facet based on an ACF Date (Time) Picker field with the facetwp_index_row hook, or with a Time Since facet.
Change the order of dates in the facet
To change the order of the dates in the facet, you can use the facetwp_facet_orderby hook. If you set the "Sort by" setting of the facet to "Raw value", it will order dates in ASC order by default, so from old to new. If you want the order reversed, you can use the following snippet:
How to use custom PHP code?
PHP code can be added to your (child) theme's functions.php file. Alternatively, you can use the Custom Hooks add-on, or a code snippets plugin. More info
// Change date order to DESC. We're using the facet_value which is yyyymmdd for ACF date fields add_filter( 'facetwp_facet_orderby', function( $orderby, $facet ) { if ( 'my_date_facet' == $facet['name'] ) { // Replace 'my_date_facet' with the name of your facet $orderby = 'f.depth, f.facet_value DESC'; // From new to old } return $orderby; }, 10, 2 );
Order a listing by a Date (Time) Picker field
First determine if your posts use an ACF Date Picker or a Date Time Picker field. This matters because these two field types store their date values differently. The Date Picker field stores it as YYYYMMDD and the Date Time Picker field as YYYY-MM-DD HH:MM:SS.
If your posts are using an ACF Date Picker field, and you want to order a listing by that field, you can use the following query arguments. This example is ready to use in the Query tab of a Listing Builder listing in Dev mode.
In lines 14-18, the query is ordered numerically by meta_value_num. This works because the Date Picker field stores its date values as YYYYMMDD.
This example uses ASC order to show the earliest dates first.
To show only posts with a future date, the example includes a meta_query (in lines lines 21-28) that compares the post date with the current date using WP's current_time(). function. If you also want to show dates in the past, remove these lines.
Don't forget to replace my_date_field with the name of your Date Picker field, in line 14 and line 23.
How to use custom PHP code?
PHP code can be added to your (child) theme's functions.php file. Alternatively, you can use the Custom Hooks add-on, or a code snippets plugin. More info
<?php // Only works for Date Picker fields, NOT Date Time Picker fields return [ 'post_type' => [ 'post' // Adapt as needed ], 'post_status' => [ 'publish' ], 'posts_per_page' => 20, // Order by date 'meta_key' => 'my_date_field', // Replace 'my_date_field' with the name of your Date Picker field. 'orderby' => array( 'meta_value_num' => 'ASC', // Numeric sorting by 'meta_value_num' works for YYYYMMDD. ASC = Smallest number (earliest date) first. 'date' => 'DESC', // Optional fallback order if value of my_date_field is the same: then order by post_date (newest first). Adapt as needed. ), // Only retrieve posts that have a date set in the future 'meta_query' => array( array( 'key' => 'my_date_field', // Replace 'my_date_field' with the name of your Date Picker field 'value' => current_time('Ymd'), // We use current_time() to respect the WordPress timezone settings 'compare' => '>', // Greater than today. Use '>=' to include today. 'type' => 'NUMERIC' ) ) ];
If your posts are using an ACF Date Time Picker field, you can use the following query arguments instead.
In lines 14-18, the query is ordered with standard string sorting, using meta_value. This works because the Date Time Picker field stores its date values as YYYY-MM-DD HH:MM:SS.
This example uses ASC order to show the earliest dates first.
To show only future dates, the example includes a meta_query (in lines lines 21-28) that compares the post date with the current time. If you also want to show dates in the past, remove these lines. Note that we use DATETIME here as type value, instead of NUMERIC.
Don't forget to replace my_date_time_field with the name of your Date Time Picker field, in line 14 and line 23.
How to use custom PHP code?
PHP code can be added to your (child) theme's functions.php file. Alternatively, you can use the Custom Hooks add-on, or a code snippets plugin. More info
<?php // Only works for Date Time Picker fields, NOT Date Picker fields return [ 'post_type' => [ 'post' // Adapt as needed ], 'post_status' => [ 'publish' ], 'posts_per_page' => 20, // Order by date 'meta_key' => 'my_date_time_field', // Replace 'my_date_time_field' with the name of your Date Time Picker field 'orderby' => array( 'meta_value' => 'ASC', // Standard string sorting by 'meta_value' works for Y-m-d H:i:s (YYYY-MM-DD HH:MM:SS). ASC = Smallest number (earliest date) first. 'date' => 'DESC', // Optional fallback order if value of my_date_time_field is the same: then order by post_date (newest first). Adapt as needed. ), // Only retrieve posts that have a date set in the future 'meta_query' => array( array( 'key' => 'my_date_time_field', // Replace 'my_date_time_field' with the name of your Date Time Picker field 'value' => current_time('Y-m-d H:i:s'), // We use current_time() to respect the WordPress timezone settings 'compare' => '>', // Greater than today. Use '>=' to include today. 'type' => 'DATETIME' ) ) ];
Using a Color Picker field
If you use an ACF Color Picker field as a facet's data source, you may want the use the color value itself to style the facet choice label. You could for example set a CSS text color or background-color to the label, or create a color swatch element before or after the label text.
You can do this with the facetwp_facet_display_value hook. Add the following snippet to your (child) theme's functions.php to give the facet choice label a CSS background-color based on the display value of the label.
Note that the snippet uses facet_display_value for the color value and not facet_value, because the facet_value (the technical value as shown in the URL) will be hashed to a random string of numbers (because of unsafe characters in the URL).
How to use custom PHP code?
PHP code can be added to your (child) theme's functions.php file. Alternatively, you can use the Custom Hooks add-on, or a code snippets plugin. More info
add_filter( 'facetwp_facet_display_value', function( $label, $params ) { if ( 'my_color_facet' == $params['facet']['name'] ) { // Replace 'my_color_facet' with the name of your color-picker-based facet. $val = $params['row']['facet_display_value']; // Use the display value here to get the unhashed hex or rgb(a) color value. $label = '<span style="background-color:' . $val . ';">' . $label . '</span>'; // Add a span to the facet choice with the color as CSS background color. } return $label; }, 20, 2 );
The above code works both with the "Enable Transparency" setting disabled (outputting a hex string) and enabled (outputting an RGBA string).
If you have the "Enable Transparency" setting disabled (so the field is outputting a hex string) and you want to prevent hashing/sanitizing of color values in the URL, you can remove the hex color's # character (which causes the hashing) with WP's sanitize_hex_color_no_hash() function from the facet_value with the facetwp_index_row hook, while indexing. The following snippet shows how to do that. Make sure to re-index after adding this snippet and making changes to it.
How to use custom PHP code?
PHP code can be added to your (child) theme's functions.php file. Alternatively, you can use the Custom Hooks add-on, or a code snippets plugin. More info
add_filter( 'facetwp_index_row', function( $params, $class ) { if ( 'my_color_facet' == $params['facet']['name'] ) { // Replace 'my_color_facet' with the name of your color-picker-based facet. // Get the color value (with the '#') $colorvalue = $params['facet_value']; // Remove the '#' from the hex color value to prevent hashed/sanitized color values in the URL $params['facet_value'] = sanitize_hex_color_no_hash( $colorvalue ); } return $params; }, 10, 2 );
Use a color taxonomy with a Color Picker term field
If you want readable color names (e.g. "green") in your facet choice labels, instead of the actual hex color values, you could create a custom "color" taxonomy (containing color names as terms), and set your facet's data source to use this taxonomy. Then, set up an ACF Color Picker field as term meta field, by setting the field's Field Group's location to this "color" taxonomy.
This will make the facet choices display color names, but you cannot yet use the color values from the Color Picker field yet to style them. To set this up, add the two snippets below to your (child) theme's functions.php.
The first part indexes the hex color value of the term meta field into the facet choice's facet_value (the technical value as shown in the URL). While doing so, in line 11 we remove the # character from the color value, with WP's sanitize_hex_color_no_hash() function, to prevent the color value from being hashed/sanitized. After re-indexing, the color value will now show as a 6-digit color code without the # (e.g. 000000 for black), in the URL when the facet choice (e.g. "black") is selected.
Next, we use the facetwp_facet_display_value hook to set a CSS background-color. For this to work, we first get the color value from facet_value value. Then we add the # character back in, on line 20 to get a valid hex color value. The result is a facet with color names as choice labels, styled with a CSS background-color set on each of the choice labels:
How to use custom PHP code?
PHP code can be added to your (child) theme's functions.php file. Alternatively, you can use the Custom Hooks add-on, or a code snippets plugin. More info
add_filter( 'facetwp_index_row', function( $params, $class ) { if ( 'my_color_facet' == $params['facet']['name'] ) { // Replace 'my_color_facet' with the name of your color-picker-based facet. // Get the taxonomy term $term_id = (int) $params['term_id']; // Get the color value from an ACF Color Picker term meta field $colorvalue = get_term_meta( $term_id, 'term_color_picker_field', true ); // Replace 'term_color_picker_field' with the name of the Color Picker term field // Remove the '#' from hex color value to prevent hashed/sanitized color values in the URL $params['facet_value'] = sanitize_hex_color_no_hash( $colorvalue ); } return $params; }, 10, 2 ); add_filter( 'facetwp_facet_display_value', function( $label, $params ) { if ( 'my_color_facet' == $params['facet']['name'] ) { // Replace 'my_color_facet' with the name of your color-picker-based facet. $val = $params['row']['facet_value']; // Use the facet_value here to get the unhashed hex color value, without the '#' $label = '<span style="background-color: #' . $val . ';">' . $label . '</span>'; // Add a span to the facet choice with the color as CSS background color. Needs the '#' before the color value. } return $label; }, 20, 2 );
Note that this setup only works when the "Enable Transparency" setting is disabled (so the field is outputting a hex color string). If you need this to work with RGBA color strings, you'll have to destructure the RGBA string into four values, and store them as a string (with e.g. a dash as separator) in the first snippet. Then restructure these four values into a valid RGBA string again in the second snippet.
Using a File or Image field
If you use an ACF Image field in a Listing Builder listing item, make sure the "Return Value" of the field is set to "Image Array" if your goal is to display the actual image.
If you use an ACF File or Image field as a facet's data source, the indexed and displayed facet value will be the file ID or image ID, no matter what "Return Value/Format" type you choose in the field's settings.
To create a facet that filters by any file/image feature other than its ID, you'll have to use the facetwp_index_row hook to first use the ID to get that feature, then index it for the facet choice's facet_value (the technical value as shown in the URL when selected) and the facet_display_value (the choice label as shown in the facet). The second example below shows how to do this.
When using an ACF Image field, you can also use the indexed image ID to get the image URL, and create a facet showing the actual images:
Create an image facet
If you want to create an image facet, with facet choices showing the images selected with the ACF image field, add the following snippet to your (child) theme's functions.php. Make sure to replace my_image_facet in line 4 with the name of your image facet. A good facet type for this would be a Checkboxes or Radio facet. When you use an fSelect facet, read the yellow banner below the code.
The code uses the facetwp_facet_display_value hook to transform the facet choice labels from the indexed image ID to an HTML <img> tag. To do this, we first get the image ID from the indexed facet_value. Then we use the wp_get_attachment_image_src() function to get the image URL from the image ID. This function takes the desired WordPress image size as the second argument. In this example, we set the image size to thumbnail, in line 10. You can choose any existing WP image size here.
How to use custom PHP code?
PHP code can be added to your (child) theme's functions.php file. Alternatively, you can use the Custom Hooks add-on, or a code snippets plugin. More info
add_filter( 'facetwp_facet_display_value', function( $label, $params ) { // Repace "my_image_facet" with the name of your image field based facet if ( 'my_image_facet' == $params['facet']['name'] ) { // Get the image ID from the indexed facet value $image_id = $params['row']['facet_value']; // Specify the desired WP image size. Replace "thumbnail" with the WP image size you want $image_size = 'thumbnail'; // Get the image URL in the specified size $image_url = wp_get_attachment_image_src( $image_id, $image_size ); if ( $image_url ) { $image_url = $image_url[0]; } // Get the alt text of the image, as set in the Media library $alt_text = get_post_meta( $image_id, '_wp_attachment_image_alt', true ); // Output the facet label as an image in the specified size // Note: for fSelect facets, use esc_html() around the label output, otherwise the HTML will be stripped out, causing the output to be empty $label = '<img src="' . $image_url . '" alt="' . $alt_text . '" />'; } return $label; }, 20, 2 );
Note that WP image sizes can be set in Settings > Media. If these default four WordPress image sizes (full, large, medium, thumbnail) are not enough, or you need more control, like fine-tuning the way images are cropped to the defined width and height, you can use WordPress' built-in add_image_size() function. Some themes also offer settings to add additional custom image sizes. There are also plugins to create and/or regenerate image sizes.
Create a file/image extension facet
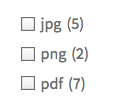
The following snippet shows how to use the facetwp_index_row hook to create a facet displaying file or image extensions, when using an ACF File or Image field.
This example works for two facets, named my_file_facet and my_image_facet. The code uses the file/image ID to get the file/image URL, and then extracts the file extension from the URL (e.g. jpg, png, pdf). This extension is then indexed for both the facet_value and the facet_display_value.
The code needs to be added to your (child) theme's functions.php. Make sure to re-index after adding or changing the code:
How to use custom PHP code?
PHP code can be added to your (child) theme's functions.php file. Alternatively, you can use the Custom Hooks add-on, or a code snippets plugin. More info
add_filter( 'facetwp_index_row', function( $params, $class ) { // Add or remove file/image facets to/from the array. Replace 'my_file_facet' and 'my_image_facet' with the name(s) of your ACF file/image facet(s). $facets = [ 'my_file_facet', 'my_image_facet' ]; if ( in_array( $params['facet_name'], $facets ) ) { $id = $params['facet_value']; // Get the ID $url = wp_get_attachment_url( $id ); // Get the URL $extension = pathinfo( $url, PATHINFO_EXTENSION ); // Get the extension from the URL $params['facet_value'] = $extension; $params['facet_display_value'] = $extension; } return $params; }, 10, 2 );
Using a Post Object or Relationship field
You may want to let a facet index a custom field that is not in your listing's post type, but in a related post, linked to it with an ACF Post Object or Relationship field.
For example, consider a scenario where you have a listing of event posts. For every event post, there's a corresponding venue post connected via an ACF Post Object field. And each venue post has an ACF Google Map field that you want indexed as the data source for a Proximity (or Map) facet.
In this case, you can't set the related Google Map field directly as the Proximity facet's data source, so you need a way to reach those values. Check out this code example that shows how to use the facetwp_index_row hook to first retrieve the related post ID, and then with that, the related post's custom field's value.
Using a True / False field
Facets using an ACF True / False field as data source are indexed as 1 (true) if the field is enabled in the post, and as 0 (false) if it is not. The facet choices will display as "Yes" when true and "No" when false.
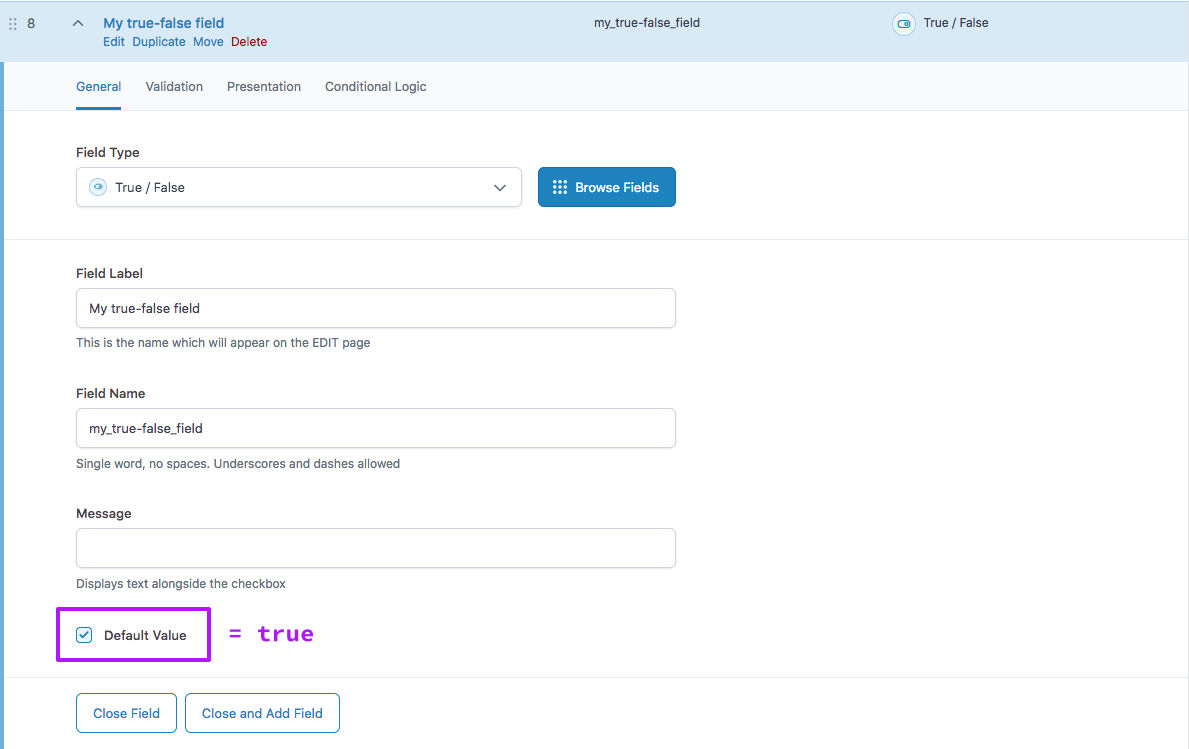
true for all posts, also posts without a saved field, and post types that do not even have this field.True / False fields can also have their "Default Value" setting enabled in the ACF field settings. If this setting is enabled, as shown in the image on the right, the default value is true.
We recommend not enabling the "Default Value" setting though, to prevent the indexing of this field for all posts in your site without a saved field, and post types that do not even have that field. In large sites, this can lead to a lot of unnecessary database rows. If you leave the setting disabled, only posts that have that field, and have its value saved, will be indexed.
If you do want to set a default value, how it will be indexed depends on the FacetWP version:
In FacetWP versions before v4.4, if the "Default Value" field setting is disabled, it is indexed as false for all posts without a saved field, and also for post types that do not have this field. If the "Default Value" field setting is enabled, posts without a saved field and posts without the field are indexed as true.
In FacetWP 4.4+, the indexing behavior of default values was changed. Posts without a saved field, and posts without the field, are only indexed when an explicit default value is set. An explicit default value can be set in two ways:
- By enabling the "Default Value" in the field's settings. In this case, the field is indexed as
true. - By using the
facetwp_index_acf_truefalse_default_falsehook, in which case the field is indexed asfalse. To do so, add the following code to your (child) theme's functions.php:
How to use custom PHP code?
PHP code can be added to your (child) theme's functions.php file. Alternatively, you can use the Custom Hooks add-on, or a code snippets plugin. More info
// Set a default value of false for True/False fields add_filter( 'facetwp_index_acf_truefalse_default_false', '__return_true' );
Note that the "Default value" field setting (which sets the default value to true) will overwrite the above hook. So if you use the hook, make sure to uncheck "Default Value" in the True/False field settings.
Customize the Yes/No choice labels
The default "Yes" and "No" facet choice labels are strings that can be translated with the internationalization function __() (e.g. with a translation plugin), or with WP's gettext filter (see this example).
The easiest way to customize them is with the facetwp_facet_display_value hook, as shown in the following example. Make sure to replace my_facet_name with the name of your facet in line 2.
How to use custom PHP code?
PHP code can be added to your (child) theme's functions.php file. Alternatively, you can use the Custom Hooks add-on, or a code snippets plugin. More info
add_filter( 'facetwp_facet_display_value', function( $label, $params ) { if ( 'my_facet_name' == $params['facet']['name'] ) { // Replace "my_facet_name" with the name of your True/False facet if ( 'Yes' == $label ) { $label = 'Included'; } elseif ( 'No' == $label ) { $label = 'Not included'; } } return $label; }, 20, 2 );
Exclude the "false" choice
To exclude the "false" choice from the facet, you can use the facetwp_index_row hook. Add the following code to your (child) theme's functions.php and replace my_facet_name with the name of your facet in line 3. Make sure to re-index after adding this snippet and making changes to it.
How to use custom PHP code?
PHP code can be added to your (child) theme's functions.php file. Alternatively, you can use the Custom Hooks add-on, or a code snippets plugin. More info
add_filter( 'facetwp_index_row', function( $params, $class ) { $exclude_values = [ '0' ]; // Remove the 'false' choice if ( 'my_facet_name' == $params['facet_name'] && in_array( $params['facet_value'], $exclude_values ) ) { // Replace 'my_facet_name' with the name of your facet $params['facet_value'] = ''; // Don't index this row } return $params; }, 10, 2 );
Using an ACF True / False field as meta_query filter
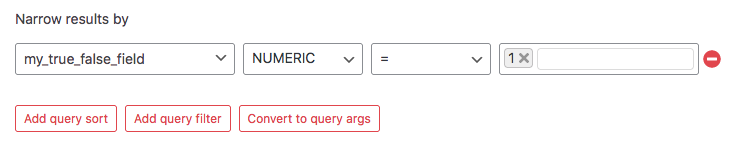
If you are using a Listing Builder listing and want to use an ACF True / False field to filter its query, set the field format to NUMERIC, and use 0 or 1 for the true/false value:
To use the same field in a meta_query, in a listing in Dev mode (or in a custom WP_Query):
How to use custom PHP code?
PHP code can be added to your (child) theme's functions.php file. Alternatively, you can use the Custom Hooks add-on, or a code snippets plugin. More info
<?php return [ "post_type" => [ "post" ], "post_status" => [ "publish" ], "meta_query" => [ [ "key" => "my_true_false_field", "value" => "1" ] ], "orderby" => [ "date" => "DESC" ], "posts_per_page" => 10 ];
Using a taxonomy term custom field
With Advanced Custom Fields you can add custom fields to taxonomy terms. (The same is true for the Pods plugin, the instructions described below are the same.)
Using a taxonomy term custom field as facet data source
When you set a taxonomy term custom term field as the data source in a facet, you will notice that the facet does not display any choices. This is because custom fields attached to taxonomy terms cannot be indexed directly by FacetWP.
However, with a bit of custom code, using a custom term field as data source is possible.
First, create the facet and set its data source to the taxonomy itself. Then, add the following code to your (child) theme's function.php. Make sure to re-index afterwards.
How to use custom PHP code?
PHP code can be added to your (child) theme's functions.php file. Alternatively, you can use the Custom Hooks add-on, or a code snippets plugin. More info
/** * This code works for term fields created in ACF and Pods. * 1. Create the facet and set its data source to the taxonomy itself (NOT to the custom term field) * 2. Add this code to your (child) theme's functions.php * 3. In the code, replace "your_facet_name" with the actual facet name * 4. Replace "your_custom_field" with the actual custom field name * 5. Re-index after adding this code, and each time when a custom term field value is changed */ add_filter( 'facetwp_index_row', function( $params, $class ) { if ( 'your_facet_name' == $params['facet_name'] ) { // Get the taxonomy term $term_id = (int) $params['term_id']; // Get the custom field value from the term $value = get_term_meta( $term_id, 'your_custom_field', true ); // Set the facet label and URL slug to the custom term field value $params['facet_display_value'] = $value; // the facet choice label // Optional, see explanation below. $params['facet_value'] = $value; // the facet URL slug, used for indexing/filtering } return $params; }, 10, 2 );
What this code does, is force FacetWP into indexing the custom term field value instead of the term name and the term slug. When using this, keep the following in mind:
Normally, when FacetWP indexes a taxonomy term, the following happens:
- Term names are stored in FacetWP’s index table as
facet_display_valueand used to generate the display of the facet’s choices. - Term slugs are stored in FacetWP’s index table as
facet_valueand are used for filtering, which also means they will show up as facet slug in the URL after interacting with the facet.
The above code sets both the facet_display_value and the facet_value to the custom field's value while indexing.
Setting facet_value to the custom field value is optional. There are a few scenarios in which you may want to keep using the term slug as facet_value:
- If your custom term field value has special characters or spaces. These will be replaced when the value is indexed, or - depending on the characters - the value will get entirely hashed into a string of random characters. If you want to keep using the term slug in the URL, do not set
facet_valueto the custom field value. - If multiple terms share the same value for the custom field, they will be indexed together as one facet choice. If you want to keep them indexed as separate choices, do not set
facet_valueto the custom field value.
Sort facet choices by a taxonomy term custom field
If you have a facet with its data source set to tags, categories or a custom taxonomy, and you want to order the facet's choices by a custom field attached to the tags/categories/terms of this taxonomy, check out this code example that uses the facetwp_facet_orderby hook to do this.
Creating custom post types with ACF
As of ACF 6.1, it is possible to register custom post types and custom taxonomies with it.
If you are registering a custom post type this way, make sure to disable the "Exclude From Search" setting located under Post Types > Edit Post Type > Advanced Settings > Visibility:

This is needed because FacetWP only indexes searchable post types. If your post type is not searchable, you will get empty facets or a "The index table is empty" error.
If you enabled this setting because you don't want this post type in your search results, it is also possible to force FacetWP to index non-searchable post types, with the facetwp_indexer_query_args hook.
Use ACF Blocks
If you are using ACF Pro, you can use ACF Blocks to create custom WordPress blocks and add them to your pages. The following sections describe some things you can do with them, with FacetWP.
Use ACF Block fields as facet data source
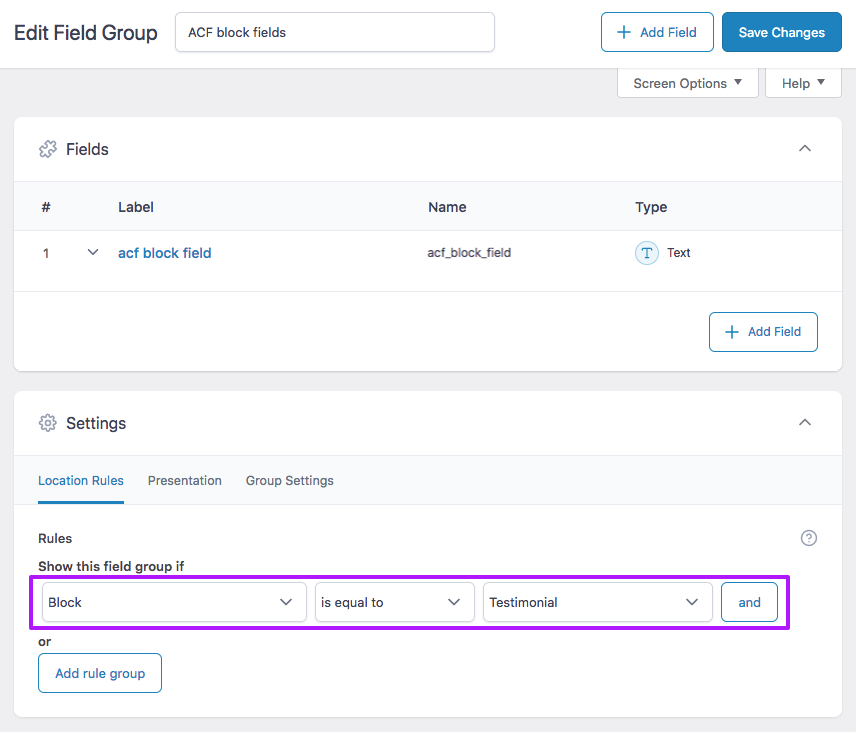
ACF blocks can have custom fields in them. To create these, first create a Field Group and add your fields. Then, in the Field Group's Settings > Location Rules, let the Field Group show in one or more of the custom ACF blocks you created:
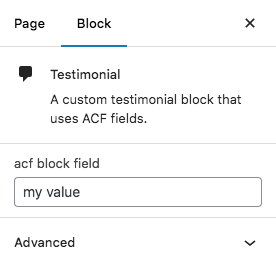
These custom fields will now appear in your block's settings, on pages/templates where you add this block, as shown in the image on the right.
By default, WordPress stores a block’s field data inside the block’s HTML comment in post_content, which is stored in the posts database table. However, FacetWP cannot use custom field data in this table to index facets. It can only index data stored in the postmeta table. So, if you create a facet and set its Data Source setting to a custom field that is connected to an ACF block, you'll see no rows indexed for this facet (in the facet overview screen), and the facet will have no choices.
To solve this, you can force ACF to store its block field data in the post-meta database table instead. This can be done by adding a "usePostMeta": "true" argument to the block's block.json file. Below is an example, with the extra argument added in line 17:
{
  "name": "acf/testimonial",
  "title": "Testimonial",
  "description": "A custom testimonial block that uses ACF fields.",
  "style": [
    "file:./testimonial.css"
  ],
  "category": "formatting",
  "icon": "admin-comments",
  "keywords": [
    "testimonial",
    "quote"
  ],
  "acf": {
    "mode": "preview",
    "renderTemplate": "testimonial.php",
    "usePostMeta": "true"
  },
  "supports": {
    "anchor": true
  }
}
After adding this argument, make sure to save the posts that use this ACF block, and/or do a full re-index.
Create a custom ACF block with a FacetWP-enabled custom WP_Query
If you are using ACF Pro, you can use ACF Blocks to create a block with a custom WP_Query listing that can be filtered by FacetWP. This listing basically works the same as a normal Facetwp-enabled WP_Query listing, but in a block.
The following steps show how to create a custom filterable listing block:
- In your (child) theme directory, create a folder for your custom block:
/themes/your-theme/blocks/facetwp-wp-query/ - In this folder, create a
block.jsonfile and add the following code to it. The file stores the standard block metadata and ACF-specific settings. Note that the block's icon is set in line 6 and uses a Dashicon name.
{
  "name": "acf/facetwp-wp-query",
  "title": "FacetWP custom WP_Query",
  "description": "A custom WP_Query FacetWP listing block.",
  "category": "widgets",
  "icon": "grid-view",
  "keywords": [ "acf", "listing", "facetwp" ],
  "supports": {
    "align": true,
    "multiple": false
  },
  "acf": {
    "mode": "preview",
    "renderTemplate": "blocks/facetwp-wp-query/facetwp-wp-query.php"
  }
}
- Create the block's template file in the same folder. In this example, we use
facetwp-wp-query.phpas file name, in line with what we specified asrenderTemplatein line 14 of theblock.jsonfile above. - Inside the template, add the
WP_Queryand the listing's post loop:
How to use custom PHP code?
PHP code can be added to your (child) theme's functions.php file. Alternatively, you can use the Custom Hooks add-on, or a code snippets plugin. More info
<?php // Define the query arguments $args = [ 'post_type' => [ 'post' ], 'posts_per_page' => 6, 'orderby' => [ 'title' => 'ASC' ], // ... your arguments 'facetwp' => true //This flags this custom query as the one to be used by FacetWP ]; // Run the query $my_query = new WP_Query( $args ); // The post loop. // The "facetwp-template" class is required ?> <div class="facetwp-template"> <?php if ( $my_query->have_posts() ) : while ( $my_query->have_posts() ) : $my_query->the_post(); ?> <div class="entry"> <h3><?php the_title(); ?></h3> <div><?php the_excerpt(); ?></div> </div> <?php endwhile; else : _e( 'Sorry, no posts matched your criteria.' ); // When there are no results, e.g. when using a Search facet. endif; wp_reset_postdata(); ?> </div>
- Register the block in your (child) theme's functions.php. Make sure to use the directory name created in step 1:
How to use custom PHP code?
PHP code can be added to your (child) theme's functions.php file. Alternatively, you can use the Custom Hooks add-on, or a code snippets plugin. More info
function my_register_blocks() { register_block_type( __DIR__ . '/blocks/facetwp-wp-query' ); } add_action( 'init', 'my_register_blocks' );
-
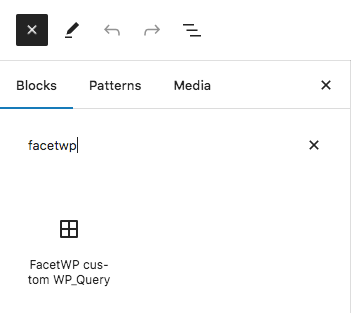
A custom FacetWP WP_Query listing block made with ACF blocks. Create a new post or page, and add the new block to the page using the Block Editor. The new custom block is called "FacetWP custom WP_Query", and is located in the "Widgets" section, as defined in line 5 of the above
block.jsonfile. You can also search for it in the Block Inserter with the keywords specified line 7. - Add some facets to the page. You could do this with PHP in the block template itself. Or you could add them to your page in a Shortcode block, or by adding their shortcodes in any text-based block.