Customize marker clustering
The Map facet is highly customizable. This page gives an overview of possible customizations of the built-in marker clustering feature.
To customize the map features, see this page:
To customize the Advanced Markers, and read about how to use JavaScript map marker hooks and functions, see this page:
To customize the behavior and icons of the built-in Overlapping Marker Spiderfier feature, see this page:
What is marker clustering?
If you have large numbers of markers concentrated in specific regions, marker clustering can help simplify their display by grouping them into clusters.
Clusters will have a cluster icon of which the color and text (or the whole icon design) is based on the total number of markers contained in them.
Each cluster icon on the map will show the number of clustered markers in it. Clusters will “de-cluster” into their contained regular markers at specified zoom levels, and/or after clicking the cluster.
Marker clustering can be enabled with the “Marker clustering” setting in your Map facet.
FacetWP uses the official Google Maps JavaScript MarkerClusterer library. Its documentation, options, methods and examples can be found here. Its GitHub repo can be found here.
Note that the Map facet has another built-in feature that helps deal with markers that are very close together or overlap because they share (almost) the same latitude/longitude: Overlapping Marker Spiderfier. Overlapping Marker Spiderfier plays nice with marker clustering: once you get down to a zoom level where clusters de-cluster into individual markers, these markers will then “spiderfy” (fan out) if they are (almost) in the same location.
Customize clustering options
Since v2.0 of the Map facet, there is a new JavaScript hook with which you can set marker clustering options: facetwp_map/clusterer. This hook filters the MarkerClustererOptions.
Below are a few clustering options you can customize:
Set marker cluster to not zoom in when clicking on it
By default, the map will zoom in when clicking on a cluster. To stop the map zooming into a cluster on click, you can set the onClusterClick option to false:
How to use custom PHP code?
PHP code can be added to your (child) theme's functions.php file. Alternatively, you can use the Custom Hooks add-on, or a code snippets plugin. More info
add_action( 'facetwp_scripts', function() { ?> <script> (function($) { $(function() { if ('object' != typeof FWP) return; FWP.hooks.addFilter('facetwp_map/clusterer', function(clusterargs, clusterconfig) { // Do not zoom in when a cluster is clicked: clusterargs['onClusterClick'] = false; // Default: true. return clusterargs; }); }); })(fUtil); </script> <?php }, 100 );
Set the maximum zoom level for a cluster to appear
The maximum zoom level that a marker can be part of a cluster can be set with the maxZoom option. The default is 15.
Note that this is one of the cluster options of the default used SuperClusterAlgorithm.
How to use custom PHP code?
PHP code can be added to your (child) theme's functions.php file. Alternatively, you can use the Custom Hooks add-on, or a code snippets plugin. More info
add_action( 'facetwp_scripts', function() { ?> <script> (function($) { $(function() { if ('object' != typeof FWP) return; FWP.hooks.addFilter('facetwp_map/clusterer', function(clusterargs, clusterconfig) { // Maximum zoom level at which clusters are generated. Our default is 15 clusterargs['algorithmOptions']['maxZoom'] = 7; // Default: 15 return clusterargs; }); }); })(fUtil); </script> <?php }, 100 );
Set the minimum zoom level for a cluster to appear
The mimimum zoom level at which close markers are added into clusters can be set with the minZoom option. The default is 0. Because zooming in increases the distance between markers, this option may work differently than you would expect.
Note that this is one of the cluster options of the default used SuperClusterAlgorithm.
How to use custom PHP code?
PHP code can be added to your (child) theme's functions.php file. Alternatively, you can use the Custom Hooks add-on, or a code snippets plugin. More info
add_action( 'facetwp_scripts', function() { ?> <script> (function($) { $(function() { if ('object' != typeof FWP) return; FWP.hooks.addFilter('facetwp_map/clusterer', function(clusterargs, clusterconfig) { // Mimimum zoom level at which close markers are added into clusters. // Because zooming in increases the distance, this may work differently than you would expect. clusterargs['algorithmOptions']['minZoom'] = 2; // Default: 0 return clusterargs; }); }); })(fUtil); </script> <?php }, 100 );
Set the minimum number of markers in a cluster
The minimum number of markers to be in a cluster before the markers are hidden and a count is shown can be set with the minPoints option. The default is 2.
Note that this is one of the cluster options of the default used SuperClusterAlgorithm:
How to use custom PHP code?
PHP code can be added to your (child) theme's functions.php file. Alternatively, you can use the Custom Hooks add-on, or a code snippets plugin. More info
add_action( 'facetwp_scripts', function() { ?> <script> (function($) { $(function() { if ('object' != typeof FWP) return; FWP.hooks.addFilter('facetwp_map/clusterer', function(clusterargs, clusterconfig) { // Minimum number of markers to form a cluster. clusterargs['algorithmOptions']['minPoints'] = 5; // Default: 2 return clusterargs; }); }); })(fUtil); </script> <?php }, 100 );
Customize the marker cluster icons
Just like normal markers, cluster icons are Advanced Markers. Advanced Markers can have two forms: customizable marker pins, or custom HTML.
There are basically two ways to customize marker cluster icons. The newest and most flexible way is to use a so-called custom “renderer” to create and set a custom Advanced Marker for the cluster icon. The advantage of doing it this way is that Advanced Markers are highly customizable, both as marker pin and as HTML marker. Specifically HTML markers can have any form or shape you can dream up. See the Customize Advanced Markers page for inspiration.
The second way is to use one of the “legacy” cluster configuration options, as explained below. This is way less complex than a custom renderer, and the recommended option for simple cluster icon customizations. Note that under the hood, also these legacy options are converted to Advanced Markers (HTML markers) in a custom renderer.
Customize the marker cluster icons with a custom renderer
The Google Maps JavaScript MarkerClusterer library that FacetWP uses, makes it possible to customize marker cluster icons by creating and setting a so-called renderer function that generates the marker cluster icons.
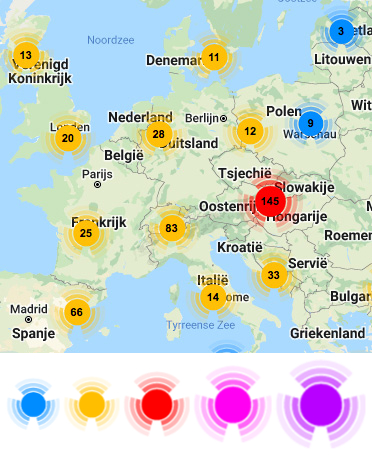
If you don’t use a custom renderer, the DefaultRenderer() function is used. The DefaultRenderer renders marker clusters as a round SVG icon in two colors: blue for small clusters and red for large ones, as shown in the image on the right. A live demo of DefaultRenderer() can be seen in the top left of the library’s cluster demo page.
Just like normal markers, cluster icons are Advanced Markers. Advanced Markers can have two forms: customizable marker pins, or custom HTML markers. On the Customize Advanced Markers page you can read everything about these two types of markers, and how to customize both.
The following conceptual code shows the code structure of how to use an Advanced Marker to create a custom marker cluster icon. Note that this code is not functional. See the sections below for working examples.
To create a custom marker cluster icon, we need to first create a custom renderer function, as shown in lines 9-31. The function returns an Advanced Marker element that uses a range of options in lines 20-26. One of the options is content, in line 25, which is the marker cluster icon content: the Advanced Marker itself. This Advanced Marker first has to be created, in line 18. We left this part out for clarity. The five examples below show what is possible and how to do this exactly.
In lines 33-41 we use the facetwp_map/clusterer JavaScript hook to pass the custom renderer function to the renderer cluster argument. Note that this is the same hook that is used to customize other cluster options.
How to use custom PHP code?
PHP code can be added to your (child) theme's functions.php file. Alternatively, you can use the Custom Hooks add-on, or a code snippets plugin. More info
add_action( 'facetwp_scripts', function() { ?> <script> (function($) { $(function() { if ('object' != typeof FWP) return; // Define a custom renderer function var customrenderer = { render: function({count, position}, stats, map) { let clustericon; // Create a cluster icon here, as an Advanced Marker // This can be a marker pin or an HTML marker // clustericon = .... see examples below const clusterOptions = { map, position, // zIndex, // if you have set zIndex // title, // if you have set cluster title content: clustericon, // Set the custom clustericon }; return new google.maps.marker.AdvancedMarkerElement(clusterOptions); } }; FWP.hooks.addFilter('facetwp_map/clusterer', function(clusterargs, clusterconfig) { // Optionally set other clusterer options here // Set the custom renderer clusterargs['renderer'] = customrenderer; return clusterargs; }); }); })(fUtil); </script> <?php }, 100 );
Example 1: Custom renderer with custom marker pins or HTML markers
Below is a fully working example that shows how to use Advanced Markers to customize the cluster icons.
Option 1 uses customized marker pins. When you use this option, cluster icons will display as red marker pins with the marker count as their glyph text, as shown in the image on the right. A live demo of this can be seen in the top right of the library’s cluster demo page. For an explanation of how customizing marker pins works exactly, see this section on the Customize Advanced Markers page.
Option 2 uses a custom HTML marker consisting of a <div> containing an <img> tag and a <span> for the marker count, and some inline CSS for styling. For an explanation of how creating HTML markers works exactly, see this section on the Customize Advanced Markers page.
In line 61 we add a dynamic title text that shows up when hovering over a cluster. We also set a high and dynamic z-index in line 64, to make sure clusters icons are always on top, and larger clusters are above smaller ones.
To understand the structure of this code example, read the explanation above.
How to use custom PHP code?
PHP code can be added to your (child) theme's functions.php file. Alternatively, you can use the Custom Hooks add-on, or a code snippets plugin. More info
add_action( 'facetwp_scripts', function() { ?> <script> (function($) { $(function() { if ('object' != typeof FWP) return; // Define a custom renderer function var customrenderer = { render: function({count, position}, stats, map) { let clustericon; // Option 1: Set a custom marker pin const pin = new google.maps.marker.PinElement({ scale: 1.0, // pin scale/size background: '#ff0000', // pin background color //borderColor: '#ff0000', // pin border color glyphColor: '#FFFFFF', // pin glyph color glyph: String(count) // Set the cluster marker count as pin glyph text }); // A few ways to add extra styling to the pin, which is an SVG: // Style the whole custom marker pin pin.element.style.opacity = '0.8'; // Set CSS opacity pin.element.classList.add('my-custom-cluster-icon'); // set a custom class on the pin element // Style the SVG > text element (which contains the glyph text) directly // Note that when pin scale is in play: font-size will be scaled too! pin.element.querySelector('svg text').style.fontSize = '13px'; // set glyph text font-size pin.element.querySelector('svg text').style.fontWeight = 'bold'; // set glyph text font-weight // Or set a class on the SVG > text element, to style the glyph text pin.element.querySelector('svg text').classList.add('my-glyph-text-class'); clustericon = pin.element; // End Option 1 // Option 2: Use a custom HTML marker const imgsrc = 'https://developers.google.com/maps/documentation/javascript/examples/full/images/beachflag.png'; const size = 28; const pinImgString = ` <div style="position: relative;"> <img src="${imgsrc}" width="${size}" height="${size}" alt="my-custom-cluster-icon"/> <span class="count" style="position: absolute; left: 0; top: 0; display: block; width: 100%; text-align: center; font-size: 12px; line-height:${size}px; color: #000000; font-weight: bold;">${count}</span> </div>`; const parser = new DOMParser(); const pinImg = parser.parseFromString(pinImgString, 'text/html').body.firstChild; clustericon = pinImg; // End Option 2 // Set cluster title text, visible on hover const title = `Cluster of ${count} markers`; // Adjust zIndex to be above other markers const zIndex = 1000000 + count; const clusterOptions = { map, position, zIndex, // if you have set zIndex above title, // if you have set title above content: clustericon, }; return new google.maps.marker.AdvancedMarkerElement(clusterOptions); } }; FWP.hooks.addFilter('facetwp_map/clusterer', function(clusterargs, clusterconfig) { // Optionally set other clusterer options here // Set a custom enderer clusterargs['renderer'] = customrenderer; return clusterargs; }); }); })(fUtil); </script> <?php }, 100 );
Example 2: Custom renderer with default SVG icons in two custom colors
Using the following example, cluster icons will display as the default SVG icons, but with two custom colors.
The two cluster colors are set in line 15. Clusters are purple by default, and orange if the cluster has more markers than the mean cluster or over 10. This example will display like the image on the right. A live demo of this can be seen in the bottom left of the library’s cluster demo page.
To understand the structure of this code example, read the explanation above.
How to use custom PHP code?
PHP code can be added to your (child) theme's functions.php file. Alternatively, you can use the Custom Hooks add-on, or a code snippets plugin. More info
add_action( 'facetwp_scripts', function() { ?> <script> (function($) { $(function() { if ('object' != typeof FWP) return; var customrenderer = { render: function({count, position}, stats, map) { // Change color if this cluster has more markers than the mean cluster or over 10 // Purple by default, orange if over 10 or more than mean const color = count > Math.max(10, stats.clusters.markers.mean) ? "#e78b0a" : "#9b0fa5"; // Create SVG literal with dynamic fill color const pinSvgString = ` <svg fill="${color}" xmlns="http://www.w3.org/2000/svg" viewBox="0 0 240 240" width="50" height="50"> <circle cx="120" cy="120" opacity=".6" r="70" /> <circle cx="120" cy="120" opacity=".3" r="90" /> <circle cx="120" cy="120" opacity=".2" r="110" /> <text x="50%" y="50%" style="fill:#fff" text-anchor="middle" font-size="50" dominant-baseline="middle" font-family="roboto,arial,sans-serif">${count}</text> </svg>`; // Create cluster SVG element const parser = new DOMParser(); const pinSvg = parser.parseFromString(pinSvgString, "image/svg+xml").documentElement; // Optional: style the cluster icon pinSvg.setAttribute("transform", "translate(0 28)"); pinSvg.querySelector('svg text').style.fontSize = '50px'; // Note that font size is scaled in the SVG sizing pinSvg.querySelector('svg text').style.fontWeight = 'bold'; // Optional: set a cluster icon class pinSvg.classList.add('my-cluster-icon'); // set a custom class // Set cluster title text, visible on hover const title = `Cluster of ${count} markers`; // Adjust zIndex to be above other markers const zIndex = 1000000 + count; const clusterOptions = { map, position, zIndex, title, content: pinSvg, }; return new google.maps.marker.AdvancedMarkerElement(clusterOptions); } }; FWP.hooks.addFilter('facetwp_map/clusterer', function(clusterargs, clusterconfig) { // Optionally set other clusterer options here // Set a custom enderer clusterargs['renderer'] = customrenderer; return clusterargs; }); }); })(fUtil); </script> <?php }, 100 );
Example 3: Custom renderer with circular SVG icons with interpolated colors
Using the following example, cluster icons will display as circular SVG icons with custom colors that are interpolated between two specified color values.
The color interpolation is based on the number of markers in the cluster. The red and blue base colors are set in line 14. This example will display like the image on the right, with different shades of interpolated purple for intermediate marker numbers. A live demo of this can be seen in the bottom right of the library’s cluster demo page.
For the color interpolation, we load in the d3-color and d3-interpolate libraries, in lines 77-82.
To understand the structure of this code example, read the explanation above.
How to use custom PHP code?
PHP code can be added to your (child) theme's functions.php file. Alternatively, you can use the Custom Hooks add-on, or a code snippets plugin. More info
add_action( 'facetwp_scripts', function() { ?> <script> (function($) { $(function() { if ('object' != typeof FWP) return; var customrenderer = { render: function({count, position}, stats, map) { // Use d3-interpolateRgb to interpolate between red and blue depending on the amount of markers in the cluster const palette = d3.interpolateRgb("#ff0000", "#0000ff"); const color = palette(count / stats.clusters.markers.max); // Create circular SVG literal with dynamic fill color const pinSvgString = ` <svg fill="${color}" xmlns="http://www.w3.org/2000/svg" viewBox="0 0 240 240" width="70" height="70"> <circle cx="120" cy="120" opacity=".8" r="70" /> <text x="50%" y="50%" style="fill:#fff" text-anchor="middle" font-size="45" dominant-baseline="middle" font-family="roboto,arial,sans-serif">${count}</text> </svg>`; // create cluster SVG element const parser = new DOMParser(); const pinSvg = parser.parseFromString(pinSvgString, 'image/svg+xml').documentElement; // Optional: style the cluster icon pinSvg.setAttribute("transform", "translate(0 28)"); pinSvg.querySelector('svg text').style.fontSize = '45px'; // Note that font size is scaled in the SVG sizing pinSvg.querySelector('svg text').style.fontWeight = 'bold'; // Optional: set a cluster icon class pinSvg.classList.add('my-cluster-icon'); // set a custom class // Set cluster title text, visible on hover const title = `Cluster of ${count} markers`; // Adjust zIndex to be above other markers const zIndex = 1000000 + count; // Optional: set a cluster icon class pinSvg.classList.add('my-cluster-icon'); // set a custom class const clusterOptions = { map, position, zIndex, title, content: pinSvg, }; return new google.maps.marker.AdvancedMarkerElement(clusterOptions); } } FWP.hooks.addFilter('facetwp_map/clusterer', function(clusterargs, clusterconfig) { // Optionally set other clusterer options here // Set a custom enderer clusterargs['renderer'] = customrenderer; return clusterargs; }); }); })(fUtil); </script> <?php }, 100 ); // Add d3-color libraries for color interpolation renderer // https://www.npmjs.com/package/d3-color // https://www.npmjs.com/package/d3-interpolate add_filter( 'facetwp_assets', function( $assets ) { $assets['d3-color'] = 'https://cdn.jsdelivr.net/npm/d3-color@3'; $assets['d3-interpolate'] = 'https://cdn.jsdelivr.net/npm/d3-interpolate@3'; return $assets; } );
Example 4: Custom renderer with circular or default SVG icons in a range of colors
Using the following example, cluster icons will display as circular or (default) layered SVG icons in a custom color range based on the number of markers in a cluster.
This basically is the manual version of the color interpolation example above. In lines 13-21 we define three colors for different percentages of the maximum number of markers in the clusters: for 0-20%, 20-60% and 60-100%. Using this setup, you can define as many color levels as you like between 0% and 100%.
If you choose the circular SVG defined as option 1, this example will display like the top image on the right. To use the layered, default SVG icon instead, use option 2. The clusters will then look like the bottom image on the right.
You can customize the SVG’s size with the width and height attributes in line 28 or line 35. The counttext fill color, font-size , font-weight and font-family can be set in line 30 or line 39.
To understand the structure of this code example, read the explanation above.
How to use custom PHP code?
PHP code can be added to your (child) theme's functions.php file. Alternatively, you can use the Custom Hooks add-on, or a code snippets plugin. More info
add_action( 'facetwp_scripts', function() { ?> <script> (function($) { $(function() { if ('object' != typeof FWP) return; var customrenderer = { render: function({count, position}, stats, map) { let color; const percentage = count / stats.clusters.markers.max; if ( percentage < 0.2 ) { color = "#FFA500"; // Orange: 0-20% of max. } else if ( percentage < 0.6 ) { color = "#FF0000"; // Red: 20-60% of max. } else { color = "#800080"; // Purple: 60-100% of max. } // Create SVG literal with dynamic fill color let pinSvgString; // Option 1: Use a simple circular SVG pinSvgString = ` <svg fill="${color}" xmlns="http://www.w3.org/2000/svg" viewBox="0 0 240 240" width="70" height="70"> <circle cx="120" cy="120" opacity=".8" r="70" /> <text x="50%" y="50%" style="fill:#fff" text-anchor="middle" font-size="45" dominant-baseline="middle" font-family="roboto,arial,sans-serif">${count}</text> </svg>`; // Option 2: Use the default layered SVG pinSvgString = ` <svg fill="${color}" xmlns="http://www.w3.org/2000/svg" viewBox="0 0 240 240" width="70" height="70"> <circle cx="120" cy="120" opacity="1" r="55" /> <circle cx="120" cy="120" opacity=".5" r="80" /> <circle cx="120" cy="120" opacity=".3" r="105" /> <text x="50%" y="50%" style="fill:#fff; font-weight: 700" text-anchor="middle" font-size="45" dominant-baseline="middle" font-family="roboto,arial,sans-serif">${count}</text> </svg>`; // create cluster SVG element const parser = new DOMParser(); const pinSvg = parser.parseFromString(pinSvgString, 'image/svg+xml').documentElement; // Optional: style the cluster icon pinSvg.setAttribute("transform", "translate(0 28)"); pinSvg.querySelector('svg text').style.fontSize = '45px'; // Note that font size is scaled in the SVG sizing pinSvg.querySelector('svg text').style.fontWeight = 'bold'; // Optional: set a cluster icon class pinSvg.classList.add('my-cluster-icon'); // set a custom class // Set cluster title text, visible on hover const title = `Cluster of ${count} markers`; // Adjust zIndex to be above other markers const zIndex = 1000000 + count; // Optional: set a cluster icon class pinSvg.classList.add('my-cluster-icon'); // set a custom class const clusterOptions = { map, position, zIndex, title, content: pinSvg, }; return new google.maps.marker.AdvancedMarkerElement(clusterOptions); } } FWP.hooks.addFilter('facetwp_map/clusterer', function(clusterargs, clusterconfig) { // Optionally set other clusterer options here // Set a custom enderer clusterargs['renderer'] = customrenderer; return clusterargs; }); }); })(fUtil); </script> <?php }, 100 );
Example 5: Custom renderer that restores the five “legacy” PNG cluster icons
Using the following example, cluster icons will display as the five “legacy” PNG cluster icons, as they existed in versions earlier than FacetWP 4.4 and the Map add-on v2.0.
In lines 13-31 we use the legacy static logic that determines which of the five icons to show, and in what size. This logic could be made dynamic by making it percentage-based, as shown in lines 13-21 of example 4.
To understand the structure of this code example, read the explanation above.
Note that you can also restore the legacy five cluster icons by using the facetwp_map_init_args PHP hook, as shown below.
How to use custom PHP code?
PHP code can be added to your (child) theme's functions.php file. Alternatively, you can use the Custom Hooks add-on, or a code snippets plugin. More info
add_action( 'facetwp_scripts', function() { ?> <script> (function($) { $(function() { if ('object' != typeof FWP) return; var customrenderer = { render: function({count, position}, stats, map) { // Icon/size based on count. This is exactly the same logic as the legacy 5 icons let i = 1; let size = 53; if (count > 10) { i = 2; size = 56; } if (count > 100) { i = 3; size = 66; } if (count > 1000) { i = 4; size = 78; } if (count > 10000) { i = 5; size = 90; } // Create an HTML Advanced Marker const imgsrc = '/wp-content/plugins/facetwp-map-facet/assets/img/m' + i + '.png'; const pinImgString = ` <div style="position: relative;" class="my-cluster-icon"> <img src="${imgsrc}" width="${size}" height="${size}" alt="clustericon"/> <span class="count" style="position: absolute; left: 0; top: 0; display: block; width: 100%; text-align: center; font-size: 11px; line-height:${size}px; color: #000000; font-weight: bold;">${count}</span> </div>`; const parser = new DOMParser(); const pinImg = parser.parseFromString(pinImgString, 'text/html').body.firstChild; // Optional: set a cluster icon class pinImg.classList.add('my-cluster-icon'); // set a custom class // Set cluster title text, visible on hover const title = `Cluster of ${count} markers`; // Adjust zIndex to be above other markers const zIndex = 1000000 + count; const clusterOptions = { map, position, zIndex, title, content: pinImg, }; return new google.maps.marker.AdvancedMarkerElement(clusterOptions); } } FWP.hooks.addFilter('facetwp_map/clusterer', function(clusterargs, clusterconfig) { // Optionally set other clusterer options here // Set a custom enderer clusterargs['renderer'] = customrenderer; return clusterargs; }); }); })(fUtil); </script> <?php }, 100 );
Legacy ways of customizing the marker cluster icons
There are a few legacy ways of customizing the marker cluster icons that we made backward compatible with the current marker clusterer implementation. With “legacy” we mean the situation before FacetWP v4.4 with the Map add-on v2.0.
These legacy methods all use the facetwp_map_init_args PHP hook. The advantage of using this PHP hook is that the needed code is a lot shorter than doing it in the new JavaScript way, using a custom renderer.
Method 1: Using imagePath and imageExtension
To create five marker cluster icons based on the number of contained markers, with your own icons, use the following code.
The five cluster icons’ sizes and colors represent the number of markers in the cluster. Which of the five cluster icons is shown, is calculated based on the number of markers in that specific cluster. From the smallest to the largest icon, the conditions to show that icon are: <10, <100, <1000, <10000, and >=10000 markers.
Option 1 uses the five “legacy” cluster icons that are available within the Map add-on files. The backward compatibility uses the legacy logic and icon colors/sizes as noted below. So this basically restores the old situation (before v2.0 of the Map add-on), as shown in the image on the right.
Option 2 shows how to use your own icons instead. For this to work, you need to make a custom directory in your theme. In this example, this directory would be /assets/img/googlemaps. The /m in the specified path is not a directory but the first part of the image name.
How to use custom PHP code?
PHP code can be added to your (child) theme's functions.php file. Alternatively, you can use the Custom Hooks add-on, or a code snippets plugin. More info
add_filter( 'facetwp_map_init_args', function( $args ) { if ( isset( $args['config']['cluster'] ) ) { // Option 1: use the 5 legacy cluster icons still available with the Map facet files $args['config']['cluster']['imagePath'] = FACETWP_URL . '/assets/img/m'; // Option 2: Use 5 custom icons in a directory in your theme $args['config']['cluster']['imagePath'] = get_stylesheet_directory_uri() . '/assets/img/googlemaps/m'; // set your own image directory in your theme here. Note: the /m at the end is not a directory, but the first part of the image names. $args['config']['cluster']['imageExtension'] = 'png'; // 'svg' will work too } return $args; } );
You can also use SVGs instead of PNGs. Just change imageExtension in line 10 to 'svg'.
If you use Option 2 above, the five images need the following specific names and sizes to work:
m1.png (size: 53x53 px, default color: blue)
m2.png (size: 56x56 px, default color: yellow)
m3.png (size: 66x66 px, default color: red)
m4.png (size: 78x78 px, default color: magenta)
m5.png (size: 90x90 px, default color: purple)
Method 2: Using the styles array
If you need more control, instead of using the imagePath and imageExtension options, as shown above, you can use the legacy styles array. With this method, you can not only set custom cluster icons and sizes, but also change the cluster icons’ text color and text sizes.
The five cluster icons’ sizes and colors represent the number of markers in the cluster. Which of the five cluster icons is shown, is calculated based on the number of markers in that specific cluster. From the smallest to the largest icon, the conditions to show that icon are: <10, <100, <1000, <10000, and >=10000 markers.
The following example uses the legacy default icon directory (in the Map add-on files) and icon sizes as shown in the image above. It sets the cluster icon text (the number of markers in the cluster) to a size of 11px, and the color to #ffffff (white).
If you want to use custom icons and sizes, specify a directory in your theme in the url option, using get_stylesheet_directory_uri(), as shown in the second example below. Place exactly five images in this directory, with their file names all starting with m (as shown in the overview above). The image sizes need to be the same as specified in the $clustericonsizes array in line 2. Note that the /m in the specified directory is not a directory but the first part of the image name.
The two-dimensional styles array needs five child arrays, for each of the five marker cluster icons, in ascending sizes:
How to use custom PHP code?
PHP code can be added to your (child) theme's functions.php file. Alternatively, you can use the Custom Hooks add-on, or a code snippets plugin. More info
add_filter( 'facetwp_map_init_args', function( $settings ) { $clustericonsizes = array( 53, 56, 66, 78, 90 ); // specify icon image sizes. These are the default values. for ( $i = 1; $i <= 5; $i ++ ) { $settings['config']['cluster']['styles'][] = [ 'url' => FACETWP_URL . '/assets/img/m' . $i . '.png', // directory, required. This is the default directory. 'width' => $clustericonsizes[ $i - 1 ], // required 'height' => $clustericonsizes[ $i - 1 ], // required 'textColor' => '#ffffff', // white, optional. Default: '#000000' 'textSize' => 11, // 11px, optional. Default: 11 ]; } return $settings; } );
The following example shows how to use one SVG image for all five cluster icon sizes. It also sets five custom ascending icon sizes in line 3 and accompanying text sizes in line 4, and sets the text color to white in line 11:
How to use custom PHP code?
PHP code can be added to your (child) theme's functions.php file. Alternatively, you can use the Custom Hooks add-on, or a code snippets plugin. More info
add_filter( 'facetwp_map_init_args', function( $settings ) { $clustericonsizes = array( 40, 80, 150, 255, 360 ); // specify custom icon image sizes $clustericontextsizes = array( 12, 18, 80, 150, 200 ); // specify custom icon text sizes for ( $i = 1; $i <= 5; $i ++ ) { $settings['config']['cluster']['styles'][] = [ 'url' => get_stylesheet_directory_uri() . '/mapicons/m1.svg', // custom directory in your theme, required. 'width' => $clustericonsizes[ $i - 1 ], // required 'height' => $clustericonsizes[ $i - 1 ], // required 'textColor' => '#ffffff', // white, optional. Default: '#000000' 'textSize' => $clustericontextsizes[ $i - 1 ], // text size based on cluster size ]; } return $settings; } );
Customize marker cluster icons by location or post ID
The following elaborate example shows how to customize marker cluster icons based on the location (latitude and/or longitude) of the cluster, or the post IDs of the posts it contains.
In Part 1 we define a custom cluster renderer function that determines how the cluster icon is rendered. Then, in Part 2, we pass this function into the renderer cluster argument.
In lines 79-112 we define a custom cluster icon, using a custom Advanced Marker. In this case, we create an HTML marker that consists of an inline SVG icon. We chose the default cluster icon SVG that is already used by the marker clusterer library.
In line 81 you can see that this SVG has a dynamically set fill attribute that uses a dynamic color value. This fill attribute determines the color of the SVG cluster icon. In lines 14-17 we define two default colors for the SVG, which are set depending on the number of markers in the cluster.
The code demonstrates two options to dynamically set the SVG’s color value:
Option 1 shows how to check for the cluster’s position, consisting of a latitude and longitude, available in position.lat() and position.lng(). If the position is roughly within the borders of the European Union, we define a specific color in line 37.
Option 2 shows how to set a custom cluster color if the cluster contains any of the post IDs specified in the postids array in line 47. We run a matching function that finds the cluster’s marker data by its latitude, then checks if that data contains the targeted post IDs. If it finds a match, we set a custom color for this cluster in lines 71-75.
Note that in lines 22-28 is shown what other cluster data is available in the render function, and how to access it.
How to use custom PHP code?
PHP code can be added to your (child) theme's functions.php file. Alternatively, you can use the Custom Hooks add-on, or a code snippets plugin. More info
add_action( 'facetwp_scripts', function() { ?> <script> (function($) { $(function() { if ('object' != typeof FWP) return; // Part 1: Create a custom cluster renderer function var customrenderer = { render: function({count, position}, stats, map) { // Set default cluster coloring // Change color if this cluster has more markers than the mean cluster, or over 10. // Color is purple by default, orange if over 10 or more than mean. let color = count > Math.max(10, stats.clusters.markers.mean) ? "#e78b0a" : "#9b0fa5"; // Optional: set a custom cluster title (visible on hover) const title = `Cluster of ${count} markers`; // Available cluster data: // Cluster location in `position` variable: position.lat() and position.lng(): // console.log(position.lat()); // Cluster stats in `stats` variable: total markers, clusters, and min/max/mean number of clusters // console.log(stats.clusters); // Get the cluster latitude and longitude let lat = position.lat(); let lng = position.lng(); // ===== Option 1: Cluster color or icon based on cluster position // Set a cluster coloring based on latitude and/or longitude. // This example changes the color if the cluster position is roughly within the borders of the European Union. if ( ( lat >= 35.0 && lat <= 71.0 ) && ( lng >= -25.0 && lng <= 40.0 ) ) { color = "#000000"; } // ===== End Option 1 // ===== Option 2: Cluster color or icon based on contained post IDs // In this example, position.lat() is used to for matching to the post IDs in the cluster, as position is the only cluster data available // Cluster color or icon based on contained post IDs let postids = [ 6886,5644 ]; // Set an array of post IDs // Function to check target latitude agains post latitudes function findMatchingCluster(targetLat, targetPostIds) { for (let i = 0; i < FWP_MAP.mc.clusters.length; i++) { let cluster = FWP_MAP.mc.clusters[i]; let clusterLat = cluster._position.lat(); // Check if latitude matches if (Math.abs(clusterLat - targetLat) < 0.000001) { // Get markers from this cluster let markers = cluster.markers; let clusterPostIds = markers.map(marker => marker.post_id); // Check if any targetPostId exists in this cluster if (targetPostIds.some(id => clusterPostIds.includes(id))) { return cluster; // Found matching cluster } } } return null; } // Run the matching function and set the cluster color for matching clusters let matchingCluster = findMatchingCluster(lat, postids); if ( matchingCluster ) { color = "#000000"; // black } // ===== End Option 2 // Create a custom HTML marker with an SVG of which the fill color is defined above // The default cluster icon SVG is used here const pinSvgString = ` <svg fill="${color}" xmlns="http://www.w3.org/2000/svg" viewBox="0 0 240 240" width="50" height="50"> <circle cx="120" cy="120" opacity=".6" r="70" /> <circle cx="120" cy="120" opacity=".3" r="90" /> <circle cx="120" cy="120" opacity=".2" r="110" /> <text x="50%" y="50%" style="fill:#fff" text-anchor="middle" font-size="50" dominant-baseline="middle" font-family="roboto,arial,sans-serif">${count}</text> </svg>`; // Adjust the cluster zIndex to be above other markers const zIndex = 1000000 + count; // Create the cluster SVG element const parser = new DOMParser(); const pinSvg = parser.parseFromString(pinSvgString, "image/svg+xml").documentElement; // Optional: style the cluster icon pinSvg.setAttribute("transform", "translate(0 28)"); pinSvg.querySelector('svg text').style.fontSize = '55px'; // Note that font size is scaled in the SVG sizing pinSvg.querySelector('svg text').style.fontWeight = 'bold'; // Optional: set a cluster icon class pinSvg.classList.add('my-cluster-icon'); // set a custom class const clusterOptions = { map, position, zIndex, title, content: pinSvg, // Set the created custom HTML marker }; return new google.maps.marker.AdvancedMarkerElement(clusterOptions); } } // Part 2: Set the above defined custom cluster renderer FWP.hooks.addFilter('facetwp_map/clusterer', function(clusterargs, clusterconfig) { clusterargs['renderer'] = customrenderer; return clusterargs }); }); })(fUtil); </script> <?php }, 100 );
Exclude the Proximity marker pin from marker clustering
If you are using the map with a Proximity facet, a yellow location marker is displayed on the map when a location is entered. This Proximity marker will be part of the closest marker cluster and will also be counted in the cluster’s displayed number.
To exclude the Proximity marker pin from the clustering behavior, add the following code to your (child) theme’s functions.php:
How to use custom PHP code?
PHP code can be added to your (child) theme's functions.php file. Alternatively, you can use the Custom Hooks add-on, or a code snippets plugin. More info
add_action( 'facetwp_scripts', function() { ?> <script> (function() { document.addEventListener('facetwp-maps-loaded', function() { var markerClusterer = FWP_MAP.mc; var proximitymarker = markerClusterer.markers.find(m => typeof m.post_id === 'undefined'); if (proximitymarker) { markerClusterer.removeMarker(proximitymarker); proximitymarker.setMap(FWP_MAP.map); } }); })(); </script> <?php }, 100 );
It is also possible to disable the Proximity marker pin entirely.
Customize cluster click behavior
If you want to customize the functionality of the map clusters, the following code shows how to use the onClusterClick option to do something when a cluster is clicked.
Two basic examples are shown: the first uses fitBounds() to zoom into a cluster when it is clicked, which essentially is the default behavior, as defined in defaultOnClusterClickHandler(). The second example shows how to get all markers in the clicked cluster.
More ways to customize clustering behavior can be found in the Google Maps JavaScript MarkerClusterer library documentation.
How to use custom PHP code?
PHP code can be added to your (child) theme's functions.php file. Alternatively, you can use the Custom Hooks add-on, or a code snippets plugin. More info
add_action( 'facetwp_scripts', function() { ?> <script> (function($) { $(function() { if ('object' != typeof FWP) return; FWP.hooks.addFilter('facetwp_map/clusterer', function(clusterargs, clusterconfig) { var onClusterClickHandler = function(e, cluster, map) { // Your code here. Two examples: // Example 1: Zoom in to bounds of cluster. This is the default behaviour, defined in defaultOnClusterClickHandler(); map.fitBounds(cluster.bounds); // Example 2: Put all markers in the clicked cluster into an object const markers = cluster.markers; console.log(markers); // Do something. }; clusterargs['onClusterClick'] = onClusterClickHandler; return clusterargs; }); }); })(fUtil); </script> <?php }, 100 );