Customize Advanced Markers
The Map facet is highly customizable. This page gives an overview of possible customizations of Advanced Markers, among which:
- Introducing Advanced Markers
- Available marker hooks
- Customize the marker pin
- Create an HTML marker
- Customize markers based on post data
- Customize other marker features, like title text, collision behavior, altitude, draggability, and clickability
- Disable marker info windows
- Customize the Proximity facet marker pin
- How to use JavaScript map marker hooks and functions
- Add a class to the post which has its marker clicked
- Open a marker’s info window on mouse hover
- Trigger a marker click and info window on post click
- Change the marker icon when an info window is open
- Display a circle or other shape around (clicked) markers
- Fade in markers on map load and refresh
- Animate markers: drop markers on map load and refresh
- Control marker visibility by map zoom level
To customize the map features, see this page:
To customize the behavior and icons of the built-in marker clusterer and Overlapping Marker Spiderfier features, see these pages:
Introducing Advanced Markers
FacetWP’s “New” Google Maps integration (FacetWP v4.4+ with the Map add-on v2.0+) implements Google’s new Advanced Markers.
Compared to Legacy markers, Advanced Markers are much more flexible in ways they can be customized. Advanced Markers are basically just HTML, so they can be whatever you want.
Important to understand is that there are two types of Advanced Markers:
- Marker pins
- HTML markers
The marker pin is the (red) “pin” icon you see by default. What’s great about this new Advanced Marker pin is that each of its features can now be customized: you can change its color, border color, the color and contents of the glyph (the inner circle), and the pin’s size.
It gets even better: the pin can also be entirely replaced by a HTML marker (and CSS), making styling even more flexible. The marker could for example be an <img> tag, an SVG icon, a styled HTML element with text, or whatever you can come up with.
Both types of customizing the markers can be done with two different hooks: a PHP hook and a JavaScript hook.
Available marker hooks
There are two hooks you can use to filter the marker arguments that determine how a marker looks: a PHP hook and a JavaScript hook.
The PHP hook runs first and is the easiest to use. But it cannot handle more advanced types of customizations. If you need those, you can use the JS hook instead, which runs in the front-end, right before the marker is added to the map.
The facetwp_map_marker_args PHP hook
The facetwp_map_marker_args PHP hook filters the marker $args, and has access to the marker’s post ID and lat/lng position. This hook runs for each marker.
You can use this hook to style/customize the marker pin by setting the pinOptions argument. Or you can use the markerHtml argument to create an HTML-based marker.
The hook can also be used to customize other Advanced Marker features, like title text for accessibility, collision behavior, marker altitude, and draggability.
How to use custom PHP code?
PHP code can be added to your (child) theme's functions.php file. Alternatively, you can use the Custom Hooks add-on, or a code snippets plugin. More info
add_filter( 'facetwp_map_marker_args', function( $args, $post_id ) { // Access the marker's lat/lng position $position = $args['position']; // array of [lat, lng] $lat = $args['position']['lat']; // float $lng = $args['position']['lng']; // float // Set (overwrite the default) marker pin features: $args['pinOptions'] = // .. // Set marker HTML (overwrites $args['pinOptions']) $args['markerHtml'] = // .. return $args; }, 10, 2 );
Note that the markerHtml argument overwrites the pinOptions argument, if you would use them both.
For working examples of how to customize the marker pin element using pinOptions, see the code examples below. And for examples of how to create HTML markers with markerHtml, see this section.
The facetwp_map/marker/content JS hook
Then there is the facetwp_map/marker/content JavaScript hook, that runs for each marker on the front-end, before it is added to the map.
This hook filters the content argument of the marker, which is either a PinElement({}) object, or an HTML DOM element, as shown in the conceptual code below. The filter hook should be run within the facetwp-refresh event so the markers are customized on each map refresh.
The args that the hook has access to are the same marker arguments as are passed in the facetwp_map_marker_args PHP hook: the marker’s post ID (in args.post_id) and the marker’s lat/lng position (in the args.position object). It is even possible to pass custom post data to this hook, via the facetwp_map_marker_args PHP hook’s arguments. Check out the section below for how to do this.
For working examples of how to customize the marker pin element with this hook, see the code examples below. And for examples of how to create HTML markers, see this section.
How to use custom PHP code?
PHP code can be added to your (child) theme's functions.php file. Alternatively, you can use the Custom Hooks add-on, or a code snippets plugin. More info
<?php add_action( 'facetwp_scripts', function() { ?> <script> document.addEventListener('facetwp-refresh', function() { if ('undefined' !== typeof FWP && 'undefined' !== typeof FWP.hooks) { FWP.hooks.addFilter('facetwp_map/marker/content', function(content, args, PinElement) { // Access the marker's post ID console.log(args.post_id); // Access the marker's lat/lng position console.log(args.position); console.log(args.position.lat); console.log(args.position.lng); // Create a pin element. See https://developers.google.com/maps/documentation/javascript/advanced-markers/basic-customization const pin = new PinElement({ // set custom pin options, see examples }); content = pin.element; // Or: // Create markers with HTML. See: https://developers.google.com/maps/documentation/javascript/advanced-markers/html-markers // A simple HTML marker: content = document.createElement('img'); content.src = 'https://developers.google.com/maps/documentation/javascript/examples/full/images/beachflag.png'; return content; }); } }); </script> <?php }, 100 );
Note that anything you set in the facetwp_map/marker/content JavaScript hook, overwrites options set in the facetwp_map_marker_args PHP hook.
Customize the marker pin
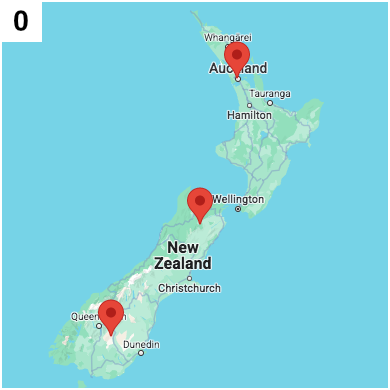
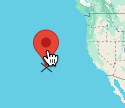
By default, the map uses a (red) marker “pin”.
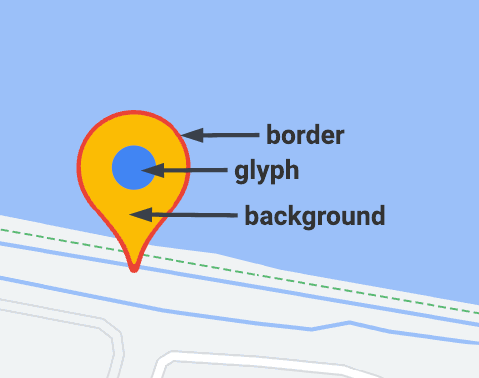
This pin is an HTML element containing an SVG for the shape. As shown in the image on the right, this pin consists of several parts, which can each be customized.
The pin has a background, a border, and a glyph (the circular element in the middle). You can change the colors of each feature, and the size of the whole pin. The glyph contents can also be customized to contain text or an icon.
Both of the above-mentioned hooks can be used to customize the pin, as both run on the marker. The facetwp_map_marker_args PHP hook runs first and is the easiest to use. But it cannot handle more advanced types of customizations. If you need those, you can use the facetwp_map/marker/content JS hook instead, which runs in the front-end, before the marker is added to the map.
Customize the marker pin with the facetwp_map_marker_args PHP hook
With the facetwp_map_marker_args PHP hook, that runs for each marker, and filters the marker $args, you can style/customize the Advanced Marker pin.
The pin consists of the following parts, which can each be customized with the $args['pinOptions'] array:
How to use custom PHP code?
PHP code can be added to your (child) theme's functions.php file. Alternatively, you can use the Custom Hooks add-on, or a code snippets plugin. More info
$args['pinOptions']['scale'] // The pin scale (size) $args['pinOptions']['background'] // The pin background color $args['pinOptions']['borderColor'] // The pin border color $args['pinOptions']['glyphColor'] // The pin glyph color $args['pinOptions']['glyph'] // The pin glyph text or image $args['pinOptions']['glyphHtml'] // The pin glyph HTML. This is a FacetWP-specific option. See below for examples. $args['pinOptions']['pinClass'] // The pin class. This is a FacetWP-specific option. See below for examples.
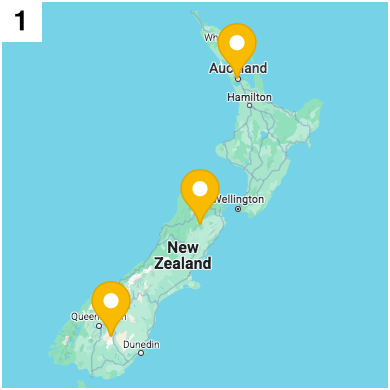
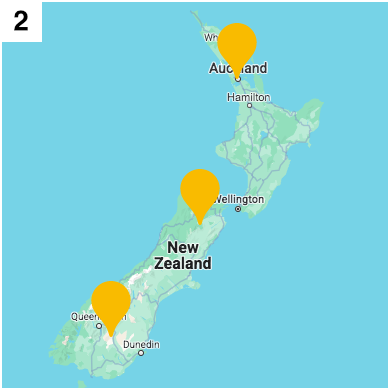
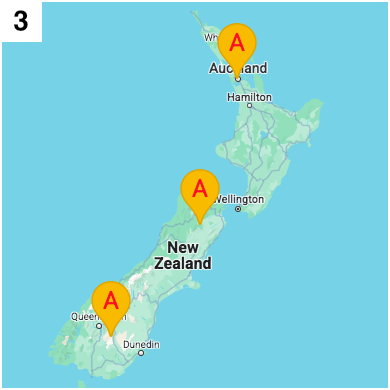
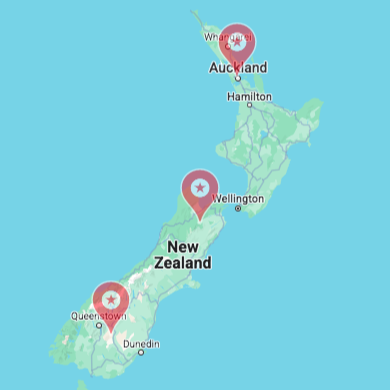
Here are five basic examples of what you can do with pinOptions, with the code for each:


How to use custom PHP code?
PHP code can be added to your (child) theme's functions.php file. Alternatively, you can use the Custom Hooks add-on, or a code snippets plugin. More info
add_filter( 'facetwp_map_marker_args', function( $args, $post_id ) { // Example 1 // Set scale and colors $args['pinOptions']['scale'] = 1.5; // The pin scale (size) $args['pinOptions']['background'] = '#FBBC04'; // The pin background color $args['pinOptions']['borderColor'] = '#E2A704'; // The pin border color $args['pinOptions']['glyphColor'] = '#FFFFFF'; // The pin glyph color $args['pinOptions']['pinClass'] = 'my-custom-marker'; // The pin class // Example 2 // Remove glyph and border $args['pinOptions']['scale'] = 1.5; // The pin scale (size) $args['pinOptions']['background'] = '#FBBC04'; // The pin background color $args['pinOptions']['borderColor'] = '#FBBC04'; // The pin border color $args['pinOptions']['glyph'] = ''; // Remove glyph $args['pinOptions']['pinClass'] = 'my-custom-marker'; // The pin class // Example 3 // Set glyph text $args['pinOptions']['scale'] = 1.5; // The pin scale (size) $args['pinOptions']['background'] = '#FBBC04'; // The pin background color $args['pinOptions']['borderColor'] = '#E2A704'; // The pin border color $args['pinOptions']['glyphColor'] = '#FF0023'; // Set glyph text color $args['pinOptions']['glyph'] = 'A'; // Set glyph text $args['pinOptions']['pinClass'] = 'my-custom-marker'; // The pin class // Example 4 // Set glyph text as Unicode character // For Unicode characters, see for example: https://www.amp-what.com/ $args['pinOptions']['scale'] = 1.5; // The pin scale (size) $args['pinOptions']['background'] = '#FBBC04'; // The pin background color $args['pinOptions']['borderColor'] = '#E2A704'; // The pin border color $args['pinOptions']['glyphColor'] = '#000000'; // Set glyph text color $args['pinOptions']['glyph'] = '✪'; // Set glyph text as Unicode character $args['pinOptions']['pinClass'] = 'my-custom-marker'; // The pin class // Example 5 // Set glyph text as emoji $args['pinOptions']['scale'] = 1.5; // The pin scale (size) $args['pinOptions']['background'] = '#FBBC04'; // The pin background color $args['pinOptions']['borderColor'] = '#E2A704'; // The pin border color $args['pinOptions']['glyph'] = '🤗'; // Set glyph text as emoji $args['pinOptions']['pinClass'] = 'my-custom-marker'; // The pin class return $args; }, 10, 2 );
Use images or icon fonts as marker pin glyph with PHP
As demonstrated in the examples above, the marker pin’s glyph by default is a colored circle. It can also be empty or contain text, a Unicode icon, and even an emoji.
What is also possible is to use an image as glyph, or a font icon.
Use an image as glyph with PHP
glypHtml option.To set an image as glyph, set the glyphHtml variable in $args['pinOptions'] to an HTML string.
In line 4 of the example below, we set it to an <img> element.
Note that the image needs a size, which you can set by adding a width and (optional) height attribute on the <img> tag. Or, as shown in the example, by using inline CSS:
How to use custom PHP code?
PHP code can be added to your (child) theme's functions.php file. Alternatively, you can use the Custom Hooks add-on, or a code snippets plugin. More info
add_filter( 'facetwp_map_marker_args', function( $args, $post_id ) { $args['pinOptions']['scale'] = 1.5; $args['pinOptions']['glyphHtml'] = '<img src="https://developers.google.com/maps/documentation/javascript/examples/full/images/beachflag.png" class="my-custom-glyph_html" style="width:20px; height:20px;"/>'; // Set glyph HTML. Set size with width or height attribute, or inline CSS return $args; }, 10, 2 );
Use a font icon as glyph with PHP
glypHtml option.As shown in the following example, it is also possible to set a font icon as the marker pin glyph.
To accomplish this, in line 7 we set the glyphHtml variable in $args['pinOptions'] to the HTML string needed for the font icon.
In this example, we use the FontAwesome library and the pizza-slice icon. The code assumes you already have included the FontAwesome font and CSS on your site.
Note that the font icon needs a size, which you can set by defining a CSS font-size as (inline) CSS.
The icon’s font color is determined by the glyphColor set in line 6.
How to use custom PHP code?
PHP code can be added to your (child) theme's functions.php file. Alternatively, you can use the Custom Hooks add-on, or a code snippets plugin. More info
add_filter( 'facetwp_map_marker_args', function( $args, $post_id ) { $args['pinOptions']['scale'] = 1.5; $args['pinOptions']['background'] = '#FF8300'; $args['pinOptions']['borderColor'] = '#FFD514'; $args['pinOptions']['glyphColor'] = '#FFFFFF'; // Set pin glyph color, which determines the icon font color $args['pinOptions']['glyphHtml'] = '<i class="fa fa-pizza-slice fa-lg" style="font-size: 20px"></i>'; // Set the font icon HTML. Use CSS font-size to control the font icon size. return $args; }, 10, 2 );
Customize the marker pin with the facetwp_map/marker/content JS hook
The facetwp_map/marker/content JavaScript hook can be used for even more advanced ways of styling Advanced Markers. You can use it both for styling marker pins, as shown below, and for creating HTML markers.
The following example shows how to first set the same pinOptions as in the facetwp_map_marker_args PHP hook, as shown above.
The pin.element that is created like this, is an HTML element with class GMAMP-maps-pin-view, which contains an inline SVG icon that is the pin shape itself.
This whole pin element can be styled directly by setting CSS properties on it, as shown in line 24.
Or you can style the glyph text directly, by setting styles to the <text> element in the <svg> of the pin element, as shown in line 29-30.
Or you can give the pin element a custom class, which can then be used to style it with CSS, as shown in line 25. Or you can give a class to the <text> element in the <svg>, to style the glyph text, as shown in line 33
How to use custom PHP code?
PHP code can be added to your (child) theme's functions.php file. Alternatively, you can use the Custom Hooks add-on, or a code snippets plugin. More info
add_action( 'facetwp_scripts', function() { ?> <script> document.addEventListener('facetwp-refresh', function() { if ('undefined' !== typeof FWP && 'undefined' !== typeof FWP.hooks) { FWP.hooks.addFilter('facetwp_map/marker/content', function( content, args, PinElement ) { // Create a new marker pin element to overwrite the default one const pin = new PinElement({ scale: 1.5, // pin scale/size background: '#FF0023', // pin background color borderColor: '#FFFFFF', // pin border color glyphColor: '#FFFFFF', // pin glyph color glyph: '✪', // glyph Unicode icon. See for example: https://www.amp-what.com/ //glyph: 'A', // glyph text //glyph: '😀', // use an emoji for the glyph text //glyph: '', // remove the glyph entirely }); // A few ways to add extra styling to the pin, which is an SVG: // Style the whole custom marker pin pin.element.style.opacity = '0.5'; // Set CSS opacity pin.element.classList.add('my-pin-class'); // set a custom class on the pin element // Style the SVG > text element (which contains the glyph text) directly // Note that when pin scale is in play: font-size will be scaled too! pin.element.querySelector('svg text').style.fontSize = '16px'; // set glyph text font-size pin.element.querySelector('svg text').style.fontWeight = 'bold'; // set glyph text font-weight // Or set a class on the SVG > text element, to style the glyph text pin.element.querySelector('svg text').classList.add('my-glyph-text-class'); // Pass the customized pin to the marker content argument content = pin.element; return content; }); } }); </script> <?php }, 100 );
Use images or icon fonts as marker pin glyph with JS
As demonstrated in the examples above, the marker pin’s glyph by default is a colored circle. It can also be empty or contain text, a Unicode icon, and even an emoji.
What is also possible is to use an image as glyph, or a font icon.
Use an image as glyph with JS

The following example shows how to set an image as glyph.
First, we create a glyphImg variable in line 12, and set it to contain an <img> element. In the next line, we set its src attribute to the image URL, an SVG in this case.
The glypImg variable is then set as glyph option in line 18 when creating the pin element.
How to use custom PHP code?
PHP code can be added to your (child) theme's functions.php file. Alternatively, you can use the Custom Hooks add-on, or a code snippets plugin. More info
add_action( 'facetwp_scripts', function() { ?> <script> document.addEventListener('facetwp-refresh', function() { if ('undefined' !== typeof FWP && 'undefined' !== typeof FWP.hooks) { FWP.hooks.addFilter('facetwp_map/marker/content', function( content, args, PinElement ) { // Create an img element for the glyph // This examples creates a marker with a custom SVG as glyph (the Google logo) // See: https://developers.google.com/maps/documentation/javascript/advanced-markers/graphic-markers#graphic-glyph const glyphImg = document.createElement('img'); glyphImg.src = 'https://developers.google.com/maps/documentation/javascript/examples/full/images/google_logo_g.svg'; // Create a new marker pin element to overwrite the default one const pin = new PinElement({ scale: 1.5, // pin scale/size glyph: glyphImg, // set the image to show as the glyph }); // Pass the customized pin to the marker content argument content = pin.element; return content; }); } }); </script> <?php }, 100 );
Use a font icon as glyph with JS
As shown in the following example, it is also possible to set a font icon as the marker pin glyph.
To accomplish this, in line 13 we create an icon variable, and set it to contain an empty <div> element.
The font icon HTML is then set as the <div>’s child element in line 14.
In this example, we use the FontAwesome library and the pizza-slice icon. The code assumes you already have included the FontAwesome font and CSS on your site.
The icon variable is then set as glyph option in line 22 when creating the pin element.
Note that the font icon needs a size, which you can set by defining a CSS font-size as (inline) CSS in line 14.
The icon’s font color is determined by the glyphColor set in line 21.
How to use custom PHP code?
PHP code can be added to your (child) theme's functions.php file. Alternatively, you can use the Custom Hooks add-on, or a code snippets plugin. More info
add_action( 'facetwp_scripts', function() { ?> <script> document.addEventListener('facetwp-refresh', function() { if ('undefined' !== typeof FWP && 'undefined' !== typeof FWP.hooks) { FWP.hooks.addFilter('facetwp_map/marker/content', function( content, args, PinElement ) { // Create an HTML element for the glyph // This examples creates a marker with a Font Awesome icon for the glyph, and uses inline CSS to set the size // See: https://developers.google.com/maps/documentation/javascript/advanced-markers/graphic-markers#icon-fonts // This example uses the FontAwesome pizza-slice icon: https://fontawesome.com/icons/pizza-slice?f=classic&s=solid const icon = document.createElement("div"); icon.innerHTML = '<i class="fa fa-pizza-slice fa-lg" style="font-size: 20px"></i>'; // Use CSS font-size to control the font icon size. // Create a new marker pin element to overwrite the default one const pin = new PinElement({ scale: 1.5, // pin scale/size background: '#FF8300', // pin background color borderColor: '#FFD514', // pin border color glyphColor: '#FFFFFF', // pin glyph color, which determines the icon font color glyph: icon, // set the font icon element to show as the glyph }); // Pass the customized pin to the marker content argument content = pin.element; return content; }); } }); </script> <?php }, 100 );
Create an HTML marker
Besides customizing the default marker pin, you can also entirely replace the pin with custom HTML (and CSS), making styling even more flexible.
The marker could be an <img> tag, an SVG icon, a styled HTML element with text, or whatever you can come up with. See the examples below for inspiration.
Both of the above-mentioned hooks can be used to create HTML markers, as both run on the marker. The facetwp_map_marker_args PHP hook runs first and is the easiest to use. But it cannot handle more advanced types of customizations. If you need those, you can use the facetwp_map/marker/content JS hook instead, which runs in the front-end, before the marker is added to the map.
Create an HTML marker with the facetwp_map_marker_args PHP hook
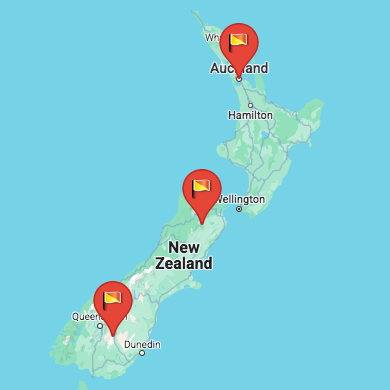
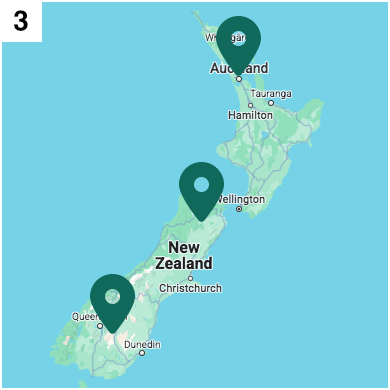
Below are four examples of HTML markers made with the facetwp_map_marker_args hook. Although you can’t see it from the image, each of the examples is made differently.
With this hook, an HTML marker can be created by passing HTML to the $args['markerHtml'] marker argument. The below example code shows four methods. You could create an <img> tag with a PNG or SVG image URL in its src attribute – examples 1 and 2. Or you could use an inline SVG – example 3. Or, you could create arbitrary HTML (e.g. a simple <div>) and style it with CSS into a shape – example 4.
In each of the examples below, the code shows how to add a custom class for extra CSS styling. Using the inline SVG (example 3), you need to add the class in the SVG code itself. For example 4, make sure to include the CSS below.

How to use custom PHP code?
PHP code can be added to your (child) theme's functions.php file. Alternatively, you can use the Custom Hooks add-on, or a code snippets plugin. More info
add_filter( 'facetwp_map_marker_args', function( $args, $post_id ) { // Example 1 // Use a PNG image URL. See https://developers.google.com/maps/documentation/javascript/advanced-markers/graphic-markers $args['markerHtml'] = '<img src="https://developers.google.com/maps/documentation/javascript/examples/full/images/beachflag.png" class="my-png-marker" alt="marker icon" />'; // Example 2 // Use an SVG image URL $args['markerHtml'] = '<img src="https://yourdomain.com/path/to/your/image.svg" class="my-png-marker" alt="marker icon" />'; // Example 3 // Use an inline SVG // We use the FontAwesome 'location dot' icon here: https://fontawesome.com/icons/location-dot?f=classic&s=solid // https://developers.google.com/maps/documentation/javascript/advanced-markers/graphic-markers#inline-svg // A custom class can be set in the inline SVG code itself. // Note: if the SVG does not have a "fill" attribute, you can style it by its class, with CSS. // In this case: .my-svg-marker { fill: #00695B; } $args['markerHtml'] = '<svg xmlns="http://www.w3.org/2000/svg" width="45" viewBox="0 0 384 512" class="my-svg-marker"><path d="M215.7 499.2C267 435 384 279.4 384 192C384 86 298 0 192 0S0 86 0 192c0 87.4 117 243 168.3 307.2c12.3 15.3 35.1 15.3 47.4 0zM192 128a64 64 0 1 1 0 128 64 64 0 1 1 0-128z" /></svg>'; // Example 4 // Use arbitrary HTML // https://developers.google.com/maps/documentation/javascript/advanced-markers/html-markers // Needs custom CSS, see below $args['markerHtml'] = '<div class="price-tag-marker">$2.5M</div>'; return $args; }, 10, 2 );
To retrieve URLs for images stored in your theme directory or the uploads directory, you can use the following WordPress functions:
How to use custom PHP code?
PHP code can be added to your (child) theme's functions.php file. Alternatively, you can use the Custom Hooks add-on, or a code snippets plugin. More info
// To get the theme directory URL, use get_stylesheet_directory_uri(). // If a child theme is being used, this function will return the child theme’s directory URL. // See: https://developer.wordpress.org/reference/functions/get_stylesheet_directory_uri/ $args['markerHtml'] = '<img src="' . get_stylesheet_directory_uri() . '/assets/images/my-custom-marker.png" class="my-custom-marker" alt="marker icon" />'; // If you need to always use the parent theme directory URL, even if you use a child theme, // use get_template_directory_uri() instead. // See: https://developer.wordpress.org/reference/functions/get_template_directory_uri/ $args['markerHtml'] = '<img src="' . get_template_directory_uri() . '/assets/images/my-custom-marker.png" class="my-custom-marker" alt="marker icon" />'; // To use the /wp-content/uploads directory URL, use wp_upload_dir(). // See: https://developer.wordpress.org/reference/functions/wp_upload_dir/ $upload_dir = wp_upload_dir(); $args['markerHtml'] = '<img src="' . $upload_dir['baseurl'] . '/my-custom-marker.png" class="my-custom-marker" alt="marker icon" />';
The following CSS is needed for the price tag HTML markers (example 4 above).
In lines 6-8 you can also see how to style the color of SVG markers with CSS (if they don’t have a fill attribute. This makes it possible to create colored SVG markers, where the color could be based on a dynamically set class that depends on the post ID (or other post data). See the examples below.
How to use custom PHP code?
PHP code can be added to your (child) theme's functions.php file. Alternatively, you can use the Custom Hooks add-on, or a code snippets plugin. More info
add_action( 'facetwp_scripts', function () { ?> <style> /* Set the color of an SVG marker if it does not have a fill attribute */ .my-svg-marker { fill: #00695B; } /* Styles needed for the price tag marker in example 4 */ .price-tag-marker { background-color: #0051FA; border-radius: 8px; color: #FFFFFF; font-size: 14px; padding: 10px 15px; position: relative; } .price-tag-marker::after { content: ""; position: absolute; left: 50%; top: 100%; transform: translate(-50%, 0); width: 0; height: 0; border-left: 8px solid transparent; border-right: 8px solid transparent; border-top: 8px solid #0051FA; } </style> <?php }, 100 );
Create an HTML marker with the facetwp_map/marker/content JS hook
Below are four examples of HTML markers made withthe facetwp_map/marker/content hook. Although you can’t see it from the image, each of the examples is made differently.
With this hook, an HTML marker can be created by passing an HTML DOM element to the content variable. The below example code shows four methods. You could create an <img> tag with a PNG or SVG image URL in its src attribute – examples 1 and 2. Or you could use an inline SVG – example 3. Or, you could create arbitrary HTML (e.g. a simple <div>) and style it with CSS into a shape – example 4.
In each of the examples below, the code shows a way to add a custom class for extra CSS styling. Using the inline SVG (example 3), you need to add the class in the SVG code itself. For example 4, make sure to include the CSS below.
How to use custom PHP code?
PHP code can be added to your (child) theme's functions.php file. Alternatively, you can use the Custom Hooks add-on, or a code snippets plugin. More info
add_action( 'facetwp_scripts', function() { ?> <script> document.addEventListener('facetwp-refresh', function() { if ('undefined' !== typeof FWP && 'undefined' !== typeof FWP.hooks) { FWP.hooks.addFilter('facetwp_map/marker/content', function( content, args, PinElement ) { // Example 1 // Use a PNG image URL. See https://developers.google.com/maps/documentation/javascript/advanced-markers/graphic-markers content = document.createElement('img'); content.src = 'https://developers.google.com/maps/documentation/javascript/examples/full/images/beachflag.png'; content.className = "my-png-marker"; // set a custom class // Example 2 // Use an SVG image URL content = document.createElement('img'); content.src = 'https://yourdomain.com/path/to/your/image.svg'; content.className = "my-svg-marker"; // set a custom class // Example 3 // Use an inline SVG // We use the FontAwesome 'location dot' SVG icon here: https://fontawesome.com/icons/location-dot?f=classic&s=solid // https://developers.google.com/maps/documentation/javascript/advanced-markers/graphic-markers#inline-svg // A custom class can be set in the inline SVG code itself. // Note: if the SVG does not have a "fill" attribute, you can style it by its class, with CSS. // In this case: .my-svg-marker { fill: #00695B; } const markerSvgString = '<svg xmlns="http://www.w3.org/2000/svg" width="45" viewBox="0 0 384 512" class="my-svg-marker"><path d="M215.7 499.2C267 435 384 279.4 384 192C384 86 298 0 192 0S0 86 0 192c0 87.4 117 243 168.3 307.2c12.3 15.3 35.1 15.3 47.4 0zM192 128a64 64 0 1 1 0 128 64 64 0 1 1 0-128z" /></svg>'; const parser = new DOMParser(); const markerSvg = parser.parseFromString(markerSvgString, 'image/svg+xml').documentElement; content = markerSvg; // Example 4 // Use arbitrary HTML // https://developers.google.com/maps/documentation/javascript/advanced-markers/html-markers // Make sure to include the CSS below to style the div. // Needs custom CSS, see below const priceTag = document.createElement("div"); priceTag.className = "price-tag-marker"; // set a custom class priceTag.textContent = "$2.5M"; // set a fixed text content = priceTag; return content; }); } }); </script> <?php }, 100 );
The following CSS is needed for the price tag HTML markers (example 3 above).
In lines 6-8 you can also see how to style the color of SVG markers with CSS (if they don’t have a fill attribute. This makes it possible to create colored SVG markers, where the color could be based on a dynamically set class that depends on the post ID (or other post data). See the examples below.
How to use custom PHP code?
PHP code can be added to your (child) theme's functions.php file. Alternatively, you can use the Custom Hooks add-on, or a code snippets plugin. More info
add_action( 'facetwp_scripts', function () { ?> <style> /* Set the color of an SVG marker if it does not have a fill attribute */ .my-svg-marker { fill: #00695B; } /* Styles needed for the price tag marker in example 4 */ .price-tag-marker { background-color: #0051FA; border-radius: 8px; color: #FFFFFF; font-size: 14px; padding: 10px 15px; position: relative; } .price-tag-marker::after { content: ""; position: absolute; left: 50%; top: 100%; transform: translate(-50%, 0); width: 0; height: 0; border-left: 8px solid transparent; border-right: 8px solid transparent; border-top: 8px solid #0051FA; } </style> <?php }, 100 );
Customize markers based on post data
You may want to set custom markers only for specific posts, based on the post ID, known post data, or the marker’s position. Or you may want to use post data within the custom marker itself.
This can be done both with the facetwp_map_marker_args PHP hook and with the facetwp_map/marker/content JS hook.
Using facetwp_map_marker_args is the easiest, because with PHP you can get any post data you need (e.g. categories, terms, or custom fields) using the post ID, which is available in the hook.
When using the facetwp_map/marker/content JS hook, the post ID and marker position are also directly available. But when you need to use post data in this hook, you first need to pass it from the PHP hook to the JS hook in its arguments.
Customize markers based on post data with the facetwp_map_marker_args PHP hook
Within the facetwp_map_marker_args PHP hook, both the post ID and the marker’s position (lat/lng values) are directly available to base your custom marker logic on.
With the $post_id, you can get any post data you like, which makes it possible to set custom markers based on any post property or logic you can come up with. You could set custom markers based on post ID, post categories/terms, or custom field data. Or you could use this post data in the marker itself, as pin glyph text, or in the construction of an HTML marker as text or image URL.
Here are some examples that show how to do this:
PHP example 1: markers based on post ID
This example shows how to set a custom marker based on (an array of) post IDs:
How to use custom PHP code?
PHP code can be added to your (child) theme's functions.php file. Alternatively, you can use the Custom Hooks add-on, or a code snippets plugin. More info
// Example 1 // Set a custom marker based on the post ID add_filter( 'facetwp_map_marker_args', function( $args, $post_id ) { if ( in_array( $post_id, [ 5648, 5649, 5650 ] ) ) { // array of your post IDs to match // Set your custom pin options: $args['pinOptions']['scale'] = 1.5; $args['pinOptions']['background'] = '#FBBC04'; $args['pinOptions']['pinClass'] = 'my-custom-marker'; // Set a custom pin class // Or, use custom marker HTML: $args['markerHtml'] = '<img src="https://yourdomain.com/path/to/your/image.svg" class="my-custom-marker" alt="marker icon" />'; } return $args; }, 10, 2 );
PHP example 2: markers based on marker position
You could also use the marker/post’s position to determine which marker to show. The position consists of the marker’s lat and lng values, which are directly available in the hook, as shown in lines 6-8.
This example sets a different marker if the position is roughly within the borders of the European Union:
How to use custom PHP code?
PHP code can be added to your (child) theme's functions.php file. Alternatively, you can use the Custom Hooks add-on, or a code snippets plugin. More info
// Example 2 // Set a custom marker based on marker position (lat/lng values) add_filter( 'facetwp_map_marker_args', function( $args, $post_id ) { // How to access the marker's lat/lng position: $position = $args['position']; // array of [lat, lng] $lat = $args['position']['lat']; // float $lng = $args['position']['lng']; // float // Set a different marker if the position is roughly within the borders of the European Union. if ( ( $lat >= 35.0 && $lat <= 71.0 ) && ( $lng >= -25.0 && $lng <= 40.0 ) ) { // Set your custom pin options: $args['pinOptions']['scale'] = 1.5; $args['pinOptions']['background'] = '#FBBC04'; $args['pinOptions']['pinClass'] = 'my-custom-marker'; // Set a custom pin class // Or, use custom marker HTML: $args['markerHtml'] = '<img src="https://yourdomain.com/path/to/your/image.svg" class="my-custom-marker" alt="marker icon" />'; } return $args; }, 10, 2 );
PHP example 3: markers based on post terms or categories
Another option would be to retrieve post data with the available $post_id and determine which marker to show based on that data.
This example shows how to set markers based on the post’s terms/categories. It uses has_term() in line 8 to check for terms in a custom taxonomy. To check for categories instead, you can use has_category().
How to use custom PHP code?
PHP code can be added to your (child) theme's functions.php file. Alternatively, you can use the Custom Hooks add-on, or a code snippets plugin. More info
// Example 3 // Set a custom marker based on the post's terms/categories add_filter( 'facetwp_map_marker_args', function( $args, $post_id ) { $taxonomy = 'genre'; // Replace with your custom taxonomy name. $terms_to_check = array( 'genre-slug-1', 'Genre Name', 456 ); // Array of term slugs, names, OR IDs. if ( has_term( $terms_to_check, $taxonomy, $post_id ) ) { // Set your custom pin options: $args['pinOptions']['scale'] = 1.5; $args['pinOptions']['background'] = '#FBBC04'; $args['pinOptions']['pinClass'] = 'my-custom-marker'; // Set a custom pin class // Or, use custom marker HTML: $args['markerHtml'] = '<img src="https://yourdomain.com/path/to/your/image.svg" class="my-custom-marker" alt="marker icon" />'; } return $args; }, 10, 2 );
PHP example 4: markers based on post type
This example shows how to create a custom HTML marker for posts of a certain post type. It uses get_post_type() to get the post type with the $post_id parameter. If the post type is my-post-type, it uses a default hard-coded marker icon. If it is not, it gets the marker icon name from an ACF custom field with the get_field() function, and appends the .png extension. The snippet also shows how to use the /wp-content/uploads/ directory in the marker image URL:
How to use custom PHP code?
PHP code can be added to your (child) theme's functions.php file. Alternatively, you can use the Custom Hooks add-on, or a code snippets plugin. More info
// Example 4 // Create a custom HTML marker for posts of a certain post type, // with a default custom marker image, or an image URL based on an ACF custom field add_filter( 'facetwp_map_marker_args', function( $args, $post_id ) { $post_type = get_post_type( $post_id ); // Get the post type of the marker's post $upload_dir = wp_upload_dir(); // Get the /wp-content/uploads directory URL if ( $post_type === 'my-post-type' ) { // Replace 'my-post-type' with the post type to check for $custom_img = 'my-post-type-marker.png'; // The image file name or path within /wp-content/uploads } else { $custom_img = get_field( 'my-marker-field', $post_id ) . '.png'; // Get the image file name from an ACF custom field } // Set the marker HTML: $args['markerHtml'] = '<img src="' . $upload_dir['baseurl'] .'/'. $custom_img . '" class="my-custom-marker" alt="marker icon" />'; return $args; }, 10, 2 );
PHP example 5: circular HTML markers based on featured image
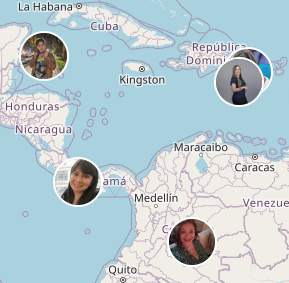
This example shows how to create a custom HTML marker based on the post’s featured image. This makes it possible to display for example company logos or user portraits on the map. With the included CSS, the marker images will be circular with a white border, like the image on the right.
Adapt the width (and optional height) attribute of the <img> HTML in line 13 to the desired marker image’s width and height.
To avoid image distortion, set a WP image size with the same size or proportions in the second parameter of the get_the_post_thumbnail_url() function, in line 5. The image size defaults to post-thumbnail, but you can use any image size set in Settings > Media or your theme’s settings. Or you can create your own image size with add_image_size(). For more info about how image sizes in WordPress work, see this tutorial section.
How to use custom PHP code?
PHP code can be added to your (child) theme's functions.php file. Alternatively, you can use the Custom Hooks add-on, or a code snippets plugin. More info
// Example 5 // Create a custom circular HTML marker with the featured image add_filter( 'facetwp_map_marker_args', function( $args, $post_id ) { if ( has_post_thumbnail( $post_id ) ) { $member_photo = get_the_post_thumbnail_url( $post_id, 'post-thumbnail' ); // Set your desired wp image size } else { $member_photo = get_home_url() . '/wp-content/uploads/default-member-photo.jpg'; // Use a fall-back image if a post does not have a featured image uploaded } // Set the marker HTML // Use width and height attributes for the image size, // or use CSS to set the image size and other styling, see below $args['markerHtml'] = '<img src="' . $member_photo . '" class="my-custom-marker" alt="marker icon" width="40" height="40" />'; return $args; }, 10, 2 ); // Styles needed for circular markers // and (optional) marker sizing (depending on width/height attribute in the <img> tag) add_action( 'facetwp_scripts', function () { ?> <style> /* Adapt '.my-custom-marker to the class of your custom marker */ .facetwp-type-map img.my-custom-marker { border-radius: 50%; /* circular */ border: 2px solid #fff !important; /* 2px white border */ box-sizing: border-box; /* make sure the border is within the set image dimension */ /* Optional: use CSS to set the image size */ width: 40px; height: 40px; } </style> <?php }, 100 );
PHP example 6: use the post term name in the pin glyph or marker HTML
This example shows how to use a post’s term name(s) in the pin glyph text or the marker HTML:
How to use custom PHP code?
PHP code can be added to your (child) theme's functions.php file. Alternatively, you can use the Custom Hooks add-on, or a code snippets plugin. More info
// Example 6 // Set the pin glyph text or HTML marker text based on the post's term/category add_filter( 'facetwp_map_marker_args', function( $args, $post_id ) { $terms = get_the_terms($post_id, 'my-taxonomy-name' ); // Replace 'my-taxonomy-name' with the name of your custom taxonomy. if ( !empty( $terms ) ) { $terms = implode( ', ', wp_list_pluck( $terms, 'name' ) ); // Get (comma-separated) term(s) // Set your custom marker here, using $args['pinOptions']. // E.g. set the post's term(s) as glyph text $args['pinOptions']['glyph'] = $terms; $args['pinOptions']['pinClass'] = 'my-custom-marker'; // Set a custom pin class // Or, set the post's term(s) as HTML marker text: $args['markerHtml'] = '<div class="my-category-marker">' . $terms . '</div>'; } return $args; }, 10, 2 );
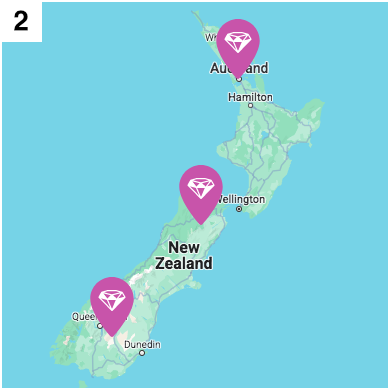
PHP example 7: styled HTML markers with dynamic price data

This example shows how to use the value of an ACF custom field that contains the price, in the pin glyph text or marker HTML.
If you use an HTML marker, and add the price-tag CSS, your markers will look like the image on the right.
How to use custom PHP code?
PHP code can be added to your (child) theme's functions.php file. Alternatively, you can use the Custom Hooks add-on, or a code snippets plugin. More info
// Example 7 // Create a custom dynamic price tag with an HTML marker, with the post's ACF custom price field value as text add_filter( 'facetwp_map_marker_args', function( $args, $post_id ) { $price = get_field( 'my-custom-price-field', $post_id, true ); // Replace 'my-custom-price-field' with the name of your ACF custom field. if ( !empty( $price ) ) { // Set your custom marker here, using $args['pinOptions']. // E.g. set the post’s ACF price field value as glyph text $args['pinOptions']['glyph'] = $price; $args['pinOptions']['pinClass'] = 'my-custom-marker'; // Set a custom pin class // Or, set the post's ACF price field value as HTML marker text: $args['markerHtml'] = '<div class="price-tag-marker">$' . $price . '</div>'; } return $args; }, 10, 2 ); // Styles needed for the price tag marker add_action( 'facetwp_scripts', function () { ?> <style> .price-tag-marker { background-color: #0051FA; border-radius: 8px; color: #FFFFFF; font-size: 14px; padding: 10px 15px; position: relative; } .price-tag-marker::after { content: ""; position: absolute; left: 50%; top: 100%; transform: translate(-50%, 0); width: 0; height: 0; border-left: 8px solid transparent; border-right: 8px solid transparent; border-top: 8px solid #0051FA; } </style> <?php }, 100 );
The same examples can be accomplished with the facetwp_map/marker/content JS hook:
Customize markers based on post data with the facetwp_map/marker/content JS hook
Within the facetwp_map/marker/content JS hook, both the post ID and the marker’s position (lat/lng values) are directly available to base your custom marker logic on. Below are two examples that show how to do this.
If you want to use other post data in this hook, like post categories/terms or custom field data (as shown in PHP examples 3-7 above, you first need to pass this data from the PHP hook to the JS hook in its arguments.
JS example 1: markers based on post ID
This example shows how to set a custom marker based on (an array of) post IDs:
How to use custom PHP code?
PHP code can be added to your (child) theme's functions.php file. Alternatively, you can use the Custom Hooks add-on, or a code snippets plugin. More info
// Example 1 // Set a custom marker based on the post ID add_action( 'facetwp_scripts', function() { ?> <script> document.addEventListener('facetwp-refresh', function() { if ('undefined' !== typeof FWP && 'undefined' !== typeof FWP.hooks) { FWP.hooks.addFilter('facetwp_map/marker/content', function( content, args, PinElement ) { // Access the marker's post ID const post_id = args.post_id const postIds = [5648, 5649, 5650]; // array of your post IDs to match if (postIds.includes(args.post_id)) { // Set your custom pin options: const pin = new PinElement({ scale: 1.5, background: '#FBBC04', }); content = pin.element; // Or, use custom marker HTML: content = document.createElement('img'); content.src = 'https://yourdomain.com/path/to/your/image.svg'; content.className = "my-custom-marker"; // set a custom class } return content; }); } }); </script> <?php }, 100 );
JS example 2: markers based on marker position
You could also use the marker/post’s position, which consists of its lat and lng values. These values are directly available in the hook, as shown in lines 12-14.
This example sets a different marker if the position is roughly within the borders of the European Union:
How to use custom PHP code?
PHP code can be added to your (child) theme's functions.php file. Alternatively, you can use the Custom Hooks add-on, or a code snippets plugin. More info
// Example 2 // Set a custom marker based on marker position (lat/lng values) add_action( 'facetwp_scripts', function() { ?> <script> document.addEventListener('facetwp-refresh', function() { if ('undefined' !== typeof FWP && 'undefined' !== typeof FWP.hooks) { FWP.hooks.addFilter('facetwp_map/marker/content', function( content, args, PinElement ) { // How to access the marker's lat/lng position: const position = args.position; // object containing lat and lng const lat = args.position.lat; // float const lng = args.position.lng; // float // Set a different marker if the position is roughly within the borders of the European Union. if ( ( lat >= 35.0 && lat <= 71.0 ) && ( lng >= -25.0 && lng <= 40.0 ) ) { // Set your custom pin options: const pin = new PinElement({ scale: 1.5, background: '#FBBC04', }); content = pin.element; // Or, use custom marker HTML: content = document.createElement('img'); content.src = 'https://yourdomain.com/path/to/your/image.svg'; content.className = "my-custom-marker"; // set a custom class } return content; }); } }); </script> <?php }, 100 );
Use custom post data in the facetwp_map/marker/content JS hook
The facetwp_map/marker/content JS hook has direct access to the post ID and the marker’s lat/lng position, which both can be used to set custom markers, as shown above.
However, if you need other post data, like post categories/terms or custom field data, you first need to pass this data from the PHP hook to the JS hook in its arguments.
In the code examples below, we’ll recreate PHP examples 3-7 above with the facetwp_map/marker/content JS hook.
Each example has two parts. In the first part, we get the needed post data within the facetwp_map_marker_args hook, and pass it in the hooks $args. In these examples, we are using $args['customData'] to store the post data. You can choose any argument name here, and create one or more arrays for all post data you need to pass.
In the second part the post data we stored in $args['customData'] is now available in the facetwp_map/marker/content hook’s args.customData object. The examples below show how to use its values to set the custom marker pin (or its glyph text), or the custom HTML marker (or its text).
JS example 3: markers based on post terms or categories
This example shows how to retrieve post data with the available $post_id and determine which marker to show based on that data.
The following code shows how to set markers based on the post’s terms/categories. It uses has_term() in line 10 to check for terms in a custom taxonomy. To check for categories instead, you can use has_category().
How to use custom PHP code?
PHP code can be added to your (child) theme's functions.php file. Alternatively, you can use the Custom Hooks add-on, or a code snippets plugin. More info
// Example 3 // Set a custom marker based on the post's terms/categories // Part 1: Pass custom post data to $args for use in the facetwp_map/marker/content JS hook add_filter( 'facetwp_map_marker_args', function( $args, $post_id ) { // Set a custom marker based on the post's terms/categories $taxonomy = 'genre'; // Replace with your custom taxonomy name. $terms_to_check = array( 'genre-slug-1', 'Genre Name', 456 ); // Array of term slugs, names, OR IDs. if ( has_term( $terms_to_check, $taxonomy, $post_id ) ) { $args['customData']['setCustomMarker'] = true; // you can use any custom argument naming } return $args; }, 10, 2 ); // Part 2: Create custom markers based on passed post data in `args` add_action( 'facetwp_scripts', function() { ?> <script> document.addEventListener('facetwp-refresh', function() { if ('undefined' !== typeof FWP && 'undefined' !== typeof FWP.hooks) { FWP.hooks.addFilter('facetwp_map/marker/content', function( content, args, PinElement ) { // Set a custom marker based on the post's terms/categories, // with the logic passed from the facetwp_map_marker_args PHP hook. if ( args.customData && typeof args.customData.setCustomMarker !== 'undefined' && args.customData.setCustomMarker === true) { // Set your custom pin options: const pin = new PinElement({ scale: 1.5, background: '#FBBC04', }); content = pin.element; // Or, use custom marker HTML: content = document.createElement('img'); content.src = 'https://yourdomain.com/path/to/your/image.svg'; content.className = "my-custom-marker"; // set a custom class content.width = "40"; // set a custom width attribute (or use CSS) content.height = "40"; // set a custom height attribute (or use CSS) } return content; }); } }); </script> <?php }, 100 );
JS example 4: markers based on post type
This example shows how to create a custom HTML marker for posts of a certain post type. It uses get_post_type() to get the post type with the $post_id parameter. If the post type is my-post-type, it uses a default hard-coded marker icon. If it is not, it gets the marker icon name from an ACF custom field with the get_field() function, and appends the .png extension. The snippet also shows how to use the /wp-content/uploads/ directory in the marker image URL:
How to use custom PHP code?
PHP code can be added to your (child) theme's functions.php file. Alternatively, you can use the Custom Hooks add-on, or a code snippets plugin. More info
// Example 4 // Create a custom HTML marker for posts of a certain post type, // with a default custom marker image, or an image URL based on an ACF custom field // Part 1: Pass custom post data to $args for use in the facetwp_map/marker/content JS hook add_filter( 'facetwp_map_marker_args', function( $args, $post_id ) { $post_type = get_post_type( $post_id ); // Get the post type of the marker's post $upload_dir = wp_upload_dir(); // Get the /wp-content/uploads directory URL if ( $post_type === 'my-post-type' ) { // Replace 'my-post-type' with the post type to check for $custom_img = 'my-post-type-marker.png'; // The image file name or path within /wp-content/uploads } else { $custom_img = get_field( 'my-marker-field', $post_id ) . '.png'; // Get the image file name from an ACF custom field } $url = $upload_dir['baseurl'] .'/'. $custom_img; $args['customData']['markerUrl'] = $url; // you can use any custom argument naming return $args; }, 10, 2 ); // Part 2: Create custom markers based on passed post data in `args` add_action( 'facetwp_scripts', function() { ?> <script> document.addEventListener('facetwp-refresh', function() { if ('undefined' !== typeof FWP && 'undefined' !== typeof FWP.hooks) { FWP.hooks.addFilter('facetwp_map/marker/content', function( content, args, PinElement ) { // Set a custom marker based on the post's terms/categories, // with the logic passed from the facetwp_map_marker_args PHP hook. if ( args.customData && typeof args.customData.markerUrl !== 'undefined' ) { // Set the custom marker HTML: content = document.createElement('img'); content.src = args.customData.markerUrl; content.className = "my-custom-marker"; // set a custom class content.width = "40"; // set a custom width attribute (or use CSS) content.height = "40"; // set a custom height attribute (or use CSS) } return content; }); } }); </script> <?php }, 100 );
JS example 5: circular HTML markers based on featured image
This example shows how to create a custom HTML marker based on the post’s featured image. This makes it possible to display for example company logos or user portraits on the map. With the included CSS in part 3, the marker images will be circular with a white border, like the image on the right.
Adapt the width (and optional height) attribute of the <img> HTML in line 34-35 to the desired marker image’s width and height. Or you can use CSS to set the width and height in lines 59-60.
To avoid image distortion, set a WP image size with the same size or proportions in the second parameter of the get_the_post_thumbnail_url() function, in line 7. The image size defaults to post-thumbnail, but you can use any image size set in Settings > Media or your theme’s settings. Or you can create your own image size with add_image_size(). For more info about how image sizes in WordPress work, see this tutorial section.
How to use custom PHP code?
PHP code can be added to your (child) theme's functions.php file. Alternatively, you can use the Custom Hooks add-on, or a code snippets plugin. More info
// Example 5 // Create a custom circular HTML marker with the featured image // Part 1: Pass custom post data to $args for use in the facetwp_map/marker/content JS hook add_filter( 'facetwp_map_marker_args', function( $args, $post_id ) { if ( has_post_thumbnail( $post_id ) ) { $member_photo = get_the_post_thumbnail_url( $post_id, 'post-thumbnail' ); // Set your desired wp image size } else { $member_photo = get_home_url() . '/wp-content/uploads/default-member-photo.jpg'; // Use a fall-back image if a post does not have a featured image uploaded } $args['customData']['markerUrl'] = $member_photo; // you can use any custom argument naming return $args; }, 10, 2 ); // Part 2: Create custom markers based on passed post data in `args` add_action( 'facetwp_scripts', function() { ?> <script> document.addEventListener('facetwp-refresh', function() { if ('undefined' !== typeof FWP && 'undefined' !== typeof FWP.hooks) { FWP.hooks.addFilter('facetwp_map/marker/content', function( content, args, PinElement ) { // Set a custom marker based on the post's terms/categories, // with the logic passed from the facetwp_map_marker_args PHP hook. if ( args.customData && typeof args.customData.markerUrl !== 'undefined' ) { // Set the custom marker HTML: content = document.createElement('img'); content.src = args.customData.markerUrl; content.className = "my-custom-marker"; // set a custom class content.width = "40"; // set a custom width attribute (or use CSS) content.height = "40"; // set a custom height attribute (or use CSS) } return content; }); } }); </script> <?php }, 100 ); // Part 3: Styles needed for circular markers // and (optional) marker sizing (depending on width/height attribute in the <img> tag) add_action( 'facetwp_scripts', function () { ?> <style> /* Adapt '.my-custom-marker to the class of your custom marker */ .facetwp-type-map img.my-custom-marker { border-radius: 50%; /* circular */ border: 2px solid #fff !important; /* 2px white border */ box-sizing: border-box; /* make sure the border is within the set image dimension */ /* Optional: use CSS to set the image size */ width: 40px; height: 40px; } </style> <?php }, 100 );
JS example 6: use the post term name in the pin glyph or marker HTML
This example shows how to use a post’s term name(s) in the pin glyph text or the marker HTML:
How to use custom PHP code?
PHP code can be added to your (child) theme's functions.php file. Alternatively, you can use the Custom Hooks add-on, or a code snippets plugin. More info
// Example 6 // Set the pin glyph text or HTML marker text based on the post’s term/category // Part 1: Pass custom post data to $args for use in the facetwp_map/marker/content JS hook add_filter( 'facetwp_map_marker_args', function( $args, $post_id ) { $terms = get_the_terms($post_id, 'my-taxonomy-name' ); // Replace 'my-taxonomy-name' with the name of your custom taxonomy. if ( !empty( $terms ) ) { $terms = implode( ', ', wp_list_pluck( $terms, 'name' ) ); // Get (comma-separated) term(s) $args['customData']['terms'] = $terms; // you can use any custom argument naming } return $args; }, 10, 2 ); // Part 2: Create custom markers based on passed post data in `args` add_action( 'facetwp_scripts', function() { ?> <script> document.addEventListener('facetwp-refresh', function() { if ('undefined' !== typeof FWP && 'undefined' !== typeof FWP.hooks) { FWP.hooks.addFilter('facetwp_map/marker/content', function( content, args, PinElement ) { if ( args.customData && typeof args.customData.terms !== 'undefined' ) { // Set your custom pin options: const pin = new PinElement({ scale: 1.5, background: '#FBBC04', glyph: args.customData.terms // set the post's term(s) as glyph text }); content = pin.element; // Or, use custom marker HTML: content = document.createElement('div'); content.textContent = args.customData.terms, // set the post's term(s) as marker text content.className = "my-custom-marker"; // set a custom class content.width = "40"; // set a custom width attribute (or use CSS) content.height = "40"; // set a custom height attribute (or use CSS) } return content; }); } }); </script> <?php }, 100 );
JS example 7: styled HTML markers with dynamic price data
This example shows how to use the value of an ACF custom field that contains the price, in the pin glyph text or marker HTML.
If you use an HTML marker, and add the price-tag CSS in part 3, your markers will look like the image on the right.
How to use custom PHP code?
PHP code can be added to your (child) theme's functions.php file. Alternatively, you can use the Custom Hooks add-on, or a code snippets plugin. More info
// Example 7 // Create a custom dynamic price tag with an HTML marker, with the post’s ACF custom price field value as text // Part 1: Pass custom post data to $args for use in the facetwp_map/marker/content JS hook add_filter( 'facetwp_map_marker_args', function( $args, $post_id ) { $price = get_field( 'my-custom-price-field', $post_id, true ); // Replace 'my-custom-price-field' with the name of your ACF custom field. if ( !empty( $price ) ) { $args['customData']['price'] = $price; // you can use any custom argument naming } return $args; }, 10, 2 ); // Part 2: Create custom markers based on passed post data in `args` add_action( 'facetwp_scripts', function() { ?> <script> document.addEventListener('facetwp-refresh', function() { if ('undefined' !== typeof FWP && 'undefined' !== typeof FWP.hooks) { FWP.hooks.addFilter('facetwp_map/marker/content', function( content, args, PinElement ) { if ( args.customData && typeof args.customData.price !== 'undefined' ) { // Set your custom pin options: const pin = new PinElement({ scale: 1.5, background: '#FBBC04', glyph: args.customData.price // set the post's price as glyph text }); content = pin.element; // Or, use custom marker HTML: content = document.createElement('div'); content.textContent = '$' + args.customData.price, // set the post's price as marker text content.className = "price-tag-marker"; // set a custom class content.width = "40"; // set a custom width attribute (or use CSS) content.height = "40"; // set a custom height attribute (or use CSS) } return content; }); } }); </script> <?php }, 100 ); // Part 3: Styles needed for the price tag marker add_action( 'facetwp_scripts', function () { ?> <style> .price-tag-marker { background-color: #0051FA; border-radius: 8px; color: #FFFFFF; font-size: 14px; padding: 10px 15px; position: relative; } .price-tag-marker::after { content: ""; position: absolute; left: 50%; top: 100%; transform: translate(-50%, 0); width: 0; height: 0; border-left: 8px solid transparent; border-right: 8px solid transparent; border-top: 8px solid #0051FA; } </style> <?php }, 100 );
Customize other marker features
Using the facetwp_map_marker_args hook, besides customizing marker icons, you can also customize a range of other marker features:
Add title text for accessibility
Title text appears when the cursor hovers over a marker. Title text is readable by screen readers and is one way to create accessible markers.
To add title text to your markers, use the title argument. The following example uses the post title as title text:
How to use custom PHP code?
PHP code can be added to your (child) theme's functions.php file. Alternatively, you can use the Custom Hooks add-on, or a code snippets plugin. More info
// https://developers.google.com/maps/documentation/javascript/advanced-markers/basic-customization#add-title-text // https://developers.google.com/maps/documentation/javascript/advanced-markers/accessible-markers add_filter( 'facetwp_map_marker_args', function( $args, $post_id ) { $args['title'] = get_the_title( $post_id ); return $args; }, 10, 2 );
Set collision behavior for a marker
Collision behavior controls how a marker will display if it collides (overlaps) with another marker. Collision behavior is only supported on vector maps.
How to use custom PHP code?
PHP code can be added to your (child) theme's functions.php file. Alternatively, you can use the Custom Hooks add-on, or a code snippets plugin. More info
// https://developers.google.com/maps/documentation/javascript/advanced-markers/collision-behavior#set_collision_behavior_for_a_marker add_filter( 'facetwp_map_marker_args', function( $args, $post_id ) { $args['collisionBehavior'] = 'OPTIONAL_AND_HIDES_LOWER_PRIORITY'; // valid options are: 'REQUIRED' (default), 'OPTIONAL_AND_HIDES_LOWER_PRIORITY' and 'REQUIRED_AND_HIDES_OPTIONAL' return $args; }, 10, 2 );
Note that FacetWP has two other ways of dealing with close/overlapping markers: the built-in Marker Clusterer, and Overlapping Marker Spiderfier.
Set a marker altitude
On vector maps, you can set the altitude at which a marker appears. This is useful for making markers appear correctly in relation to 3D map content, when the user uses map tilt (if the vector map supports that).
To set the altitude for a marker, specify an altitude property in the position argument:
How to use custom PHP code?
PHP code can be added to your (child) theme's functions.php file. Alternatively, you can use the Custom Hooks add-on, or a code snippets plugin. More info
// https://developers.google.com/maps/documentation/javascript/advanced-markers/collision-behavior#set_marker_altitude add_filter( 'facetwp_map_marker_args', function( $args, $post_id ) { $args['position']['altitude'] = 20; // altitude in meters return $args; }, 10, 2 );
Make markers draggable
When draggability is enabled, users can drag markers on the map using the mouse or the arrow keys. To make a marker draggable, set the gmpDraggable property to true:
How to use custom PHP code?
PHP code can be added to your (child) theme's functions.php file. Alternatively, you can use the Custom Hooks add-on, or a code snippets plugin. More info
// https://developers.google.com/maps/documentation/javascript/advanced-markers/draggable-markers add_filter( 'facetwp_map_marker_args', function( $args, $post_id ) { $args['gmpDraggable'] = true; return $args; }, 10, 2 );
Note that the Legacy Marker’s draggable property is backward compatible and can still be used.
Make markers unclickable (disable marker info windows)
If you need all or some markers to be unclickable, you can set their clickable marker argument to false using the facetwp_map_marker_args hook, as shown below.
If a marker is set to be unclickable like this, it will not open its info window. However, the facetwp_map/marker/click action hook will still fire, so any code using this hook to track marker clicks will still work.
The following code makes all markers (except the Proximity marker) unclickable.
The included CSS in lines 10-12 sets the default pointer cursor to default for all markers. All marker pins have the GMAMP-maps-pin-view class. Note that if you use HTML markers, you need to set a custom class in the marker HTML and use that.
How to use custom PHP code?
PHP code can be added to your (child) theme's functions.php file. Alternatively, you can use the Custom Hooks add-on, or a code snippets plugin. More info
add_filter( 'facetwp_map_marker_args', function( $args, $post_id ) { $args['clickable'] = false; // make all markers unclickable return $args; }, 10, 2 ); // Set a 'default' cursor when the marker is unclickable add_action( 'wp_head', function () { ?> <style> .GMAMP-maps-pin-view { cursor: default; /* set default cursor */ } </style> <?php }, 100 );
Make markers unclickable conditionally
The facetwp_map_marker_args hook has access to the post ID of each marker it runs for, so you can check that post ID against an array of post IDs for which the markers must be unclickable.
The included CSS in lines 14-16 sets the default pointer cursor to default for markers that have the unclickable class. If you are using marker pins, this class is set with the pinClass option in line 5. If you use HTML markers, you need to set a custom class in the marker HTML itself and use that.
How to use custom PHP code?
PHP code can be added to your (child) theme's functions.php file. Alternatively, you can use the Custom Hooks add-on, or a code snippets plugin. More info
add_filter( 'facetwp_map_marker_args', function( $args, $post_id ) { $disable_marker_click = array( 5648, 5678 ); // Create an array with the post IDs of posts with unclickable markers if ( in_array( $post_id, $disable_marker_click ) ) { $args['clickable'] = false; // Make this marker unclickable $args['pinOptions']['pinClass'] = 'unclickable'; // Set a custom pin class } return $args; }, 10, 2 ); // Set a 'default' cursor when the marker is unclickable add_action( 'wp_head', function () { ?> <style> .unclickable { cursor: default; /* set default cursor */ } </style> <?php }, 100 );
Another approach is to use the $post_id to check the value of a custom field. For example, you could create an is_clickable True/False field with Advanced Custom Fields and get the value of that field for each marker’s post ID:
How to use custom PHP code?
PHP code can be added to your (child) theme's functions.php file. Alternatively, you can use the Custom Hooks add-on, or a code snippets plugin. More info
add_filter( 'facetwp_map_marker_args', function( $args, $post_id ) { if ( get_field( 'is_clickable', $post_id ) === false ) { $args['clickable'] = false; // Make this marker unclickable $args['pinOptions']['pinClass'] = 'unclickable'; // Set a custom pin class } return $args; }, 10, 2 ); // Set a 'default' cursor when the marker is unclickable add_action( 'wp_head', function () { ?> <style> .unclickable { cursor: default; /* set default cursor */ } </style> <?php }, 100 );
Make markers with empty info window content unclickable
It is also possible to check if a marker’s info window content is empty, and if so, make the marker unclickable.
The following code shows how to do this. The included CSS in lines 14-16 sets the default pointer cursor to default for markers that have the unclickable class. If you are using marker pins, this class is set with the pinClass option in line 5. If you use HTML markers, you need to set a custom class in the marker HTML itself and use that.
How to use custom PHP code?
PHP code can be added to your (child) theme's functions.php file. Alternatively, you can use the Custom Hooks add-on, or a code snippets plugin. More info
// Only use with the "Info window ajax loading" setting disabled add_filter( 'facetwp_map_marker_args', function( $args, $post_id ) { if ( empty( $args['infoWindowContent'] ) ) { $args['clickable'] = false; $args['pinOptions']['pinClass'] = 'unclickable'; // Set a custom pin class } return $args; }, 10, 2 ); // Set a 'default' cursor when the marker is unclickable add_action( 'wp_head', function () { ?> <style> .unclickable { cursor: default; /* set default cursor */ } </style> <?php }, 100 );
Note that the above code does not work when the “Info window ajax loading” setting is enabled. It will make the marker unclickable no matter if the info window is empty or not.
With the “Info window ajax loading” setting enabled, use the following code instead. Make sure to replace my_map_facet with the name of your Map facet in line 4:
How to use custom PHP code?
PHP code can be added to your (child) theme's functions.php file. Alternatively, you can use the Custom Hooks add-on, or a code snippets plugin. More info
// Only use with the "Info window ajax loading" setting enabled add_filter('facetwp_map_marker_args', function ($args, $post_id) { $content = FWP()->facet->facet_types['map']->get_marker_content( $post_id, 'my_map_facet' ); // Replace 'my_map_facet' with the name of your map facet if ( empty( $content ) ) { $args['clickable'] = false; $args['pinOptions']['pinClass'] = 'unclickable'; // Set a custom pin class } return $args; }, 10, 2); // Set a 'default' cursor when the marker is unclickable add_action( 'wp_head', function () { ?> <style> .unclickable { cursor: default; /* set default cursor */ } </style> <?php }, 100 );
Customize the Proximity facet marker pin
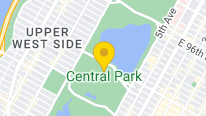
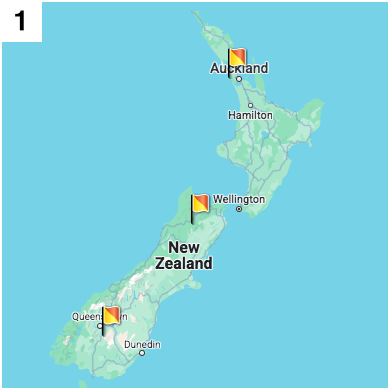
If you are using the map with a Proximity facet, when a location is entered, a yellow location marker is displayed on the map, as shown in the image on the right.
Like all other markers on the map, the proximity pin is an Advanced Marker. This means you can customize it in exactly the same way as other markers. You can customize it as marker pin, or change it into an HTML marker.
Below are some simple examples, but you can use any of the customizations described above for normal markers.
The only difference with normal markers, is that when customizing the marker with PHP, you need to use a different hook: facetwp_map_proximity_marker_args. This hook works in the same way as facetwp_map_marker_args for normal markers.
As shown in lines 22-29, you can also use this hook to change the proximity marker’s (translatable) title (displayed on hover), and its (translatable) info window content (displayed when clicked).
To disable the title text, just set $args['title'] to an empty string, as shown in line 26. To disable the info window popup, see this section below.
How to use custom PHP code?
PHP code can be added to your (child) theme's functions.php file. Alternatively, you can use the Custom Hooks add-on, or a code snippets plugin. More info
add_filter( 'facetwp_map_proximity_marker_args', function( $args ) { // Customize the marker pin // You can use any of the more advanced options to customize marker pins, like glyphHtml $args['pinOptions']['scale'] = 1.5; // Set pin scale/size $args['pinOptions']['background'] = '#FFFFFF'; // Set pin background color $args['pinOptions']['borderColor'] = '#FF0023'; // Set pin border color $args['pinOptions']['glyphColor'] = '#FF0023'; // Set pin glyph color // $args['pinOptions']['glyph'] = 'A'; // Set glyph text // $args['pinOptions']['glyph'] = '✪'; // Set glyph text as Unicode character // $args['pinOptions']['glyph'] = '🤗'; // Set glyph text as emoji // $args['pinOptions']['glyph'] = ''; // Remove glyph entirely // $args['pinOptions']['glyphHtml'] = '<img src="https://developers.google.com/maps/documentation/javascript/examples/full/images/beachflag.png" class="my-custom-glyph_html" style="width:20px; height:20px;"/>'; // Set glyph HTML. Set size with width or height attribute, or inline CSS $args['pinOptions']['pinClass'] = 'my-custom-proximity-marker'; // The pin class // Or, reset to Google Map's default marker pin $args['pinOptions'] = []; // Or, use an HTML marker $args['markerHtml'] = '<img src="https://developers.google.com/maps/documentation/javascript/examples/full/images/beachflag.png" alt="Your location" />'; // Customize the (translatable) title text (visible on hover) $args['title'] = __( 'Your selected location', 'facetwp-map-facet' ); // Default: "Your location" // Or, disable the title text //$args['title'] = ''; // Disable title // Customize the (translatable) info window content $args['infoWindowContent'] = '<p>'.__( 'Your selected location', 'facetwp-map-facet' ).'</p>'; // Default: "<p>Your location</p>" return $args; }, 10, 2 );
Just like for normal markers, it is also possible to customize the proximity marker with JavaScript, using the facetwp_map/marker/content JS hook.
You can use any of the above-described JS-based customizations for normal markers. The only difference is that you need to select for the proximity marker, as this hook runs for all markers. In line 10 of the example below, we do this by checking the marker’s title, which for the proximity marker is Your location (unless you customized it, as shown in the PHP snippet above).
How to use custom PHP code?
PHP code can be added to your (child) theme's functions.php file. Alternatively, you can use the Custom Hooks add-on, or a code snippets plugin. More info
add_action( 'facetwp_scripts', function() { ?> <script> document.addEventListener('facetwp-refresh', function() { if ('undefined' !== typeof FWP && 'undefined' !== typeof FWP.hooks) { FWP.hooks.addFilter('facetwp_map/marker/content', function( content, args, PinElement ) { //Select for the Proximity pin by its title (if that is not customized) if ( args.title == "Your location" ) { // Create a new marker pin element to overwrite the default one const pin = new PinElement({ scale: 1.5, // pin scale/size background: '#FF0023', // pin background color borderColor: '#FFFFFF', // pin border color glyphColor: '#FFFFFF', // pin glyph color glyph: '✪', // glyph Unicode icon. See for example: https://www.amp-what.com/ //glyph: 'A', // glyph text //glyph: '😀', // use an emoji for the glyph text //glyph: '', // remove the glyph entirely }); // Style the whole custom marker pin pin.element.style.opacity = '0.5'; // Set CSS opacity pin.element.classList.add('my-pin-class'); // set a custom class on the pin element // Pass the customized pin to the marker content argument content = pin.element; } return content; }); } }); </script> <?php }, 100 );
Disable the Proximity facet marker pin
If you want to completely disable the Proximity marker pin, you can use this hook:
How to use custom PHP code?
PHP code can be added to your (child) theme's functions.php file. Alternatively, you can use the Custom Hooks add-on, or a code snippets plugin. More info
add_filter( 'facetwp_map_proximity_marker_args', '__return_false' );
Be aware that using the above code may lead to unexpected map behavior for users if a Proximity search is performed that has no results (markers). Without any markers (also not the Proximity marker), the map cannot use fitBounds(), which it normally uses to zoom and pan the map’s viewport to contain the available markers.
If you have enabled marker clustering, you can also exclude the Proximity marker pin from the clustering behavior.
Disable the Proximity facet marker info window
When the Proximity facet marker pin is clicked, by default it will open an info window with the text “Your location”. This info window content can be changed with the $args['infoWindowContent'] argument, as shown in the code example above.
But you may want to disable this info window entirely. The following code shows how to do this, by setting the clickable argument to false.
The code also uses the pinClass option to set a custom unclickable class on the Proximity pin marker, which is then used to set the cursor to default with the CSS rule in lines 11-13. Note that if you use an HTML marker for the Proximity marker, you need to set a custom class in the marker HTML and use that.
How to use custom PHP code?
PHP code can be added to your (child) theme's functions.php file. Alternatively, you can use the Custom Hooks add-on, or a code snippets plugin. More info
add_filter( 'facetwp_map_proximity_marker_args', function( $args ) { $args['clickable'] = false; $args['pinOptions']['pinClass'] = 'unclickable'; // Set a custom pin class return $args; }, 10, 2 ); // Set a 'default' cursor when the marker is unclickable add_action( 'wp_head', function () { ?> <style> .unclickable { cursor: default; /* set default cursor */ } </style> <?php }, 100 );
Display the Proximity radius as a circle on the map
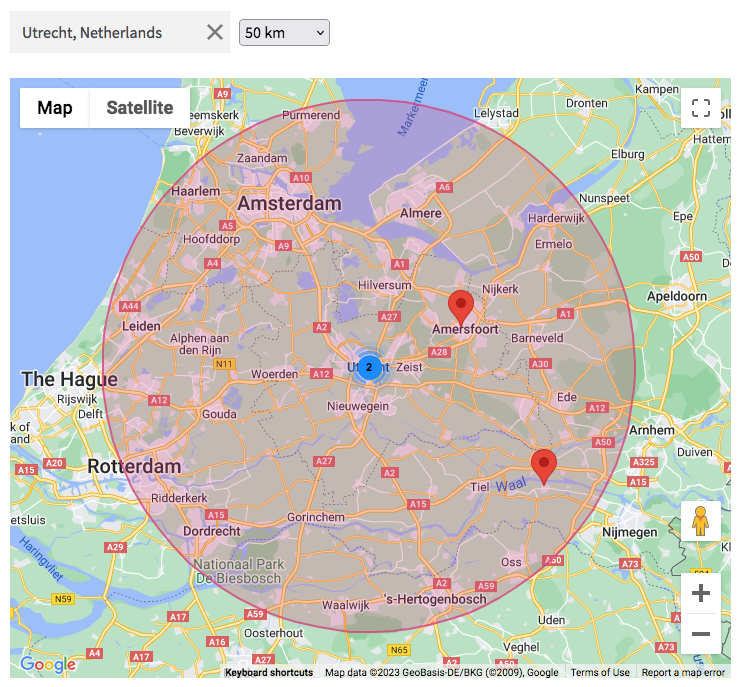
The following code draws a circle shape on the map each time a location is entered in the Proximity facet. The circle’s radius will adapt automatically to the radius set in the Proximity facet.
In lines 24-29 you can customize the circle’s fill color and opacity, and its stroke color, opacity and weight.
Make sure to replace my_proximity_facet with the name of your proximity facet in line 14, and set the correct number of units (kilometers or miles) in line 17, depending on the “Units of measurement” setting you have used for your Proximity facet.
Be aware that the map’s default fitBounds behavior will make the map zoom into the found locations when the Proximity facet is used. The circle’s edge will then end up outside or around the viewport of the map. If you want the entire circle to be always visible, you could set a maximum zoom level in the Map facet’s Zoom min / max setting, or make the circle smaller than the Proximity radius (which will possibly cause some markers to be outside the circle).
In some situations, it may be an idea to disable the fitBounds behavior entirely and set a custom zoom level and/or center.
How to use custom PHP code?
PHP code can be added to your (child) theme's functions.php file. Alternatively, you can use the Custom Hooks add-on, or a code snippets plugin. More info
add_action( 'facetwp_scripts', function() { ?> <script> (function() { document.addEventListener('facetwp-maps-loaded', function() { // Clear existing circle if it exists if (FWP_MAP.circle) { FWP_MAP.circle.setMap(null); // Clear circle from map FWP_MAP.circle = null; // Remove circle instance entirely } let proximityfacet = FWP.facets['my_proximity_facet']; // Replace "my_proximity_facet" with the name of your Proximity facet let lat = parseFloat(proximityfacet[0]); let lng = parseFloat(proximityfacet[1]); let radius = parseFloat(proximityfacet[2]) * 1000; // For Kilometers. Use 1609.344 if you have set the Unit of measurement setting to Miles if (proximityfacet.length) { FWP_MAP.circle = new google.maps.Circle({ center: { lat: lat, lng: lng }, radius: radius, // Circle radius in meters fillColor: "#d93f7c", // Circle coloring fillOpacity: 0.25, // Circle opacity strokeColor: "#d93f7c", // Circle outline color strokeOpacity: 0.8, // Circle outline color strokeWeight: 2, // Circle outline thickness map: FWP_MAP.map }); if (FWP_MAP.circle) { FWP_MAP.circle.setMap(FWP_MAP.map); } } }); })(); </script> <?php }, 100 );
To display a circle (or other shape) around (clicked) markers, see the example below.
How to use JavaScript map marker hooks and functions
FacetWP provides several JavaScript hooks and functions to perform actions when markers are interacted with, or to perform actions on markers or their info windows. For example when markers themselves, post (titles) in the result listing, the map itself, or info windows close buttons are clicked.
Here is an overview of the main hooks, functions and event you can use:
How to use custom JavaScript code?
JavaScript code can be placed in your (child) theme's main JavaScript file. Alternatively, you can add it manually between
<script>tags in the<head>section of your (child) theme's header.php file. You can also load it with a hook in your (child) theme's functions.php file, or in the Custom Hooks add-on. To load the code only on pages with facets, use thefacetwp_scriptshook. To load it on all pages, usewp_headorwp_footer. Or you can use a code snippets plugin. More info// Create marker content for a marker (marker pins or marker HTML) // Needs to run within the facetwp-refresh event FWP.hooks.addFilter('facetwp_map/marker/content', function( content, args, PinElement ) { // Set marker content return content; }); // Do something on marker click FWP.hooks.addAction('facetwp_map/marker/click', function(marker) {}); // Do something on marker mouseover FWP.hooks.addAction('facetwp_map/marker/mouseover', function(marker) {}); // Do something on marker mouseout FWP.hooks.addAction('facetwp_map/marker/mouseout', function(marker) {}); // Do something after the marker is added to the map FWP.hooks.addAction('facetwp_map/marker/added', function(marker) {}); // Run the above actions, e.g.'facetwp_map/marker/click' FWP.hooks.doAction('facetwp_map/marker/click', marker); // Open the info window for a marker FWP_MAP.infoWindow.open(FWP_MAP.map, marker); // Get markers by post ID to perform actions on them FWP_MAP.get_post_markers(postid); // The array in which FacetWP stores the markers FWP_MAP.markersArray; // Trigger clicks on markers google.maps.event.trigger( marker, 'click'); // If you don't have spiderfied markers google.maps.event.trigger( marker, 'spider_click'); // If you have spiderfied markers. Will also work if you don't have spiderfied markers. // Listen for FacetWP map has finished loading document.addEventListener('facetwp-maps-loaded', function() {}); // Listen for a map click event google.maps.event.addListener(FWP_MAP.map, 'click', function(event) {}); // Listen for a marker info window close event google.maps.event.addListener(FWP_MAP.infoWindow, 'closeclick', function() {}); // Listen for a map zoom level change FWP_MAP.map.addListener('zoom_changed', function(event) {});
Below are some examples of how to use these hooks and functions:
- Add a class to the post which has its marker clicked
- Open a marker’s info window on mouse hover
- Trigger a marker click and info window on post click
- Change the marker icon when an info window is open
- Display a circle or other shape around (clicked) markers
- Fade in markers on map load and refresh
- Animate markers: drop markers on map load and refresh
- Control marker visibility by map zoom level
Example 1: Add a class to the post which has its marker clicked
The following examples add the CSS class is-active to the active post (the post that has its corresponding marker clicked), which could be used to style it differently than the other posts.
The code also adds an optional scroll to the active post element (when its marker is clicked). If you don’t need that, just remove lines lines 19-24.
How to use custom PHP code?
PHP code can be added to your (child) theme's functions.php file. Alternatively, you can use the Custom Hooks add-on, or a code snippets plugin. More info
add_action( 'facetwp_scripts', function() { ?> <script> (function($) { if ('object' !== typeof FWP) { return; } FWP.hooks.addAction('facetwp_map/marker/click', function(marker) { // The post ID associated with the active marker var post_id = marker.post_id; // The following code adds the CSS class "is-active" to the active post, // assuming each result's HTML is structured similarly to: // <div class="post-item" data-id="123">Hello World!</div> $('.post-item').removeClass('is-active'); $('.post-item[data-id="' + post_id + '"]').addClass('is-active'); // Optional: scroll to the active post element var offset = $('.post-item[data-id="' + post_id + '"]').nodes[0].offsetTop; window.scrollTo({ top: offset, behavior: 'smooth', }); }); })(fUtil); </script> <?php }, 100 );
The above example assumes your posts (or post titles) have a class post-item and a data-id attribute containing the post ID. One way to accomplish this is by using the Listing Builder’s Dev mode:
Example 1 – Using a Listing Builder listing in Dev mode
To give your posts (or post titles) a class post-item and a data-id attribute containing the post ID, add the following code to the “Display Code” field:
How to use custom PHP code?
PHP code can be added to your (child) theme's functions.php file. Alternatively, you can use the Custom Hooks add-on, or a code snippets plugin. More info
<?php while ( have_posts() ): the_post(); ?> <h3><a href="<?php the_permalink(); ?>" class="post-item" data-id="<?php the_id(); ?>"><?php the_title(); ?></a></h3> <?php endwhile; ?>
Now you can add some CSS to highlight the active listing item:
How to use custom PHP code?
PHP code can be added to your (child) theme's functions.php file. Alternatively, you can use the Custom Hooks add-on, or a code snippets plugin. More info
add_action( 'facetwp_scripts', function() { ?> <style> .post-item.is-active { border: 1px solid red !important; } </style> <?php }, 100 );
Example 1 – Using a Listing Builder listing in visual mode
If you have built your layout in the visual (non-Dev Mode) Listing Builder, it is a bit more difficult to get the post ID on each listing result in the grid. Currently, it is not possible to set it as class on the .fwpl-result container. But you can add it to its direct child div with class .fwpl-row.
To accomplish this, add a “Post ID” item to the listing. Give it the “Unique name” postid, and hide it:
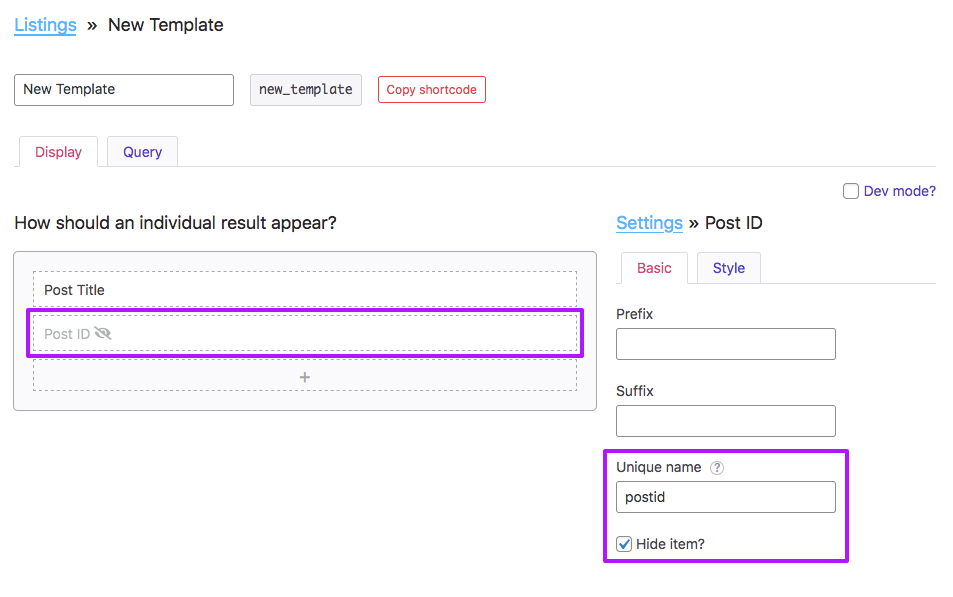
Next, click the purple gear icon in the top center of your listing, which will open the main Row settings. Click the “Style” tab, and in the “CSS class” field at the bottom, enter: postid-{{ postid }}:
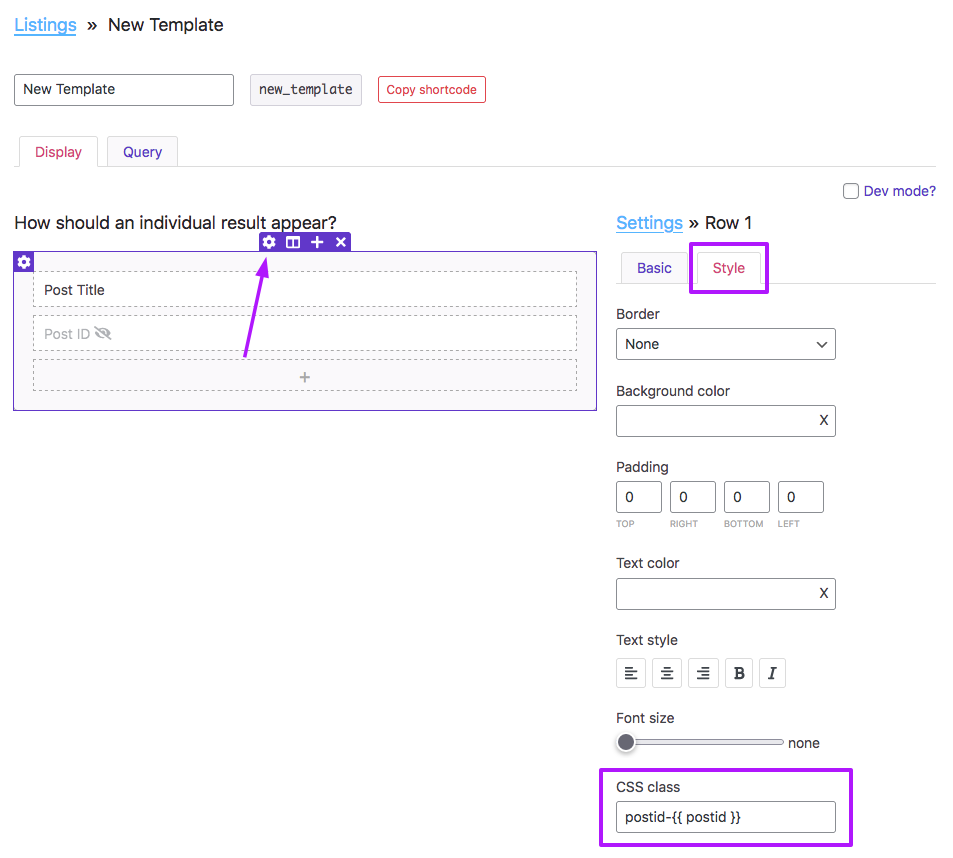
This will add a class postid-# to each .fwpl-result > .fwpl-row item. Note that the {{ postid }} part is a so-called dynamic tag.
Next, add the following snippet. The code also adds an optional scroll to the active post element (when its marker is clicked). If you don’t need that, just remove lines lines 17-22.
How to use custom PHP code?
PHP code can be added to your (child) theme's functions.php file. Alternatively, you can use the Custom Hooks add-on, or a code snippets plugin. More info
add_action( 'facetwp_scripts', function() { ?> <script> (function($) { if ('object' !== typeof FWP) { return; } FWP.hooks.addAction('facetwp_map/marker/click', function(marker) { // The post ID associated with the active marker var post_id = marker.post_id; // The following code adds the CSS class "is-active" to the active post's main .fwpl-row child div $('.fwpl-result > .fwpl-row').removeClass('is-active'); $('.fwpl-result > .fwpl-row.postid-' + post_id).addClass('is-active'); // Optional: scroll to the active post element var offset = $('.fwpl-result > .fwpl-row.postid-' + post_id).nodes[0].offsetTop; window.scrollTo({ top: offset, behavior: 'smooth', }); }); })(fUtil); </script> <?php }, 100 );
Now you can add some CSS to highlight the active listing item:
How to use custom PHP code?
PHP code can be added to your (child) theme's functions.php file. Alternatively, you can use the Custom Hooks add-on, or a code snippets plugin. More info
add_action( 'facetwp_scripts', function() { ?> <style> .fwpl-result > .fwpl-row.is-active { border: 1px solid red !important; } </style> <?php }, 100 );
Example 2: Open a marker’s info window on mouse hover
In addition to the marker click event, FacetWP also supports marker mouseover and mouseout events.
The following example opens a marker’s info window on mouseover. The code works with and without the “Info window ajax loading” setting enabled.
To use mouseout instead, replace facetwp_map/marker/mouseover on line 11 with facetwp_map/marker/mouseout.
How to use custom PHP code?
PHP code can be added to your (child) theme's functions.php file. Alternatively, you can use the Custom Hooks add-on, or a code snippets plugin. More info
add_action( 'facetwp_scripts', function() { ?> <script> (function($) { if ('object' !== typeof FWP) { return; } let isProgrammaticClick = false; FWP.hooks.addAction('facetwp_map/marker/mouseover', function(marker) { if ('undefined' !== typeof marker.infoWindowContent) { FWP_MAP.infoWindow.setContent(marker.infoWindowContent); } else if ('undefined' === typeof FWP_MAP.contentCache[marker.post_id]) { FWP_MAP.infoWindow.setContent('Loading...'); FWP_MAP.infoWindow.open(FWP_MAP.map, marker); return $.post(FWP_JSON.map.ajaxurl, { action: 'facetwp_map_marker_content', facet_name: FWP_JSON.map.facet_name, post_id: marker.post_id }, { dataType: 'text', contentType: 'application/x-www-form-urlencoded', done: (resp) => { FWP_MAP.contentCache[marker.post_id] = resp; FWP_MAP.infoWindow.setContent(resp); FWP.hooks.doAction('facetwp_map/marker/click', marker); // Trigger extra click to reposition marker/infowindow within viewport if (!isProgrammaticClick) { isProgrammaticClick = true; google.maps.event.trigger(marker, 'click'); isProgrammaticClick = false; } } }); } FWP_MAP.infoWindow.open(FWP_MAP.map, marker); }); })(fUtil); </script> <?php }, 100 );
Example 3: Trigger a marker click and info window on post click
The get_post_markers() function can be used to get markers by post ID and perform actions on them.
The following example triggers a marker click when you click on a post in the results list. It sets the map center to the marker’s position, opens its info window, and sets a custom zoom level.
Make sure that the zoom level is higher than the marker clusterer’s bottom limit, otherwise the separate markers will not be shown.
The click event to use is spider_click because of the built-in Overlapping Marker Spiderfier. If you don’t have any markers close together, you can also use the click event.
How to use custom PHP code?
PHP code can be added to your (child) theme's functions.php file. Alternatively, you can use the Custom Hooks add-on, or a code snippets plugin. More info
add_action( 'facetwp_scripts', function () { ?> <script> (function($) { $(document).on('click', '.post-item', function(e) { e.preventDefault(); // Necessary if '.post-item' is an <a> tag and you don't want it to open the post page itself. var postid = $(this).attr('data-id'); var marker = FWP_MAP.get_post_markers(postid); $.each( marker, function( key, value ) { FWP_MAP.map.setCenter({ lat: value.position.lat, lng: value.position.lng }); FWP_MAP.is_zooming = true; // Needed if you are using the "Enable map filtering" button FWP_MAP.map.setZoom(17); // Set a zoom level between 1 and 20. Make sure it is higher than the marker clusterer's bottom limit. // google.maps.event.trigger(value, 'click'); // If you don't have spiderfied markers google.maps.event.trigger(value, 'spider_click'); // If you have spiderfied markers. Will also work if you don't have spiderfied markers. }); }); })(jQuery); </script> <?php }, 100 );
This example assumes your post items (or post titles) have a class post-item and a data-id attribute containing the post ID. One way to accomplish this is by using the Listing Builder’s Dev mode:
Example 3 – Using a Listing Builder listing in Dev mode
To give your posts (or post titles) a class post-item and a data-id attribute containing the post ID, add the following code to the “Display Code” field:
How to use custom PHP code?
PHP code can be added to your (child) theme's functions.php file. Alternatively, you can use the Custom Hooks add-on, or a code snippets plugin. More info
<?php while ( have_posts() ): the_post(); ?> <h3><a href="<?php the_permalink(); ?>" class="post-item" data-id="<?php the_id(); ?>"><?php the_title(); ?></a></h3> <?php endwhile; ?>
Example 3 – Using a Listing Builder listing in visual mode
If you have built your layout in the visual (non-Dev Mode) Listing Builder, you can add a class postid-# to each .fwpl-result > .fwpl-row item with a so-called dynamic tag, as explained above in Example 1.
Then, use the following code instead:
How to use custom PHP code?
PHP code can be added to your (child) theme's functions.php file. Alternatively, you can use the Custom Hooks add-on, or a code snippets plugin. More info
add_action( 'facetwp_scripts', function () { ?> <script> (function($) { $(document).on('click', '.fwpl-row', function(e) { e.preventDefault(); // Necessary if '.post-item' is an <a> tag and you don't want it to open the post page itself. // Works for Listing Builder listing templates with a postid-# class on each .fwpl-result > .fwpl-row item. var postid; const classes = $(this)[0].classList; for (const className of classes) { if (className.startsWith('postid-')) { postid = className.substring('postid-'.length); } } var marker = FWP_MAP.get_post_markers(postid); $.each( marker, function( key, value ) { FWP_MAP.map.setCenter({ lat: value.position.lat, lng: value.position.lng }); FWP_MAP.is_zooming = true; // Needed if you are using the "Enable map filtering" button FWP_MAP.map.setZoom(17); // Set a zoom level between 1 and 20. Make sure it is higher than the marker clusterer's bottom limit. // google.maps.event.trigger(value, 'click'); // If you don't have spiderfied markers google.maps.event.trigger(value, 'spider_click'); // If you have spiderfied markers. Will also work if you don't have spiderfied markers. }); }); })(jQuery); </script> <?php }, 100 );
Example 4: Change the marker icon when an info window is open
The following code example changes the marker icon when an info window is opened, and switches it back when it is closed. This can be useful to indicate an ‘active’ marker with a different design or color.
The code works both when using customized marker icons (marker pins or HTML markers) and default marker icons.
First, in lines 7-21 we define the ‘active’ marker icon. You can do this by creating a custom marker pin, or by using marker HTML.
In case you are using customized markers icons (marker pins HTML markers) for the unclicked markers, these are stored in lines 23-30, so they can be re-set when the info window is closed, another marker is clicked, or when the user clicks anywhere on the map.
In line 32 we use the facetwp_map/marker/click hook to detect a click on a marker, store its post_id in window.marker_post_id as the active open marker, and set that marker’s icon to the ‘active’ version, by setting the marker’s content value to the ‘active’ pin or HTML, in lines 43-45
In line 50 we use the Google Maps JavaScript API’s closeclick event to detect the closing of the info window. When that happens, or when the map is clicked anywhere (causing all info windows to close), or when another marker is clicked, we use FacetWP’s get_post_markers function and pass it the stored active marker’s post_id so we can switch its icon back to the original one. Note that if you are not using custom markers, you can simply reset them by setting the marker’s content value to null, as indicated in three places in the code.
How to use custom PHP code?
PHP code can be added to your (child) theme's functions.php file. Alternatively, you can use the Custom Hooks add-on, or a code snippets plugin. More info
add_action( 'facetwp_scripts', function() { ?> <script> document.addEventListener('facetwp-maps-loaded', function() { // Define the active marker pin/HTML: // Option 1/ Use a customized marker pin: let pinActive = new google.maps.marker.PinElement({ scale: 1.5, background: '#FBBC04', borderColor: '#FBBC04', glyphColor: '#ff0023', glyph: '🤗' }); let activeMarker = pinActive.element; // Option 2/ Use custom marker HTML: // let activeMarker = document.createElement('img'); // activeMarker.src = 'https://mydomain.com/images/mycustommarker.png'; // Path to the custom marker image // Store the original marker content (the custom marker) for all markers, to be able to reset them. // Only needed when you use custom markers. // For default markers reset them with marker.content = null below (3x) FWP_MAP.markersArray.forEach(marker => { if (!marker.originalContent) { marker.originalContent = marker.content; } }); FWP.hooks.addAction('facetwp_map/marker/click', function(marker) { // Check if another marker is already active and reset its icon. if (window.marker_post_id) { let post_id = window.marker_post_id; let prevmarker = FWP_MAP.get_post_markers(post_id)[0]; if (prevmarker) { prevmarker.content = prevmarker.originalContent; // Or use prevmarker.content = null if you are using default marker pins. } } // Set the clicked marker to have the 'active' icon window.marker_post_id = marker.post_id; marker.content = activeMarker; }); // When an infoWindow is closed google.maps.event.addListener(FWP_MAP.infoWindow, 'closeclick', function() { if (window.marker_post_id) { let post_id = window.marker_post_id; let marker = FWP_MAP.get_post_markers(post_id)[0]; marker.content = marker.originalContent; // Or use marker.content = null if you are using default marker pins. } }); // When the map is clicked google.maps.event.addListener(FWP_MAP.map, 'click', function(event) { if (window.marker_post_id) { let post_id = window.marker_post_id; let marker = FWP_MAP.get_post_markers(post_id)[0]; marker.content = marker.originalContent; // Or use marker.content = null if you are using default marker pins. } }); }); </script> <?php }, 100 );
Example 5: Display a circle or other shape around (clicked) markers
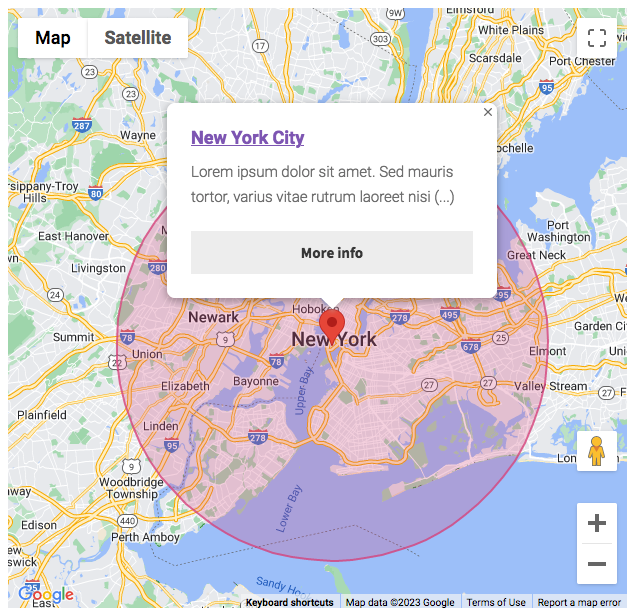
The following code uses the facetwp_map/marker/click hook to draw a circle around a marker when it is clicked. Note that instead of a circle, this could be any other type of shape/polygon supported by the Google Maps API.
You can customize the circle’s fill color and opacity, and its stroke color, opacity and weight. The circle’s size is determined by the radius value (in meters) set in line 22.
Clicking another marker will clear the previous circle. The code (optionally) also removes the circle when any marker’s info window is closed, and/or when you click anywhere on the map.
If you want to apply the code only to certain markers, you can use the clicked marker’s post_id to write a condition.
How to use custom PHP code?
PHP code can be added to your (child) theme's functions.php file. Alternatively, you can use the Custom Hooks add-on, or a code snippets plugin. More info
add_action( 'facetwp_scripts', function() { ?> <script> (function() { FWP.hooks.addAction('facetwp_map/marker/click', function(marker) { // Clear existing circle if it exists if ( 'undefined' !== typeof FWP_MAP.circle ) { FWP_MAP.circle.setMap(null); // Clear circle from map FWP_MAP.circle = null; // Remove circle instance entirely } // let post_id = marker.post_id; // The marker's post_id could be used to apply this code only to certain markers. let lat = marker.position.lat; let lng = marker.position.lng; FWP_MAP.circle = new google.maps.Circle({ center: { lat: lat, lng: lng }, radius: 25000, // Circle radius in meters fillColor: "#D93F7C", // Circle coloring fillOpacity: 0.25, // Circle opacity strokeColor: "#D93F7C", // Circle outline color strokeOpacity: 0.8, // Circle outline color strokeWeight: 2, // Circle outline thickness map: FWP_MAP.map }); // Optional: when an infoWindow is closed, clear the circle from the map google.maps.event.addListener(FWP_MAP.infoWindow, 'closeclick', function() { FWP_MAP.circle.setMap(null); }); // Optional: when the map is clicked anywhere, clear the circle from map google.maps.event.addListener(FWP_MAP.map, 'click', function(event) { FWP_MAP.circle.setMap(null); }); }); })(); </script> <?php }, 100 );
To draw a circle around each marker, without a click, you can do it as follows:
How to use custom PHP code?
PHP code can be added to your (child) theme's functions.php file. Alternatively, you can use the Custom Hooks add-on, or a code snippets plugin. More info
add_action( 'facetwp_scripts', function() { ?> <script> (function() { document.addEventListener('facetwp-maps-loaded', function() { // Get all markers let markers = FWP_MAP.markersArray; Object.keys(markers).forEach(function(key) { let value = markers[key]; let lat = value.position.lat; let lng = value.position.lng; FWP_MAP.circle = new google.maps.Circle({ center: { lat: lat, lng: lng }, radius: 25000, // Circle radius in meters fillColor: "#d93f7c", // Circle coloring fillOpacity: 0.25, // Circle opacity strokeColor: "#d93f7c", // Circle outline color strokeOpacity: 0.8, // Circle outline color strokeWeight: 2, // Circle outline thickness map: FWP_MAP.map }); FWP_MAP.circle.setMap(FWP_MAP.map); }); }); })(); </script> <?php }, 100 );
To display the Proximity facet radius as a circle on the map, see the example above.
Example 6: Fade in markers on map load and refresh
The following snippet uses FacetWP’s facetwp_map/marker/added hook to let markers fade in when the map loads, and on each refresh (after filtering).
When a marker is added, the opacity is set to 0 (invisible). Then, when the interactionObserver sees that a marker entering the viewport, it sets the opacity to 1, with a transition to let the marker fade in over 2.5 seconds, as set in line 7.
How to use custom PHP code?
PHP code can be added to your (child) theme's functions.php file. Alternatively, you can use the Custom Hooks add-on, or a code snippets plugin. More info
add_action('facetwp_scripts', function () { ?> <script> const intersectionObserver = new IntersectionObserver((entries) => { for (const entry of entries) { if (entry.isIntersecting) { entry.target.style.transition = "all 2.5s"; // Fade in over 2.5 seconds entry.target.style.opacity = "1"; intersectionObserver.unobserve(entry.target); } } }); FWP.hooks.addAction('facetwp_map/marker/added', function(marker) { marker.content.style.opacity = "0"; intersectionObserver.observe(marker.content); }); </script> <?php }, 100);
Example 7: Animate markers: drop markers on map load and refresh
The following snippet uses FacetWP’s facetwp_map/marker/added hook to let markers vertically “drop into” the viewport when the map loads, and on each refresh (after filtering).
The interactionObserver sees when a marker enters the viewport, and adds the drop class, which has a CSS animation attached that animates the vertical (Y) position and opacity. When the attached animationend event listener sees that the animation is ended, it removes the class and sets the opacity to 1. Each marker animation starts with a randomized delay, based on a delay value that can be customized in line 19.
A live demo of this effect can be seen here.
How to use custom PHP code?
PHP code can be added to your (child) theme's functions.php file. Alternatively, you can use the Custom Hooks add-on, or a code snippets plugin. More info
add_action( 'facetwp_scripts', function() { ?> <script> const intersectionObserver = new IntersectionObserver((entries) => { for (const entry of entries) { if (entry.isIntersecting) { entry.target.classList.add("drop"); intersectionObserver.unobserve(entry.target); } } }); FWP.hooks.addAction('facetwp_map/marker/added', function(marker) { marker.content.style.opacity = "0"; marker.content.addEventListener("animationend", (event) => { marker.content.classList.remove("drop"); marker.content.style.opacity = "1"; }); const time = 1.5 + Math.random(); // 1.5s delay marker.content.style.setProperty("--delay-time", time + "s"); intersectionObserver.observe(marker.content); }); </script> <?php }, 100 ); add_action( 'wp_head', function () { ?> <style> /* set the default transition time */ :root { --delay-time: .5s; } /* set the animation keyframes */ @keyframes drop { 0% { transform: translateY(-200px) scaleY(0.9); opacity: 0; } 5% { opacity: 0.7; } 50% { transform: translateY(0px) scaleY(1); opacity: 1; } 65% { transform: translateY(-17px) scaleY(0.9); opacity: 1; } 75% { transform: translateY(-22px) scaleY(0.9); opacity: 1; } 100% { transform: translateY(0px) scaleY(1); opacity: 1; } } /* animate when class is 'drop' */ .drop { animation: drop 0.3s linear forwards var(--delay-time); } </style> <?php }, 100 );
Example 8: Control marker visibility by map zoom level
The following snippet shows how to control marker visibility by map zoom level.
In this example, markers with post IDs within the trackedPostIds array in line 9 are hidden when the zoom level is higher than 10 (as set in the zoomThreshold variable in line 12).
The code uses an event listener in line 14 to listen for the zoom_changed map event. When it fires, and the zoom level is higher than zoomThreshold, it uses the FWP_MAP.markersArray to filter the array by the trackedPostIds, and hides each marker that is within it. Markers are hidden by setting their CSS display property to none in line 22.
Note that the zoom level is a value between 1 and 20. The actual available levels are determined by the “Zoom min/max” setting of the Map facet.
How to use custom PHP code?
PHP code can be added to your (child) theme's functions.php file. Alternatively, you can use the Custom Hooks add-on, or a code snippets plugin. More info
add_action( 'facetwp_scripts', function () { ?> <script> (function($) { document.addEventListener('facetwp-maps-loaded', function() { // Optional: only markers of these post IDs const trackedPostIds = [5648, 5649, 5650]; // Array of post IDs to track // Zoom level threshold const zoomThreshold = 10; FWP_MAP.map.addListener('zoom_changed', () => { const currentZoom = FWP_MAP.map.getZoom(); // Filter markers by post ID and hide them when the current zoom is larger than the set zoomThreshold FWP_MAP.markersArray .filter(marker => trackedPostIds.includes(marker.post_id)) // Optional: only markers of these post IDs .forEach(marker => { marker.content.style.display = currentZoom > zoomThreshold ? "none" // Hide marker above threshold : "block"; // Show marker below threshold }); }); }); })(fUtil); </script> <?php }, 100 );