Customize marker pins (legacy)
The Map facet is highly customizable. This page gives an overview of possible customizations of the (legacy) marker pins, among which:
- Customize the marker pins
- Customize the Proximity facet marker pin
- How to use JavaScript map marker hooks and functions
To customize the (legacy) map features, see this page:
To customize the behavior and icons of the built-in (legacy) marker clusterer and (legacy) Overlapping Marker Spiderfier features, see these pages:
Customize the marker pins
The simplest way to change the marker pin images is with the following code. Make sure to use a transparent PNG or SVG.
How to use custom PHP code?
PHP code can be added to your (child) theme's functions.php file. Alternatively, you can use the Custom Hooks add-on, or a code snippets plugin. More info
add_filter( 'facetwp_map_marker_args', function( $args, $post_id ) { $args['icon'] = get_stylesheet_directory_uri() . '/assets/images/marker.png'; // set your theme image path here return $args; }, 10, 2 );
For more flexibility, you could alternatively use arrays to mimic Google Map API’s JS objects:
How to use custom PHP code?
PHP code can be added to your (child) theme's functions.php file. Alternatively, you can use the Custom Hooks add-on, or a code snippets plugin. More info
add_filter( 'facetwp_map_marker_args', function( $args, $post_id ) { $args['icon'] = [ 'url' => get_stylesheet_directory_uri() . '/assets/images/marker.png', // set your theme image path here 'scaledSize' => [ 'width' => 16, 'height' => 16 ] ]; return $args; }, 10, 2 );
This also gives you access to other properties to fine-tune the position of the marker icon, like anchor and labelOrigin (to position marker labels). See Google maps documentation on the google.maps.Icon interface for an overview of available properties.
Customize the marker pins for selected posts only
The following example is the same as the previous one, but changes the marker pins only for specific posts:
How to use custom PHP code?
PHP code can be added to your (child) theme's functions.php file. Alternatively, you can use the Custom Hooks add-on, or a code snippets plugin. More info
add_filter( 'facetwp_map_marker_args', function( $args, $post_id ) { $myposts_with_custom_markers = array(101, 102, 103); // array with the post id's of posts that need a custom marker if ( in_array( $post_id, $myposts_with_custom_markers ) ) { $args['icon'] = [ 'url' => get_stylesheet_directory_uri() . '/assets/images/marker.png', // set your theme image path here 'scaledSize' => [ 'width' => 16, 'height' => 16 ] ]; } return $args; }, 10, 2 );
Customize the marker pins for each post category or term
You could select posts based on any post property available through the $post_id parameter. An example would be to give each post category/term a different marker pin, using has_category() or has_term():
How to use custom PHP code?
PHP code can be added to your (child) theme's functions.php file. Alternatively, you can use the Custom Hooks add-on, or a code snippets plugin. More info
add_filter( 'facetwp_map_marker_args', function( $args, $post_id ) { if ( has_term( 'my-term-slug', 'my-taxonomy', $post_id ) ) { // replace with your term slug and taxonomy $args['icon'] = [ 'url' => get_stylesheet_directory_uri() . '/assets/images/marker.png', // set your theme image path here 'scaledSize' => [ 'width' => 16, 'height' => 16 ] ]; } return $args; }, 10, 2 );
Customize the marker pins for posts of a certain post type
Another possibility is to check the post type of the post by its $post_id parameter, using get_post_type(). The following example checks if the post type is agriturismi. If it is, it uses a default hard-coded marker icon. If it is not, it gets the marker icon name from an ACF custom field with the get_field() function, and appends the .png extension. The snippet also shows how to use the /wp-content/uploads/ directory in the marker image URL:
How to use custom PHP code?
PHP code can be added to your (child) theme's functions.php file. Alternatively, you can use the Custom Hooks add-on, or a code snippets plugin. More info
add_filter( 'facetwp_map_marker_args', function( $args, $post_id ) { $upload_dir = wp_upload_dir(); // Get the /wp-content/uploads directory URL $post_type = get_post_type( $post_id ); // Get the post type of the marker's post if ( $post_type === 'agriturismi' ) { $custom_img = 'marker-agriturismi.svg'; } else { $custom_img = get_field( 'tipo_azienda', $post_id ) . '.png'; } $args['icon'] = [ 'url' => $upload_dir['baseurl'] .'/'. $custom_img, // Make sure this returns a valid URL 'scaledSize' => [ 'width' => 16, 'height' => 16 ] ]; return $args; }, 10, 2 );
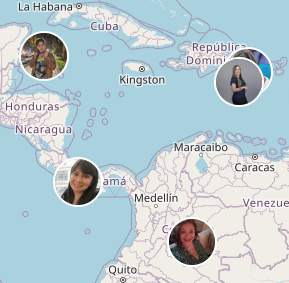
Use a (featured) image as marker pin
With the following code, you can set an image (for example the post’s featured image) as the marker pin. This makes it possible to display for example company logos or user portraits on the map:
How to use custom PHP code?
PHP code can be added to your (child) theme's functions.php file. Alternatively, you can use the Custom Hooks add-on, or a code snippets plugin. More info
add_filter( 'facetwp_map_marker_args', function( $args, $post_id ) { if ( has_post_thumbnail( $post_id ) ) { $member_photo = get_the_post_thumbnail_url( $post_id, 'post-thumbnail' ); // Set your desired wp image size and adapt scaledSize below } else { $member_photo = get_home_url() . '/wp-content/uploads/default-member-photo.jpg'; // Use a fall-back image if a post does not have a featured image uploaded } $args['icon'] = [ 'url' => $member_photo, 'scaledSize' => [ 'width' => 50, 'height' => 50 ] ]; // $args['optimized'] = false; // Optional: forces DOM elements for marker images instead of Canvas. Only use this when needed, e.g. to reach marker <img> elements with CSS return $args; }, 10, 2 );
Adapt the scaledSize argument to the desired marker image’s width and height. To avoid image distortion, set a WP image size with the same size or proportions in the second parameter of the get_the_post_thumbnail_url() function. The image size defaults to post-thumbnail, but you can use any image size set in Settings > Media or your theme’s settings. Or you can create your own image size with add_image_size(). For more info about how image sizes in WordPress work, see this tutorial section.
Style marker pin images
If you try to style the marker pin images (set with above code), you’ll notice that they are hard to target with CSS, as they do not have a specific class.
A solution is to let your CSS target <img> tags within the map that have a src attribute that starts with (^=) your image directory, in this example /wp-content/uploads/. Make sure that your fallback image is also in the same directory.
The following snippet adds CSS that makes the marker pin images circular, with a 2px white border:
How to use custom PHP code?
PHP code can be added to your (child) theme's functions.php file. Alternatively, you can use the Custom Hooks add-on, or a code snippets plugin. More info
add_action( 'wp_head', function() { ?> <style> .facetwp-type-map img[src^="https://mysite.com/wp-content/uploads/"] { border-radius: 50%; /* circular */ border: 2px solid #fff !important; /* 2px white border */ box-sizing: border-box; /* make sure the border is within the set image dimension */ } </style> <?php }, 100 );
Be aware that there is one possible caveat with this approach: when you have a large number of markers, Google Maps automatically switches to using canvas to draw the marker images, to optimize performance. When that happens, there will be no <img> DOM elements that the above CSS can apply to.
The solution is to set the “optimized” flag to false in the marker options. To do so, you can use the following snippet, or add the argument to the snippet you already have.
How to use custom PHP code?
PHP code can be added to your (child) theme's functions.php file. Alternatively, you can use the Custom Hooks add-on, or a code snippets plugin. More info
add_filter( 'facetwp_map_marker_args', function( $args, $post_id ) { $args['optimized'] = false; // Forces DOM elements instead of Canvas return $args; }, 10, 2 );
Add a marker label
Using the facetwp_map_marker_args filter, you can pass properties of the Google Maps MarkerLabel interface. This makes it possible to add a marker label above, below, or beside your marker.
The following example adds a marker label with the post title as text. Optionally, you can set a few other properties like fontSize and fontWeight.
The label will display at the exact origin of your marker, so with a marker already there it will be centered on top of the marker. To position the label relative to the marker, you can pass a custom class (in this example label-position):
How to use custom PHP code?
PHP code can be added to your (child) theme's functions.php file. Alternatively, you can use the Custom Hooks add-on, or a code snippets plugin. More info
add_filter( 'facetwp_map_marker_args', function( $args, $post_id ) { $labeltext = esc_html( get_the_title( $post_id ) ); // Fetch the post title. $args['label'] = [ 'text' => $labeltext, 'className' => 'label-position', // A custom class. // optional: 'color' => 'red', 'fontSize' => '40px', 'fontWeight' => 'bold', 'fontFamily' => 'Courier' ]; return $args; }, 10, 2 );
Using this custom class, the label can now be relatively positioned with a few lines of CSS. Note that to position the label above the marker, you can use a negative value for top:
How to use custom PHP code?
PHP code can be added to your (child) theme's functions.php file. Alternatively, you can use the Custom Hooks add-on, or a code snippets plugin. More info
add_action( 'wp_head', function() { ?> <style> .facetwp-type-map .label-position { position: relative; top: -40px; /* Use a negative value to position the label above the marker. And you can use 'bottom', 'left' and 'right'. */ } </style> <?php } );
As an alternative to positioning the label with CSS, if you are using custom markers pins, you can use the labelOrigin property to position the label. To position the label above the marker, use a negative value for y:
How to use custom PHP code?
PHP code can be added to your (child) theme's functions.php file. Alternatively, you can use the Custom Hooks add-on, or a code snippets plugin. More info
add_filter( 'facetwp_map_marker_args', function( $args, $post_id ) { $args['icon'] = [ 'url' => get_stylesheet_directory_uri() . '/assets/images/marker.png', // Set your theme image path here. 'scaledSize' => [ 'width' => 16, 'height' => 16 ], 'labelOrigin' => [ 'x' => 0, // You can use negative values. 'y' => -50 // Use a negative value to position the label above the marker. ] ]; return $args; }, 10, 2 );
Add a label and remove the marker pin
If you want to add a marker label, while removing the marker icon itself, you can use an empty icon argument (with a space between the quotes) to unset the marker icons:
How to use custom PHP code?
PHP code can be added to your (child) theme's functions.php file. Alternatively, you can use the Custom Hooks add-on, or a code snippets plugin. More info
add_filter( 'facetwp_map_marker_args', function( $args, $post_id ) { $labeltext = esc_html( get_the_title( $post_id ) ); // Fetch the post title. $args['label'] = [ 'text' => $labeltext, 'className' => 'label-position', // A custom class. // optional: 'color' => 'red', 'fontSize' => '40px', 'fontWeight' => 'bold', 'fontFamily' => 'Courier' ]; $args['icon'] = ' '; // Removes the marker icons. Note: for this to work, there needs to be a space between the quotes. return $args; }, 10, 2 );
Make markers unclickable (disable marker info windows)
If you need (some) markers to be unclickable, you can set their clickable marker argument to false with the facetwp_map_marker_args hook.
This makes all markers unclickable:
How to use custom PHP code?
PHP code can be added to your (child) theme's functions.php file. Alternatively, you can use the Custom Hooks add-on, or a code snippets plugin. More info
add_filter( 'facetwp_map_marker_args', function( $args, $post_id ) { $args['clickable'] = false; // make all markers unclickable return $args; }, 10, 2 );
The hook has access to the post ID of each marker it runs for, so you can check that post ID against an array of post IDs for which the markers must be unclickable:
How to use custom PHP code?
PHP code can be added to your (child) theme's functions.php file. Alternatively, you can use the Custom Hooks add-on, or a code snippets plugin. More info
add_filter( 'facetwp_map_marker_args', function( $args, $post_id ) { $disable_marker_click = array( 5648, 5678 ); // Create an array with the post IDs of posts with unclickable markers if ( in_array( $post_id, $disable_marker_click ) ) { $args['clickable'] = false; // Make this marker unclickable } return $args; }, 10, 2 );
Another approach is to use the $post_id to check the value of a custom field. For example, you could create an is_clickable True/False field with Advanced Custom Fields and get the value of that field for each marker’s post ID:
How to use custom PHP code?
PHP code can be added to your (child) theme's functions.php file. Alternatively, you can use the Custom Hooks add-on, or a code snippets plugin. More info
add_filter( 'facetwp_map_marker_args', function( $args, $post_id ) { if ( get_field( 'is_clickable', $post_id ) === false ) { $args['clickable'] = false; // Make this marker unclickable } return $args; }, 10, 2 );
Customize the Proximity facet marker pin
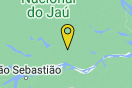
If you are using the map with a Proximity facet, when a location is entered, a yellow location marker is displayed on the map.
With the following code, you can change the proximity marker pin’s path, color, opacity, scale, and anchor. The code example shows the default icon settings. All of these settings need to have a value.
How to use custom PHP code?
PHP code can be added to your (child) theme's functions.php file. Alternatively, you can use the Custom Hooks add-on, or a code snippets plugin. More info
add_filter( 'facetwp_map_proximity_marker_args', function( $args ) { $args['icon'] = [ 'path' => 'M8,0C3.582,0,0,3.582,0,8s8,24,8,24s8-19.582,8-24S12.418,0,8,0z M8,12c-2.209,0-4-1.791-4-4 s1.791-4,4-4s4,1.791,4,4S10.209,12,8,12z', 'fillColor' => 'gold', 'fillOpacity' => 0.8, 'scale' => 0.8, 'anchor' => [ 'x' => 8.5, 'y' => 32 ] ]; return $args; }, 10 );
You can also replace the default proximity marker pin with a custom marker image, with the following code. Make sure to use a transparent PNG or SVG.
How to use custom PHP code?
PHP code can be added to your (child) theme's functions.php file. Alternatively, you can use the Custom Hooks add-on, or a code snippets plugin. More info
add_filter( 'facetwp_map_proximity_marker_args', function( $args ) { $args['icon'] = get_stylesheet_directory_uri() . '/assets/images/marker.png'; // set your theme image path here return $args; }, 10 );
For more flexibility, you could alternatively use arrays to mimic Google Map API’s JS objects:
How to use custom PHP code?
PHP code can be added to your (child) theme's functions.php file. Alternatively, you can use the Custom Hooks add-on, or a code snippets plugin. More info
add_filter( 'facetwp_map_proximity_marker_args', function( $args ) { $args['icon'] = [ 'url' => get_stylesheet_directory_uri() . '/assets/images/marker.png', // set your theme image path here 'scaledSize' => [ 'width' => 16, 'height' => 16 ] ]; return $args; }, 10 );
This also gives you access to other properties to fine-tune the position of the marker icon, like anchor and labelOrigin (to position marker labels). See Google maps documentation on the google.maps.Icon interface for an overview of available properties.
Disable the Proximity facet marker pin
If you want to completely disable the Proximity marker pin, you can use this hook:
How to use custom PHP code?
PHP code can be added to your (child) theme's functions.php file. Alternatively, you can use the Custom Hooks add-on, or a code snippets plugin. More info
add_filter( 'facetwp_map_proximity_marker_args', '__return_false' );
Be aware that using the above code may lead to unexpected map behavior for users if a Proximity search is performed that has no results (markers). Without any markers (also not the Proximity marker), the map cannot use fitBounds(), which it normally uses to zoom and pan the map’s viewport to contain the available markers.
If you have enabled marker clustering, you can also exclude the Proximity marker pin from the clustering behavior.
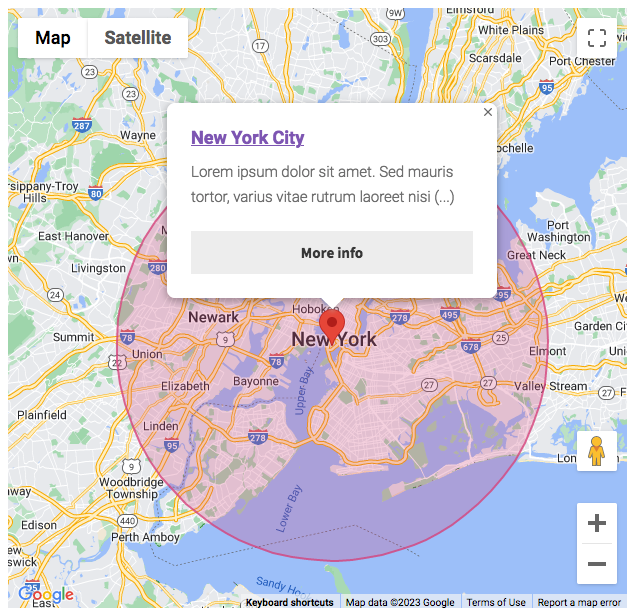
Display the Proximity radius as a circle on the map
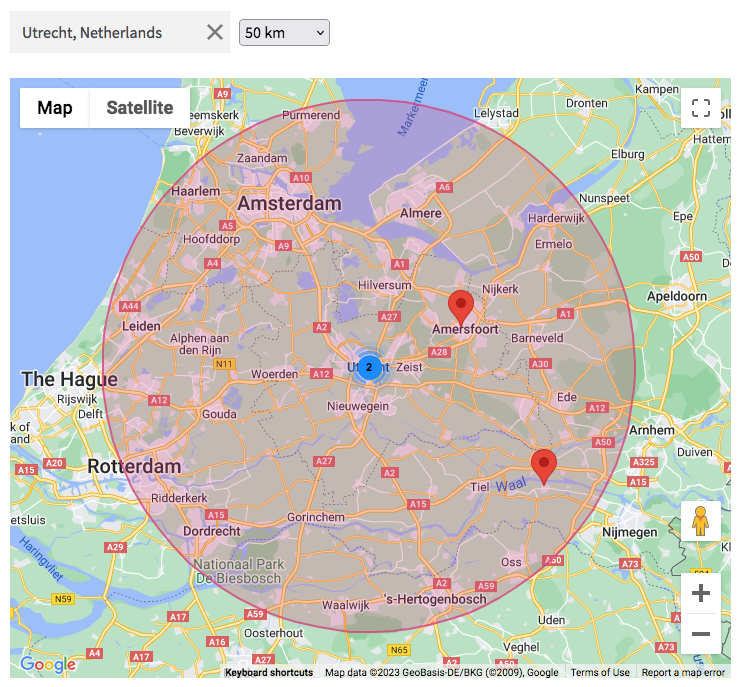
The following code draws a circle shape on the map each time a location is entered in the Proximity facet. The circle’s radius will adapt automatically to the radius set in the Proximity facet.
You can customize the circle’s fill color and opacity, and its stroke color, opacity and weight. Make sure to replace my_proximity_facet with the name of your proximity facet in line 14, and set the correct number of units (kilometers or miles) in line 17, depending on the “Units of measurement” setting you have used.
Be aware that the map’s default fitBounds behavior will make the map zoom into the found locations when the Proximity facet is used. The circle’s edge will then end up outside or around the viewport of the map. If you want the entire circle to be always visible, you could set a maximum zoom level in the map’s Zoom min / max setting, or make the circle smaller than the Proximity radius (which will possibly cause some markers to be outside the circle). In some situations, it may be an idea to disable the fitBounds behavior entirely and set a custom zoom level and/or center.
How to use custom PHP code?
PHP code can be added to your (child) theme's functions.php file. Alternatively, you can use the Custom Hooks add-on, or a code snippets plugin. More info
add_action( 'facetwp_scripts', function() { ?> <script> (function() { document.addEventListener('facetwp-loaded', function() { // Clear existing circle if it exists if (FWP_MAP.circle) { FWP_MAP.circle.setMap(null); // Clear circle from map FWP_MAP.circle = null; // Remove circle instance entirely } let proximityfacet = FWP.facets['my_proximity_facet']; // Replace "my_proximity_facet" with the name of your Proximity facet let lat = parseFloat(proximityfacet[0]); let lng = parseFloat(proximityfacet[1]); let radius = parseFloat(proximityfacet[2]) * 1000; // For Kilometers. Use 1609.344 if you have set the Unit of measurement setting to Miles if (proximityfacet.length) { FWP_MAP.circle = new google.maps.Circle({ center: { lat: lat, lng: lng }, radius: radius, // Circle radius in meters fillColor: "#D93F7C", // Circle coloring fillOpacity: 0.25, // Circle opacity strokeColor: "#D93F7C", // Circle outline color strokeOpacity: 0.8, // Circle outline color strokeWeight: 2, // Circle outline thickness map: FWP_MAP.map }); if (FWP_MAP.circle) { FWP_MAP.circle.setMap(FWP_MAP.map); } } }); })(); </script> <?php }, 100 );
To display a circle (or other shape) around (clicked) markers, see the example below.
How to use JavaScript map marker hooks and functions
FacetWP provides several JavaScript hooks and functions to perform actions when markers are interacted with, or to perform actions on markers. For example when markers themselves, post (titles) in the result listing, or info windows close buttons are clicked.
Example 1: Add a class to the post which has its marker clicked
The following examples add the CSS class is-active to the active post (the post which has its corresponding marker clicked), which could be used to style it differently than the other posts.
The code also adds an optional scroll to the active post element (when its marker is clicked). If you don’t need that, just remove lines lines 19-24.
How to use custom PHP code?
PHP code can be added to your (child) theme's functions.php file. Alternatively, you can use the Custom Hooks add-on, or a code snippets plugin. More info
add_action( 'facetwp_scripts', function() { ?> <script> (function($) { if ('object' !== typeof FWP) { return; } FWP.hooks.addAction('facetwp_map/marker/click', function(marker) { // The post ID associated with the active marker var post_id = marker.post_id; // The following code adds the CSS class "is-active" to the active post, // assuming each result's HTML is structured similarly to: // <div class="post-item" data-id="123">Hello World!</div> $('.post-item').removeClass('is-active'); $('.post-item[data-id="' + post_id + '"]').addClass('is-active'); // Optional: scroll to the active post element var offset = $('.post-item[data-id="' + post_id + '"]').nodes[0].offsetTop; window.scrollTo({ top: offset, behavior: 'smooth', }); }); })(fUtil); </script> <?php }, 100 );
The above example assumes your posts (or post titles) have a class post-item and a data-id attribute containing the post ID. One way to accomplish this is by using the Listing Builder’s Dev mode:
Example 1 – Using a Listing Builder listing in Dev mode
To give your posts (or post titles) a class post-item and a data-id attribute containing the post ID, add the following code to the “Display Code” field:
How to use custom PHP code?
PHP code can be added to your (child) theme's functions.php file. Alternatively, you can use the Custom Hooks add-on, or a code snippets plugin. More info
<?php while ( have_posts() ): the_post(); ?> <h3><a href="<?php the_permalink(); ?>" class="post-item" data-id="<?php the_id(); ?>"><?php the_title(); ?></a></h3> <?php endwhile; ?>
Now you can add some CSS to highlight the active listing item:
How to use custom PHP code?
PHP code can be added to your (child) theme's functions.php file. Alternatively, you can use the Custom Hooks add-on, or a code snippets plugin. More info
add_action( 'facetwp_scripts', function() { ?> <style> .post-item.is-active { border: 1px solid red !important; } </style> <?php }, 100 );
Example 1 – Using a Listing Builder listing in visual mode
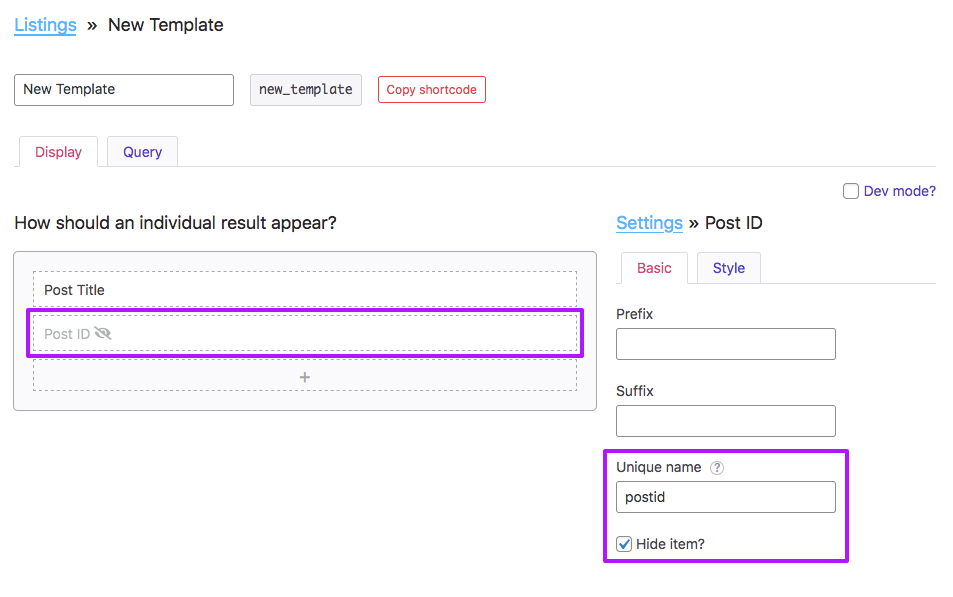
If you have built your layout in the visual (non-Dev Mode) Listing Builder, it is a bit more difficult to get the post ID on each listing result in the grid. Currently, it is not possible to set it as class on the .fwpl-result container. But you can add it to its direct child div with class .fwpl-row.
To accomplish this, add a “Post ID” item to the listing. Give it the “Unique name” postid, and hide it:
Next, click the purple gear icon in the top center of your listing, which will open the main Row settings. Click the “Style” tab, and in the “CSS class” field at the bottom, enter: postid-{{ postid }}:
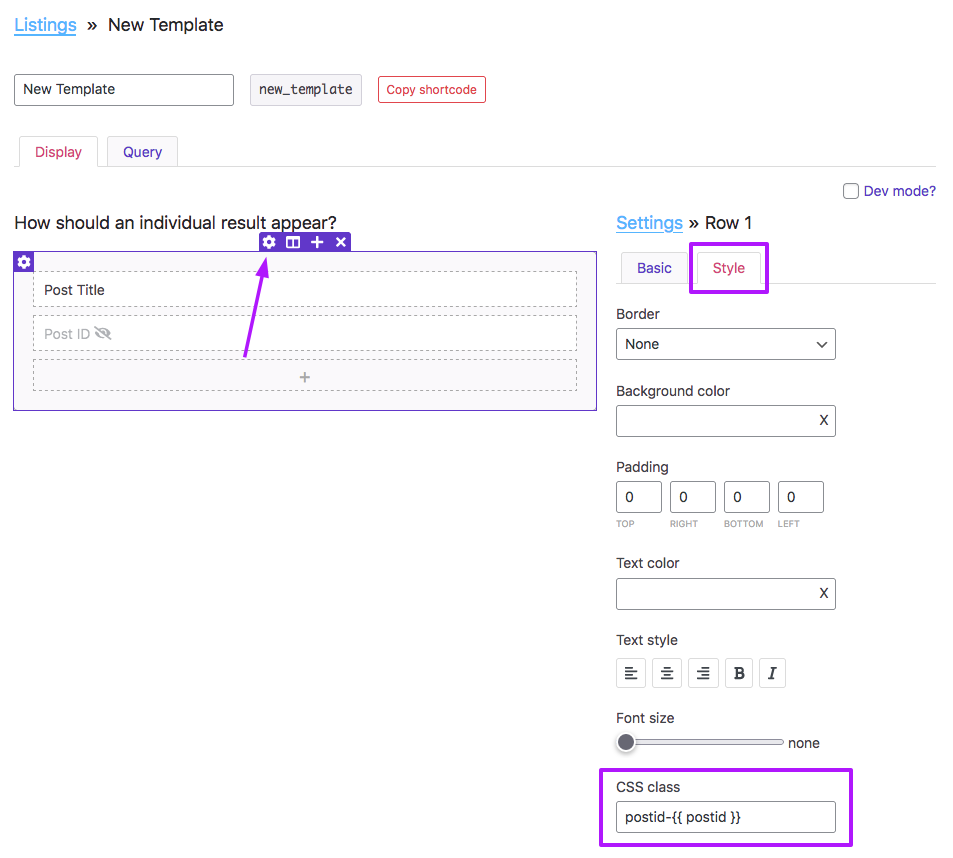
This will add a class postid-# to each .fwpl-result > .fwpl-row item. Note that the {{ postid }} part is a so-called dynamic tag.
Next, add the following snippet. The code also adds an optional scroll to the active post element (when its marker is clicked). If you don’t need that, just remove lines lines 17-22.
How to use custom PHP code?
PHP code can be added to your (child) theme's functions.php file. Alternatively, you can use the Custom Hooks add-on, or a code snippets plugin. More info
add_action( 'facetwp_scripts', function() { ?> <script> (function($) { if ('object' !== typeof FWP) { return; } FWP.hooks.addAction('facetwp_map/marker/click', function(marker) { // The post ID associated with the active marker var post_id = marker.post_id; // The following code adds the CSS class "is-active" to the active post's main .fwpl-row child div $('.fwpl-result > .fwpl-row').removeClass('is-active'); $('.fwpl-result > .fwpl-row.postid-' + post_id).addClass('is-active'); // Optional: scroll to the active post element var offset = $('.fwpl-result > .fwpl-row.postid-' + post_id).nodes[0].offsetTop; window.scrollTo({ top: offset, behavior: 'smooth', }); }); })(fUtil); </script> <?php }, 100 );
Now you can add some CSS to highlight the active listing item:
How to use custom PHP code?
PHP code can be added to your (child) theme's functions.php file. Alternatively, you can use the Custom Hooks add-on, or a code snippets plugin. More info
add_action( 'facetwp_scripts', function() { ?> <style> .fwpl-result > .fwpl-row.is-active { border: 1px solid red !important; } </style> <?php }, 100 );
Example 2: Open a marker’s info window on mouse hover
In addition to the click event, FacetWP also supports mouseover and mouseout events.
This example opens a marker’s info window on mouse hover:
How to use custom PHP code?
PHP code can be added to your (child) theme's functions.php file. Alternatively, you can use the Custom Hooks add-on, or a code snippets plugin. More info
add_action( 'facetwp_scripts', function() { ?> <script> (function($) { if ('object' !== typeof FWP) { return; } let isProgrammaticClick = false; FWP.hooks.addAction('facetwp_map/marker/mouseout', function(marker) { if ('undefined' !== typeof marker.content) { FWP_MAP.infoWindow.setContent(marker.content); } // For ajax marker info window content else if ('undefined' === typeof FWP_MAP.contentCache[marker.post_id]) { FWP_MAP.infoWindow.setContent('Loading...'); FWP_MAP.infoWindow.open(FWP_MAP.map, marker); return $.post(FWP_JSON.map.ajaxurl, { action: 'facetwp_map_marker_content', facet_name: FWP_JSON.map.facet_name, post_id: marker.post_id }, { dataType: 'text', contentType: 'application/x-www-form-urlencoded', done: (resp) => { FWP_MAP.contentCache[marker.post_id] = resp; FWP_MAP.infoWindow.setContent(resp); FWP.hooks.doAction('facetwp_map/marker/click', marker); // Trigger extra click to reposition marker/infowindow within viewport if (!isProgrammaticClick) { isProgrammaticClick = true; google.maps.event.trigger(marker, 'click'); isProgrammaticClick = false; } } }); } FWP_MAP.infoWindow.open(FWP_MAP.map, marker); }); })(fUtil); </script> <?php }, 100 );
Example 3: Trigger a marker click and info window on post click
The get_post_markers() function can be used to get markers by post ID and perform actions on them.
The following example triggers a marker click when you click on a post in the results list. It sets the map center to the marker’s position, opens its info window, and sets a custom zoom level.
Make sure that the zoom level is higher than the marker clusterer’s bottom limit, otherwise the separate markers will not be shown.
The click event to use is spider_click because of the built-in Overlapping Marker Spiderfier. If you don’t have any markers close together, you can also use the click event.
How to use custom PHP code?
PHP code can be added to your (child) theme's functions.php file. Alternatively, you can use the Custom Hooks add-on, or a code snippets plugin. More info
add_action( 'facetwp_scripts', function () { ?> <script> (function($) { $(document).on('click', '.post-item', function(e) { e.preventDefault(); // Necessary if '.post-item' is an <a> tag and you don't want it to open the post page itself. var postid = $(this).attr('data-id'); var marker = FWP_MAP.get_post_markers(postid); $.each( marker, function( key, value ) { FWP_MAP.map.setCenter({ lat: value.position.lat(), lng: value.position.lng() }); FWP_MAP.is_zooming = true; // Needed if you are using the "Enable map filtering" button FWP_MAP.map.setZoom(17); // Set a zoom level between 1 and 20. Make sure it is higher than the marker clusterer's bottom limit. // google.maps.event.trigger(value, 'click'); // If you don't have spiderfied markers google.maps.event.trigger(value, 'spider_click'); // If you have spiderfied markers. Will also work if you don't have spiderfied markers. }); }); })(jQuery); </script> <?php }, 100 );
This example assumes your post items (or post titles) have a class post-item and a data-id attribute containing the post ID. One way to accomplish this is by using the Listing Builder’s Dev mode:
Example 3 – Using a Listing Builder listing in Dev mode
To give your posts (or post titles) a class post-item and a data-id attribute containing the post ID, add the following code to the “Display Code” field:
How to use custom PHP code?
PHP code can be added to your (child) theme's functions.php file. Alternatively, you can use the Custom Hooks add-on, or a code snippets plugin. More info
<?php while ( have_posts() ): the_post(); ?> <h3><a href="<?php the_permalink(); ?>" class="post-item" data-id="<?php the_id(); ?>"><?php the_title(); ?></a></h3> <?php endwhile; ?>
Example 3 – Using a Listing Builder listing in visual mode
If you have built your layout in the visual (non-Dev Mode) Listing Builder, you can add a class postid-# to each .fwpl-result > .fwpl-row item with a so-called dynamic tag, as explained above in Example 1.
Then, use the following code instead:
How to use custom PHP code?
PHP code can be added to your (child) theme's functions.php file. Alternatively, you can use the Custom Hooks add-on, or a code snippets plugin. More info
add_action( 'facetwp_scripts', function () { ?> <script> (function($) { $(document).on('click', '.fwpl-row', function(e) { e.preventDefault(); // Necessary if '.post-item' is an <a> tag and you don't want it to open the post page itself. // Works for Listing Builder listing templates with a postid-# class on each .fwpl-result > .fwpl-row item. var postid; const classes = $(this)[0].classList; for (const className of classes) { if (className.startsWith('postid-')) { postid = className.substring('postid-'.length); } } var marker = FWP_MAP.get_post_markers(postid); $.each( marker, function( key, value ) { FWP_MAP.map.setCenter({ lat: value.position.lat(), lng: value.position.lng() }); FWP_MAP.is_zooming = true; // Needed if you are using the "Enable map filtering" button FWP_MAP.map.setZoom(17); // Set a zoom level between 1 and 20. Make sure it is higher than the marker clusterer's bottom limit. // google.maps.event.trigger(value, 'click'); // If you don't have spiderfied markers google.maps.event.trigger(value, 'spider_click'); // If you have spiderfied markers. Will also work if you don't have spiderfied markers. }); }); })(jQuery); </script> <?php }, 100 );
Example 4: Change the marker icon when an info window is open
This code example changes the (custom) marker icon when an info window is opened and switches it back when it is closed. This can be useful to indicate an ‘active’ marker with a different design or color.
First, we define the ‘default’ and ‘active’ icons, using the properties of the google.maps.Icon interface. The specified ‘default’ icon and its properties should of course be the same as the custom icon you have specified with one of the above methods.
We use the facetwp_map/marker/click hook to detect a click on a marker and store its post_id to get its object. In that object we then set that marker’s icon to the ‘active’ version, with the setIcon() method.
We use Google Map API’s closeclick event to detect the closing of the info window. When that happens, or when the map is clicked anywhere (causing all info windows to close), or when another marker is clicked, we use FacetWP’s get_post_markers function and pass it the stored active marker’s post_id to get the that marker’s object so we can switch its icon back to the original one:
How to use custom PHP code?
PHP code can be added to your (child) theme's functions.php file. Alternatively, you can use the Custom Hooks add-on, or a code snippets plugin. More info
add_action( 'facetwp_scripts', function() { ?> <script> (function($) { if ('object' !== typeof FWP) { return; } // Change URL to the default marker icon let icon_default = { url: '/wp-content/themes/storefront/mapicons/m3.png', scaledSize: { width: 40, height: 40 } }; // Change URL to the alternative, 'active' icon let icon_active = { url: '/wp-content/themes/storefront/mapicons/m4.png', scaledSize: { width: 40, height: 40 } }; $(function() { FWP.hooks.addAction('facetwp_map/marker/click', function(marker) { // Check if another marker is already active. If so set to default icon if (window.marker_post_id) { let post_id = window.marker_post_id; let marker = FWP_MAP.get_post_markers(post_id)[0]; marker.setIcon(icon_default); // or use marker.setIcon(null); for the default pin } // Set the clicked marker to have the 'active' icon window.marker_post_id = marker.post_id; marker.setIcon(icon_active); }); // When an infoWindow is closed revert its marker to the default icon google.maps.event.addListener(FWP_MAP.infoWindow, 'closeclick', function() { let post_id = window.marker_post_id; let marker = FWP_MAP.get_post_markers(post_id)[0]; marker.setIcon(icon_default); // or use marker.setIcon(null); for the default pin }); // When the map is clicked anywhere, revert the active marker to the default icon google.maps.event.addListener(FWP_MAP.map, 'click', function(event) { if (window.marker_post_id) { let post_id = window.marker_post_id; let marker = FWP_MAP.get_post_markers(post_id)[0]; marker.setIcon(icon_default); // or use marker.setIcon(null); for the default pin } }); }); })(jQuery); </script> <?php }, 100 );
Example 5: Display a circle or other shape around (clicked) markers
The following code uses the facetwp_map/marker/click hook to draw a circle around a marker when it is clicked. Note that instead of a circle, this could be any other type of shape/polygon supported by the Google Maps API.
You can customize the circle’s fill color and opacity, and its stroke color, opacity and weight. The circle’s size is determined by the radius value (in meters) set in line 22.
Clicking another marker will clear the previous circle. The code (optionally) also removes the circle when any marker’s info window is closed, and/or when you click anywhere on the map.
If you want to apply the code only to certain markers, you can use the clicked marker’s post_id to write a condition.
How to use custom PHP code?
PHP code can be added to your (child) theme's functions.php file. Alternatively, you can use the Custom Hooks add-on, or a code snippets plugin. More info
add_action( 'facetwp_scripts', function() { ?> <script> (function() { FWP.hooks.addAction('facetwp_map/marker/click', function(marker) { // Clear existing circle if it exists if ( 'undefined' !== typeof FWP_MAP.circle ) { FWP_MAP.circle.setMap(null); // Clear circle from map FWP_MAP.circle = null; // Remove circle instance entirely } // let post_id = marker.post_id; // The marker's post_id could be used to apply this code only to certain markers. let lat = marker.position.lat(); let lng = marker.position.lng(); FWP_MAP.circle = new google.maps.Circle({ center: { lat: lat, lng: lng }, radius: 25000, // Circle radius in meters fillColor: "#D93F7C", // Circle coloring fillOpacity: 0.25, // Circle opacity strokeColor: "#D93F7C", // Circle outline color strokeOpacity: 0.8, // Circle outline color strokeWeight: 2, // Circle outline thickness map: FWP_MAP.map }); // Optional: when an infoWindow is closed, clear the circle from the map google.maps.event.addListener(FWP_MAP.infoWindow, 'closeclick', function() { FWP_MAP.circle.setMap(null); }); // Optional: when the map is clicked anywhere, clear the circle from map google.maps.event.addListener(FWP_MAP.map, 'click', function(event) { FWP_MAP.circle.setMap(null); }); }); })(); </script> <?php }, 100 );
To draw a circle around each marker, without a click, you can do it as follows:
How to use custom PHP code?
PHP code can be added to your (child) theme's functions.php file. Alternatively, you can use the Custom Hooks add-on, or a code snippets plugin. More info
add_action( 'facetwp_scripts', function() { ?> <script type="text/javascript"> (function() { document.addEventListener('facetwp-loaded', function() { // Get all markers let markers = FWP_MAP.markersArray; Object.keys(markers).forEach(function(key) { let value = markers[key]; let lat = value.position.lat(); let lng = value.position.lng(); FWP_MAP.circle = new google.maps.Circle({ center: { lat: lat, lng: lng }, radius: 25000, // Circle radius in meters fillColor: "#d93f7c", // Circle coloring fillOpacity: 0.25, // Circle opacity strokeColor: "#d93f7c", // Circle outline color strokeOpacity: 0.8, // Circle outline color strokeWeight: 2, // Circle outline thickness map: FWP_MAP.map }); FWP_MAP.circle.setMap(FWP_MAP.map); }); }); })(); </script> <?php }, 100 );
To display the Proximity facet radius as a circle on the map, see the example above.