How to switch the facet logic on the front-end
Several facet types have a “Facet logic” setting, which determines if the facet uses AND or OR logic when selecting multiple choices. We sometimes get asked how to enable the end user to choose between AND and OR logic, with a switch or a button.
With some custom coding this is possible, as explained and demonstrated below.
First, let’s take a look at the basics:
The “Facet logic” setting
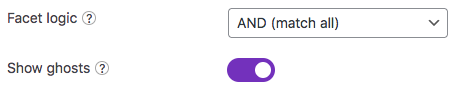
The following four facet types have a “Facet logic” setting, which determines the logic used between multiple choices within the facet:
Selecting “AND (match all)” will reduce the results with multiple selections, while “OR (match any)” will increase the results.
For example, assume a facet with the choices “Apple”, “Banana”, and “Pear”:
- AND (match all) – if you select “Apple”, the choices “Banana” and “Pear” will disappear (or become ghosts if “Show ghosts” is enabled). Only results matching “Apple” will remain.
- OR (match any) – if you select “Apple”, the choices “Banana” and “Pear” will remain. If you select both “Apple” and “Banana”, results matching either will remain.
Changing the “Facet logic” setting with PHP
The “Facet logic” setting is set per facet. However, the same facet can be placed on multiple pages or in multiple templates, and you may want to let it use a different logic in some situations.
Of course, you could make multiple facets with different settings. But it may be good to know that you can use PHP to change the facet logic used for a specific facet, using the facetwp_facet_filter_posts hook. This can be used to change the facet’s AND/ORfiltering logic on specific pages or templates, or based on a custom condition.
Changing the “Facet logic” dynamically with JS on the front-end
Now for the tutorial part: how can we enable the end user to choose between AND and OR logic when selecting multiple choices in a facet?
The trick is to use two facets and switch between them. The setup and steps described below will result in what can be seen in the demo below.
Setup overview: using two facets
The “Facet logic” setting is a fixed setting. There is no good way to change that setting on the fly when using the facet itself.
A workaround is to create two of the same facets: one with its “Facet logic” setting set to AND, and one set to OR.
After adding both facets to a page, we also need to create a switching interface, for example, two buttons. The buttons will let the user switch between the two facets, where only one of them is visible (and filtering) at the same time.
Let’s say you have a page with the two facets and two buttons labeled “Use AND” and “Use OR”. And currently, the AND facet is visible, and the OR facet is invisible. When clicking the “Use OR” button, the following should happen:
- The “OR” facet should become visible and the “AND” facet invisible.
- The “Use OR” button should become active and the “Use AND” button inactive.
- The “OR” facet should take over any selections that were made in the “AND” facet.
- The “AND” facet’s selections should be cleared.
- A refresh should happen to refresh the listing with the newly applied selections and logic.
Steps 1-2 would involve some JS that changes classes on the buttons and facets.
Steps 3-5, the switching of the facets’ filtering, would basically have to do this:
How to use custom JavaScript code?
JavaScript code can be placed in your (child) theme's main JavaScript file. Alternatively, you can add it manually between
<script>tags in the<head>section of your (child) theme's header.php file. You can also load it with a hook in your (child) theme's functions.php file, or in the Custom Hooks add-on. To load the code only on pages with facets, use thefacetwp_scriptshook. To load it on all pages, usewp_headorwp_footer. Or you can use a code snippets plugin. More infoFWP.is_reset = true; // Initialize a reset FWP.facet['facet_or'] = FWP.facet['facet_and']; // Copy values of the first facet to second facet that will now be in use FWP.facet['facet_and'] = []; // Clear the selections of the first facet FWP.refresh(); // Refresh the facets and listing, with the new selections and logic applied
To set up a working example is slightly more complicated. The following steps explain how to re-create the demo below:
Step 1: Create a page with two facets and a listing
First, we’ll create a new page, add a listing template, and add two Checkboxes facets.
For the listing template, the easiest is to create a Listing Builder listing and add its shortcode to the page. Or you can use any existing page/template with a supported listing template. For the query, choose a post type that has posts available.
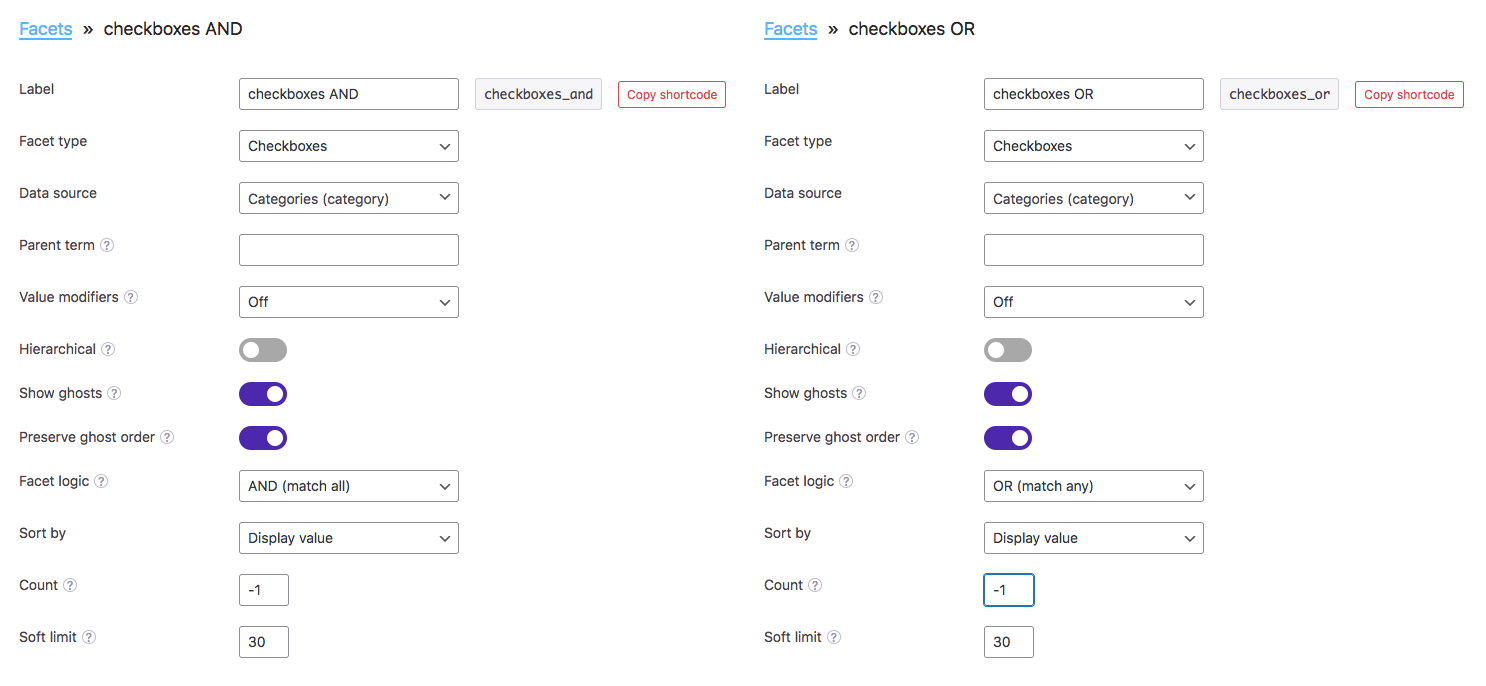
Next, create two Checkboxes facets with opposite “Facet logic” settings. One called checkboxes_and with its setting set to “AND (match all)”, and the other called checkboxes_or with its setting set to “OR (match any)”. The other settings need to be identical. The data source can be anything that works to filter the post type set in your listing template query. In this example, we use categories.
For both facets, make sure to enable “Show ghosts”, so that the facets will not become empty and disappear when, after switching, there are no results for the selected choices. Without “Show ghosts” enabled, when that happens, the user cannot unclick the facet choices (except with a Reset facet).
Also enable “Preserve ghost order”, so that there is no jumping of choices when the facets are switched. Without “Preserve ghost order” enabled, ghost choices will appear at the bottom, which changes the order of choices.
The settings should now look like this:
After saving your facet settings and clicking the “Re-index” button, add the facets to your page that already had a listing template.
To recreate the demo below, also add a Reset facet, a Pager facet set to “Result counts”, and optionally another Pager facet set to “Page numbers”, for pagination.
Your page should now show the listing, the two identical-looking Checkboxes facets, and the Reset and Pager facets. We’ll now build a switching interface with two buttons:
Step 2: Set up the switching UI
In this tutorial, we’ll create two buttons to function as the switch between the two facets with the different logic settings. To keep things simple, we set them up as regular <button> elements in a container <div>, and add some basic styling. Each button has a unique id that we’ll use later to attach click events to.
Add the following to the top of the page, above the two Checkboxes facets:
<div class="switch">
  <button id="use-and" class="facet-logic-switch" href="javascript:void(0)">Use 'AND' - results reduce</button>
  <button id="use-or" class="facet-logic-switch" href="javascript:void(0)">Use 'OR' - results increase</button>
</div>

<style>
  .switch {
    display: block;
    width: 100%;
    overflow: hidden;
    margin: 30px 0;
  }
  .facet-logic-switch {
    background: #aaa;
    border: none;
    margin: 0 20px 20px 0;
    color: #ffffff;
    border-radius: 3px;
    padding: 11px 16px;
    font-weight: normal;
    float: left;
    cursor: pointer;
  }
  .facet-logic-switch.active {
    background: #42b845;
    pointer-events: none; /* Prevents re-clicking the active state */
  }
</style>
You can set this switch up any way you want: as buttons, links, a toggle switch, radio buttons, dropdowns, or tabs.
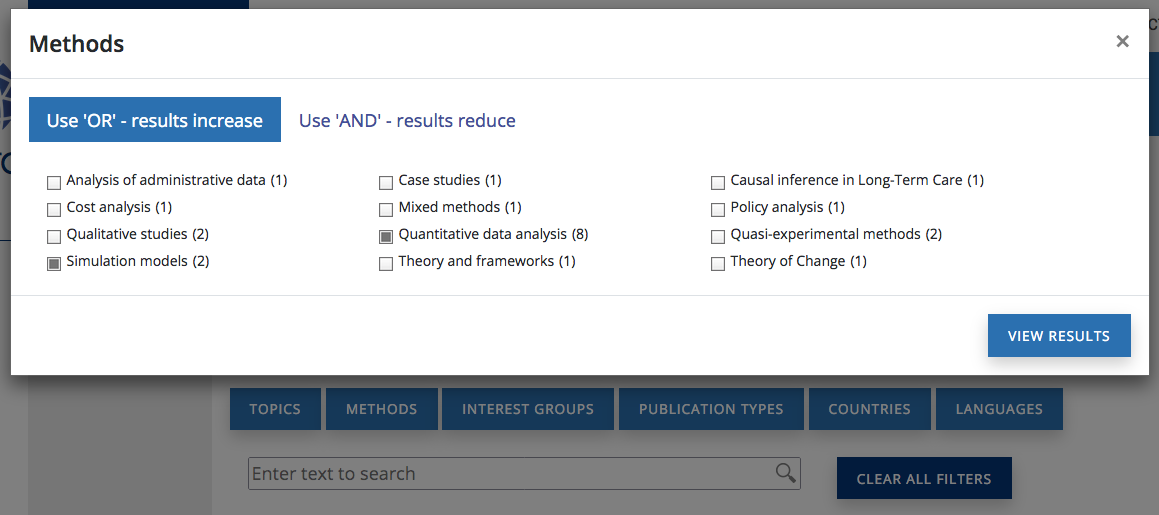
For inspiration, here is a screenshot of a user’s website with each facet in a separate modal. The screenshot shows the “Methods” facet’s modal active, containing a tabbing interface to switch between the two facets (with the AND facet currently invisible), and an “Apply” button.
Step 3: Add the switching logic
Next, we’ll add some custom JS that performs the facet switching when clicking the buttons.
Add the following code to your (child) theme’s functions.php.
Make sure the facet names in lines 9 and 10 are the same as your two facets (as created in step 1).
Also make sure the button IDs in lines 13 and 14 are the same as the IDs of your button elements (as created in step 2).
How to use custom PHP code?
PHP code can be added to your (child) theme's functions.php file. Alternatively, you can use the Custom Hooks add-on, or a code snippets plugin. More info
add_action( 'facetwp_scripts', function() { ?> <script> (function($) { // Part 1: Set up facet names and button IDs // Set your two facet names const facet_name_and = 'checkboxes_and'; // The facet with "Facet logic" set to AND const facet_name_or = 'checkboxes_or'; // The facet with "Facet logic" set to OR // Set the IDs of your two switch buttons const btn_id_and = '#use-and'; // The "Use AND" button const btn_id_or = '#use-or'; // The "Use OR" button // Part 2: Helper function to handle the UI state: the active classes of the switch links and the visibility of the two facets const set_facet_logic_state = function(active_type) { const is_and = (active_type === 'and'); const btn_and = $(btn_id_and); const btn_or = $(btn_id_or); const facet_and = $('.facetwp-facet-' + facet_name_and); const facet_or = $('.facetwp-facet-' + facet_name_or); if (is_and) { btn_and.addClass('active'); btn_or.removeClass('active'); facet_and.removeClass('facetwp-hidden'); facet_or.addClass('facetwp-hidden'); } else { btn_and.removeClass('active'); btn_or.addClass('active'); facet_and.addClass('facetwp-hidden'); facet_or.removeClass('facetwp-hidden'); } }; // Part 3: Set the initial UI state on first pageload $(document).on('facetwp-loaded', function() { if (!FWP.loaded) { // On first page load only // If the OR facet has values (e.g., from a URL), show OR UI. // Otherwise, default to AND UI. if (FWP.facets[facet_name_or] && FWP.facets[facet_name_or].length > 0) { set_facet_logic_state('or'); } else { set_facet_logic_state('and'); } } }); // Part 4: The switching logic document.addEventListener('click', function(e) { // Switch to AND facet if (e.target.matches(btn_id_and)) { FWP.is_reset = true; FWP.facets[facet_name_and] = FWP.facets[facet_name_or] || []; FWP.facets[facet_name_or] = []; // Switch UI state set_facet_logic_state('and'); // Refresh FWP.refresh(); } // Switch to OR facet else if (e.target.matches(btn_id_or)) { FWP.is_reset = true; FWP.facets[facet_name_or] = FWP.facets[facet_name_and] || []; FWP.facets[facet_name_and] = []; // Switch UI state set_facet_logic_state('or'); // Refresh FWP.refresh(); } }, false); })(fUtil); </script> <?php } );
The code consists of four parts:
- Part 1 is where the two facets and two buttons are defined, as we have done.
- Part 2 is a helper function to handle the UI state of the switch buttons and the two facets, on click of the buttons. The function basically switches the
.activeclass to determine the “active” switch button, and the.facetwp-hiddenclass to show and hide the two facets. - Part 3 sets the initial state of the buttons and facets, on first page load. The facet with
ANDlogic will be the default active facet, unless the page loads with selections in the URL for theORfacet, in which case that facet will then be the active one. - Part 4 contains the actual switching logic. On click of the switching buttons, four things happen:
- The “active” state of the buttons is switched (the button color is switched).
- The visibility of the two facets is switched.
- Any current facet selections are transferred to the newly activated facet.
- A refresh is triggered, to update the facets and listing to the new state.
With all parts in place, your page should now look and work like the demo below:
Demo
The recipes demo below uses the above-described setup and code to switch between two Checkboxes facets that use the recipes category taxonomy as data source. Only one of the two facets is visible at the time.
The first facet has its “Facet logic” setting set to “AND (match all)” (the default one). The second facet is set to “OR (match any)”. Both have “Show ghosts” and “Preserve ghost order” enabled.
Try making a selection that reduces the results. For example: Enriched & sweet and Sandwich bread. Then switch to OR mode and notice that the number of results increase.