Proximity (legacy)
What is the “Legacy” Proximity facet?
In FacetWP v4.4 and newer, you can choose between two Proximity facet types:
- The Legacy Proximity facet – uses Google’s legacy “Places API” – as described on this page.
- The new Proximity facet – uses Google’s “Places API (New).
This split was introduced to let existing users decide when to migrate to the new Proximity facet. Migrating to the new version is optional but recommended.
To learn more about the context of the Proximity and Map facet changes in FacetWP v4.4, and why you should consider migrating to the new versions, read the news article about the release.
The “Use Legacy Proximity facet” switch

The switch between the Legacy and new Proximity facet is determined by the new “Use Legacy Proximity facet” setting, which is located under FacetWP > Settings.
This setting is only available in FacetWP v4.4 and newer, and is only visible if you have entered a key in the “Google Maps API key” setting above it.
To use (or keep using) the Legacy Proximity facet, enable this setting. If you do so, make sure the Google’s legacy “Places API” is enabled. To migrate to the new Proximity facet, follow the migration instructions below.
Note that this switch between the Legacy and new Proximity facet is site-wide: you can’t set it differently for specific pages or Proximity facets. If needed, the switch can also be set (or overridden) programmatically.
Existing users
If you already had a key entered in the “Google Maps API key” setting before you updated to FacetWP4.4+, the “Use Legacy Proximity facet” setting will be enabled by default and you are still using the Legacy Proximity facet. You can choose yourself if you want to migrate to the new Proximity facet and when. Make sure to read the migration instructions.
To future-proof your site, we recommend migrating to the new version. But you can decide to keep using the Legacy Proximity facet for now. It will keep working until Google decides to discontinue the legacy “Places API” at an unknown point in the future. We recommend keeping an eye on Google’s legacy and deprecations pages.
New users
If you are a new FacetWP or Proximity facet user, or you did not already have an API key entered before updating FacetWP to v4.4+, the “Use Legacy Proximity facet” setting will be disabled by default. In this situation, there is no reason to use the Legacy Proximity facet. We recommend keeping the setting disabled and starting to use the new Proximity facet right away.
Users with FacetWP versions older than v4.4
For FacetWP versions older than v4.4, there is no choice and you will automatically be using the Legacy Proximity facet.
How to migrate to the new Proximity facet

To migrate an existing site already using a Proximity facet to the new Proximity facet, follow the steps below.
If you are using any Proximity-related custom code, or if you also are migrating to the new Map facet, we recommend doing this on a staging site first.
- Update your (staging) site to FacetWP 4.4+.
- Go to
FacetWP > Settingsand Disable the “Use Legacy Proximity facet” setting. - Enable “Places API (New)” in you Google Cloud Console, and for your project (if you have that restricted to certain APIs). Save your changes and wait 5 minutes for them to propagate.
- If you are using a staging site, keep the legacy “Places API” enabled for now, so that your live site keeps working. Or create a different project for each site in the Console. Disable the legacy “Places API” later when you are done, or do it now when you don’t use a staging site. You can entirely disable the API, or only in your project restrictions.
- Test correct API connection with the new test feature in the FacetWP settings.
- Go through each Proximity-related code snippet you have in your
functions.php(or code snippets plugin, or Custom Hooks add-on), one by one. Look it up in the documentation below, and check if it needs replacing. We added purple migration banners where relevant, and below each snippet that has a new version or needs attention. For some of the snippets we added backward compatibility and replacing is optional. If a legacy snippet does not have a purple banner below it, you can safely assume it still works and does not need adapting. - Clear your browser cache.
- Test your Proximity facet. Make sure to check your browser console for any errors when using it.
- When you are done migrating, disable the legacy “Places API” in the Google Cloud Console if you have not already done so. You can entirely disable the API, or only in your project restrictions.
- Read the new documentation to see what new things are possible. To learn more about the context of all changes in FacetWP v4.4, read the news article about the release.
- Optional (but highly recommended): if you are using a Map facet, migrate the Legacy Map facet to the new Map facet.
- Open a support ticket if you run into issues with any (documented) snippets.
How the Proximity facet works
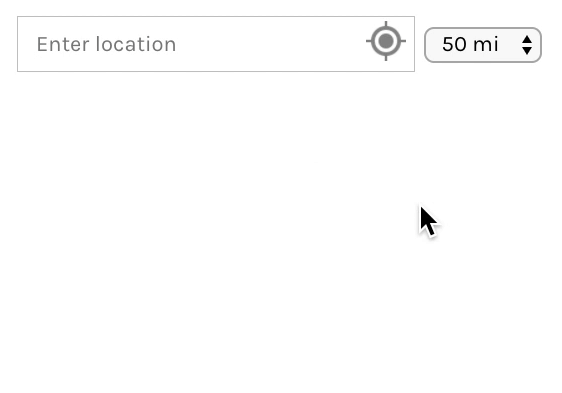 The Proximity facet lets you find results near a specified location, entered manually, or by clicking the “Locate me” button.
After a user enters a location and clicks a place in the autocomplete dropdown, a radius can be chosen from a pre-defined list, with a dropdown or slider. Results within that radius from the chosen location are then displayed in the listing, and (if available) on the map.
How location, place center points and radius work
After clicking a place in the dropdown, FacetWP uses Google’s Places API to fetch the latitude, longitude of that places’s central point. Results within the user-defined radius of that point are displayed.
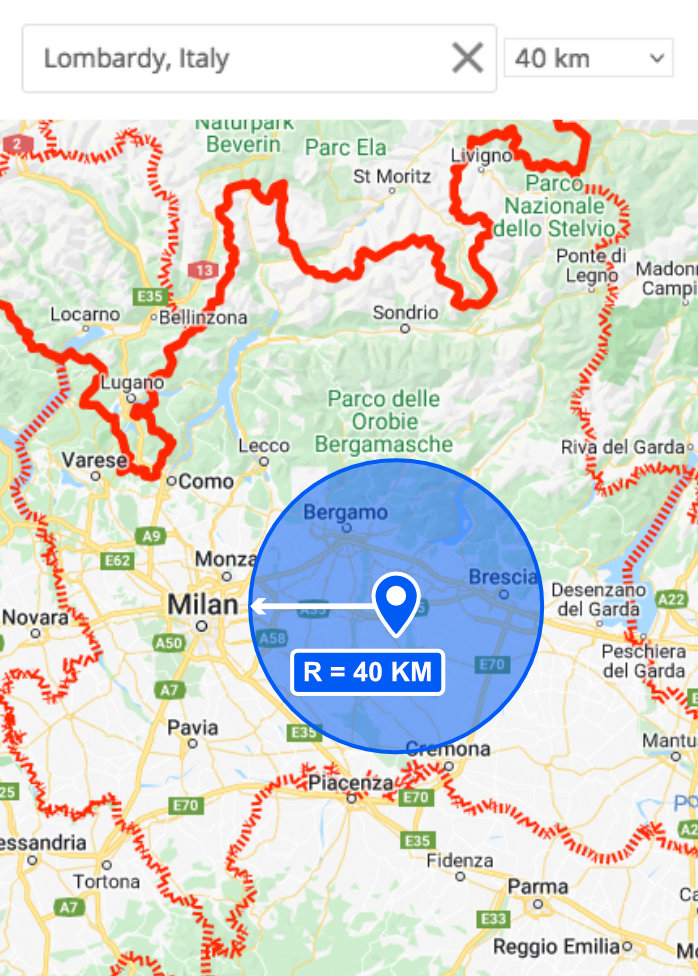
The facet does not understand geographic / political boundaries. If you search for a country (e.g. “Italy”), the facet will return results extending from that country’s geographical center point (as defined by the Google Places API (New)), which may include results from other countries if the chosen radius is large enough.
Be aware that this behavior is possibly confusing for users. For example, if a user searches for the region Lombardy (Italy), they may expect to see results within the whole region (including its capital Milan). They may even expect results with a radius extending from the border of the region, not the center point. The Lombardy region is about 220km from west to east. So if a user searches it with a radius set to 40km, the facet will only display results within a circle of 80km diameter around Lombardy’s center point, which covers only a small part of the region, and does not include its capital Milan.
Keep this behavior in mind when choosing radius options for your situation. If you expect users to often search for regions or even countries, it makes sense to offer higher radius settings that cover whole regions or countries. Also, setting the default radius to a higher value can make the initial results more intuitively correct.
Another approach would be to limit what “Place Types” are returned by the autocomplete results, and exclude regions and countries. And/or to limit results to a specific country or region, or bias/restrict autocomplete results towards a specific geographical area.
Combine a Proximity facet with a Map facet
If you use a Proximity facet on its own, it will return results within the chosen radius from the specified location. But there is no map for the user to interact with, nor any other feedback that includes distances.
You can show the resulting posts’ distances to the specified location, and/or let users sort results by distance. But to give users visual feedback, a Proximity facet can very well be combined with a Map facet.
When a location and radius are set (or changed) with the Proximity facet, the map will automatically zoom in or out, showing the locations that are within the radius of the set location.
If the Proximity facet is in use, it will display a yellow marker pin at the set location. This marker pin can be customized, disabled, or excluded from marker clustering behavior).
See the Advanced map customization page for more things you can do with the map, and the Customize marker pins page for more Proximity facet/marker customizations.
Available options
| Name | Description |
|---|---|
| Data source | The Data source should be a custom field containing a comma-separated latitude, longitude. Or – if you use a separate custom field for the longitude – only a latitude. See below for more info. |
| Longitude | Choose a custom field to use for the longitude value, if stored separately from the latitude (optional). See below for more info. |
| Unit of measurement | Choose Miles or Kilometers. The chosen unit is used in distance calculations and will show up as “mi” or “km” in the Radius dropdown or slider label. Note: this unit label is translatable/customizable with the facetwp_i18n hook. The default text is also translatable with a translation plugin or a WordPress gettext filter (see this example). And if you want to distinguish between singular and plural unit text in the radius dropdown, see below. |
| Radius UI | The UI element to use for the radius selector (“Dropdown”, “Slider”, or “None”) |
| Radius options | A comma-separated list of radius choices. The values need to be integers. Default: “10, 25, 50, 100, 250”. These radius choices can be customized programmatically if needed. This setting is only available if the “Radius UI” setting is set to “Dropdown”. |
| Range (min) | The minimum value for the radius slider. This setting is only available if the “Radius UI” setting is set to “Slider”. |
| Range (max) | The maximum value for the radius slider. This setting is only available if the “Radius UI” setting is set to “Slider”. |
| Default radius | The default radius to be shown in the radius selector. If left empty, the first radius option will be the default if the “Radius UI” setting is set to “Dropdown”, and the middle of the range will be the default if the “Radius UI” setting is set to “Slider”. The default radius can be customized programmatically if needed. |
| Placeholder text | The placeholder text that appears within the input box (default: “Enter location”). Note: this text is translatable/customizable with the facetwp_i18n hook. The default text is also translatable with a translation plugin or a WordPress gettext filter (see this example). |
Choose a Data source
The chosen Data source should be a custom field containing a comma-separated latitude, longitude value.
You can also use separate custom fields for the latitude and longitude. In this case, select the custom field for the latitude in the “Data source” setting, and the custom field for the longitude in the “Longitude” setting.
The latitude and longitude values must be a number value (technically a float value) with a . (dot) as the decimal character. Valid latitude values must be between (and including) -90.0 and 90.0. And valid longitude values must be between (and including) -180.0 and 180.0.
Other data sources
The following plugins and themes offer dedicated custom fields for latitude and longitude that can be used as data source for the Proximity facet. Click the links for specific instructions on using these fields:
Using multiple data sources / locations per post
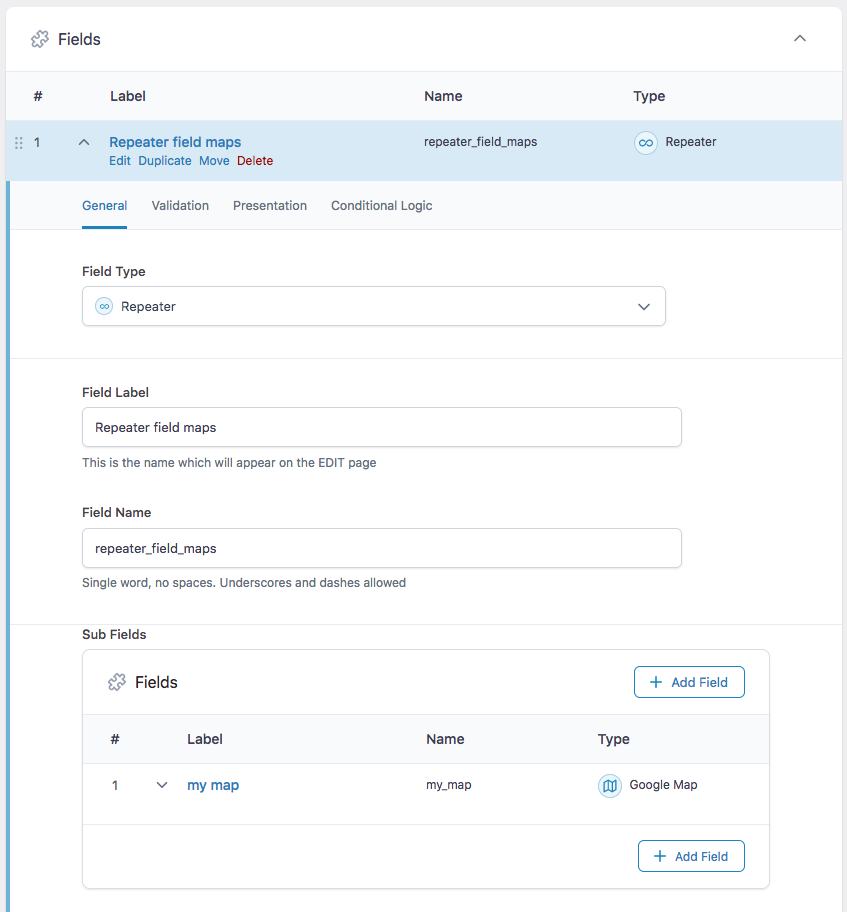
my_map in this example).It is possible to index multiple locations per post, by using a multi-value custom field, like an ACF repeater field, or for example a checkboxes/dropdown field (if you have a select number of locations to choose from).
If you use an ACF Repeater field with a Google Maps sub field, you need to choose the Google Maps sub field’s name from the Map facet’s Data Source dropdown (my_map in the example to the right).
Make sure to choose the field under the “ACF” heading in the Data Source dropdown.
How to get a Google Maps API key
For the Proximity (and Map) facets to work, you need to enter a valid Google Maps API key in the “Google Maps API key” setting in FacetWP’s settings. To get, set and test your API key, follow these steps:
1. Create a Google Maps API key in Google Cloud Console
Set up Google Cloud Console and a project
To get a Google Maps API key, you need a Google Cloud Console account. If you don’t have one, set up a new account.
In your account, create a project for your website, and set up billing.
Set up billing
To be able to use the API key you are going to create, you first need to set up a Billing Account in Google Cloud Console, and add your project to it. You will need a credit card to do so.
Your account will be billed for each request to the three above APIs. However, Google offers free credits, making usage free in practice for sites that are not heavily visited.
Before March 1, 2025, Google offered a free monthly credit of $200. On March 1, 2025, this has changed to a free monthly usage threshold of 10K requests for each product. Check the pricing page and the Pricing Calculator to estimate your costs.
Note that FacetWP optimizes billing costs for using the Places API, by using session tokens.
Enable the required Google APIs
In your project, enable the following three APIs under APIs & Services > Enable APIs and services:
- Maps JavaScript API: required for the Map / Proximity facets to work.
- Geocoding API: required for the Proximity facet’s “Locate me” button.
- Places API: required for the Legacy Proximity facet’s autocomplete function.
Create an API key
Next, add a new API key: in your project, go to API's & Services > Credentials, then click Create credentials > API key.
Copy the key so you can add it to the FacetWP settings later.
Click on the key name to go to the key’s settings page. Give it a descriptive name, and add some restrictions:
Restrict your API key
For security and to avoid being billed unexpectedly, it is strongly recommended to restrict your API key to your website’s domain, and to the above three API’s.
To do so, on the Credentials page, click on the key name to go to the key’s settings page. Set up key restrictions as desired. It is recommended to at least restrict the key to your website URL(s). Note that restricting APIs to the website’s/server’s IP address will not work. IP restrictions only work for Google web service APIs, not the JavaScript web APIs that FacetWP uses.
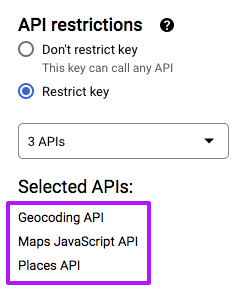
Next, to make sure the key can only use the needed three APIs, scroll to the bottom of the screen to “API restrictions”. Select “Restrict key” and select the above three API services, as shown in the image on the right.
Save your settings. Note that it may take up to 5 minutes for changed settings to take effect.
Control costs by setting quota limits
To avoid being billed unexpectedly, it is strongly recommended to restrict your API key, as described above.
Another way to prevent high costs is to set quota limits on your API usage.
2. Add the Google Maps API key to FacetWP
After generating an API key, add it to: Settings > FacetWP > Settings > Google Maps API key.
Both the Proximity facet and the Map facet need this key.
If the key is incorrect, or if your Google Cloud Console settings prevent your site from using it, your map show the message “This page can’t load Google Maps correctly”, and the Console will display this error: “Google Maps JavaScript API error: ApiProjectMapError”.
To test if you have set up everything correctly in the Google Cloud Console, you can use the “Test Google APIs” feature, located in FacetWP’s settings. This testing feature is available in FacetWP v4.4+.
Add the API key programmatically
Besides in FacetWP’s settings, the API key can also be set with a constant in wp-config.php:
How to use custom PHP code?
PHP code can be added to your (child) theme's functions.php file. Alternatively, you can use the Custom Hooks add-on, or a code snippets plugin. More info
define( 'GMAPS_API_KEY', 'your-api-key' );
Or with the facetwp_gmaps_api_key hook in your (child) theme’s functions.php:
How to use custom PHP code?
PHP code can be added to your (child) theme's functions.php file. Alternatively, you can use the Custom Hooks add-on, or a code snippets plugin. More info
add_filter( 'facetwp_gmaps_api_key', function( $api_key) { return 'your-api-key'; });
Add the Google Maps API key to Advanced Custom Fields
If you are using the Advanced Custom Fields Google Map field as the data source, make sure you pass the same Google Maps API key into ACF. ACF needs the Google Maps API in the backend to geolocate the address entered for each post.
Add the Google Maps API key to Listify, Listable, WP Job Manager
If you are using Listify theme, Listable theme and/or the WP Job Manager plugin, make sure to also add the Google Maps API key to:
(Job) Listings > Settings > Google Maps API Key
The Listify theme itself has second setting to enter the Google Maps API key, at:
Appearance > Customize > Listings > Map settings
3. Test Google API connection
In FacetWP version 4.4+, you can test the correct connection to the above three Google APIs.
To run the test, go to Settings > FacetWP > Settings > Test Google APIs and click the test buttons. If the “Use Legacy Proximity facet” setting is enabled, you’ll see four buttons. The Legacy Proximity facet needs the “Places API (Legacy)” enabled. In the Google Cloud Console this API is simply called “Places API”. So in this situation, only the first three test results need to be green and say “connected”, and the “Places API (New)” is irrelevant.
To prepare for migration to the new Proximity facet, you can also test the Places API (New), which needs to be enabled for that. After migrating to the new Proximity facet, when the “Use Legacy Proximity facet” setting is disabled, only the “Places API (New)” test is visible and needs to be connected correctly. Make sure to disable the legacy “Places API” in the Google Cloud Console after migrating.
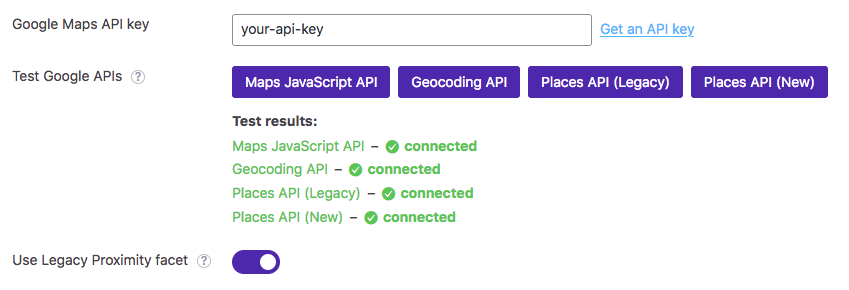
If any of the required three test results is red and says “connection failed”, check all API key settings and restrictions in your Google Cloud project. Make sure the three needed APIs are enabled, and available in your project.
It may take up to 5 minutes for changed Google Cloud Console settings to take effect.
Note that the Geocoding API needs the Maps JavaScript API enabled and correctly connected. If the Geocoding API test keeps failing, reload the page and/or clear your browser cache and try again.
To get more information about a failed connection, you can also check the front-end page that contains the Map/Proximity facet(s). Make sure to clear your browser cache first. Then open the browser console, reload the page and check for errors happening before, during or after using the facet(s). If you see any errors, you can look up the meaning of the error message.
Places/Autocomplete session tokens and billing
When using a Proximity facet, and typing in the input field, an “Autocomplete” request is done to the “Places/Autocomplete” API, which returns the predicted places in the Proximity facet’s dropdown. This request would normally be billed as one “Autocomplete” request. Next, when clicking one of the five predicted Places in the dropdown, a “Places Details” request is done, fetching its location. Normally this request would be billed separately.
FacetWP optimizes these costs by using a single session token for both the “Autocomplete” and the “Places Details” request. When re-using the same session token like this, Google groups both requests into a single session when billed.
As long as the user does not click a Place in the dropdown, the Autocomplete requests will be using the same token, also when searching for new Places. The session is only ended after a Place in the dropdown is clicked (also without new typing in the input field). A new session token is created again when the user starts typing in the field again.
You can read more about session pricing here. Check Google’s pricing page and the Pricing Calculator to estimate your potential costs.
The “Locate me” button
When the user clicks the “Locate me” button, the Proximity facet tries to determine the user’s location and uses that as the center point for the search. The radius setting determines the size of the area around that center point.
Accuracy of the “Locate me” button
When the “Locate me” button is clicked, FacetWP attempts to determine the user’s location. FacetWP first makes a browser Geolocation API request, which returns an approximate latitude/longitude based on the user’s IP address.
Then FacetWP performs a reverse lookup to determine the human-friendly physical address. This is not an exact science, and occasionally the location can be off by several kilometers.
Click the “Locate me” button automatically on the first map load
To click the “Locate me” button automatically when the page loads, add the following code to your (child) theme’s functions.php. The Proximity facet will be set to the approximate location of the user, using the default radius.
Note that this code will cause an immediate location permission pop-up. Some browsers (like IOS Safari) will not store the permission and will ask repeated permission, on every page with a Proximity facet. FacetWP has no influence on these permission pop-ups.
Part 1 of the code prevents the loading of all map markers (and an extra Google API call for this) on the initial map load, by emptying the locations array in line 10, using the facetwp_render_output hook.
Part 2 then automatically clicks the “Locate me” button on the initial map load (in line 32), but only when the Proximity facet does not already have a selection in the URL.
To prevent the now empty map with no markers showing very shortly before it refreshes with the user location, the CSS in Part 3 hides the map by default. In line 36, the visible class is added when the user location has loaded, or if the Proximity facet already had a selection in the URL. The accompanying CSS is added in lines 54-56.
How to use custom PHP code?
PHP code can be added to your (child) theme's functions.php file. Alternatively, you can use the Custom Hooks add-on, or a code snippets plugin. More info
// Part 1 - Prevent an initial map load with all markers. // This code removes all markers on the initial map load, but only when the Proximity facet has no selection. // Change "my_proximity_facet" to the name of your Proximity facet. add_filter( 'facetwp_render_output', function( $output, $params ) { foreach ( $params['facets'] as $key => $facet ) { if ( 'my_proximity_facet' == $facet['facet_name'] ) { if ( empty( $facet['selected_values'] ) ) { if ( FWP()->ajax->is_preload && isset( $output['settings']['map']['locations']) ) { $output['settings']['map']['locations'] = []; } } } } return $output; }, 11, 2 ); // Part 2 - Trigger a "Locate-me" button click on the first map load, but only when the Proximity facet has no selection. // This code adds the 'visible' class the first map load or when the first map load has an active Proximity facet. // Change "my_proximity_facet" to the name of your Proximity facet (2x). add_action( 'facetwp_scripts', function() { ?> <script> window.addEventListener('DOMContentLoaded', function() { if ('undefined' !== typeof FWP.hooks) { FWP.hooks.addAction('facetwp/loaded', function() { // On first page load, only when the Proximity facet has no selection. if ( ! FWP.loaded && ! FWP.facets['my_proximity_facet'].length ) { fUtil('.locate-me').trigger('click'); } // After the first map load or when the Proximity facet has a selection on the first map load. if ( FWP.loaded || FWP.facets['my_proximity_facet'].length > 0 ) { fUtil('.facetwp-type-map').addClass('visible'); } }); } }); </script> <?php }, 1000); // Part 3 - Hide the map on the initial map load, when it loads with no markers. // Then show it after the "Locate me" button click has triggered, or when the Proximity facet has a selection on the first map load. add_action( 'wp_head', function() { ?> <style> .facetwp-type-map { display: none; } .facetwp-type-map.visible { display: block; } </style> <?php }, 100 );
Customize Places autocomplete options
The Places API that the Legacy Proximity facet uses to predict and autocomplete Places while you type (and fetch its location when you click one), has several customizable autocomplete options. The most useful options are listed below.
Localize the autocomplete predictions
There are two Places Autocomplete options involved when localizing the Proximity facet’s autocomplete predictions: language and region. For best results, use them both together.
To set the language in which to show the Proximity facet’s autocomplete predictions, use the language option. If you don’t explicitly set a language, it will default to the browser’s language preference. The language code needs to be a IETF BCP-47 language code.
The region option affects address formatting and ranking of prediction results, and may influence what results are returned. This does not restrict results to the specified region.
This example returns results in German and sets the region to Germany:
How to use custom PHP code?
PHP code can be added to your (child) theme's functions.php file. Alternatively, you can use the Custom Hooks add-on, or a code snippets plugin. More info
add_filter( 'facetwp_proximity_autocomplete_options', function( $options ) { $options['language'] = 'de'; // Show predictions in German $options['region'] = 'de'; // Make formatting and ranking region-based. return $options; });
Note that the region needs to be specified as a ccTLD (“top-level domain”) two-character value. Most ccTLD codes are identical to IETF BCP-47 language codes, with some notable exceptions. For example, the United Kingdom’s ccTLD is “uk” (.co.uk) while its language code is “en-GB”. To demonstrate this, the following example shows prediction results in British English language, and sets the region to the UK:
How to use custom PHP code?
PHP code can be added to your (child) theme's functions.php file. Alternatively, you can use the Custom Hooks add-on, or a code snippets plugin. More info
add_filter( 'facetwp_proximity_autocomplete_options', function( $options ) { $options['language'] = 'en-GB'; // Show predictions in British English. $options['region'] = 'uk'; // Make formatting and ranking region-based. return $options; });
If you specify an invalid region code, the API will return an error in the browser Console when using the Proximity facet.
Limit autocomplete results to a specific country or region
It is possible to limit the autocomplete results to one or more countries/regions with the “componentRestrictions” option. You can specify a single country, or an array of up to five country code strings. The country code needs to be a two-letter ISO 3166-1 Alpha-2 country code and is case insensitive.
This code example forces the autocomplete to show only choices in Germany and The Netherlands (country codes = de and nl):
How to use custom PHP code?
PHP code can be added to your (child) theme's functions.php file. Alternatively, you can use the Custom Hooks add-on, or a code snippets plugin. More info
<?php add_filter( 'facetwp_proximity_autocomplete_options', function( $options ) { $options['componentRestrictions'] = [ 'country' => ['de','nl'], // Limit to Germany and The Netherlands ]; return $options; });
Bias or restrict autocomplete results towards a specific area
With the locationBias option, it is possible to bias the autocomplete prediction results towards a specific area by setting a location with lat/lng coordinates, and defining a “bounding box” surrounding that location.
The following example sets New York City as location and defines a bounding box with sides of approximately 10km away from the specified center.
The prediction results in the facet will now be biased towards, but not restricted to to places within the bounding box.
You can test this example code by entering “Amsterdam” in the Proximity facet’s field. The first prediction result will be a billiards club in New York with that name, and not the capital of the Netherlands, which would otherwise be the first.
How to use custom PHP code?
PHP code can be added to your (child) theme's functions.php file. Alternatively, you can use the Custom Hooks add-on, or a code snippets plugin. More info
add_filter( 'facetwp_proximity_autocomplete_options', function( $options ) { // New York City. Test results with "Amsterdam". It will show a NYC billiards club. $mylocation = [ 'lat' => 40.6974034, 'lng' => -74.1197615 ]; // Create a bounding box with sides ~10km away from the location point $locationBias = [ 'north' => $mylocation['lat'] + 0.1, 'south' => $mylocation['lat'] - 0.1, 'east' => $mylocation['lng'] + 0.1, 'west' => $mylocation['lng'] - 0.1, ]; $options['locationBias'] = $locationBias; // Bias results to the bounding box return $options; } );
To restrict the results to places within the bounding box, use the locationRestriction option instead:
How to use custom PHP code?
PHP code can be added to your (child) theme's functions.php file. Alternatively, you can use the Custom Hooks add-on, or a code snippets plugin. More info
add_filter( 'facetwp_proximity_autocomplete_options', function( $options ) { // New York City. Test results with "Amsterdam". $mylocation = [ 'lat' => 40.6974034, 'lng' => -74.1197615 ]; // Create a bounding box with sides ~10km away from the location point $locationRestriction = [ 'north' => $mylocation['lat'] + 0.1, 'south' => $mylocation['lat'] - 0.1, 'east' => $mylocation['lng'] + 0.1, 'west' => $mylocation['lng'] - 0.1, ]; $options['locationRestriction'] = $locationRestriction; // Restrict results to the bounding box return $options; } );
Note that you should not set locationBias and locationRestriction at the same time. If neither are set, the results will be biased by IP address, meaning the IP address will be mapped to an imprecise location and used as a biasing signal.
Migrate the deprecated “bounds” option
In previous versions of the Places API, you needed to use the bounds option to bias the autocomplete prediction results towards a specific area.
Google has deprecated the bounds option as of May 2023. If you are still using this option, as shown in the snippet below, make sure to migrate it to the new locationBias or locationRestriction option.
How to use custom PHP code?
PHP code can be added to your (child) theme's functions.php file. Alternatively, you can use the Custom Hooks add-on, or a code snippets plugin. More info
<?php // Don't use, 'bounds' is deprecated. // Migrate to 'locationBias' or 'locationRestriction' add_filter( 'facetwp_proximity_autocomplete_options', function( $options ) { // New York City. Test results with "Amsterdam" $mylocation = [ 'lat' => 40.6974034, 'lng' => -74.1197615 ]; // Create a bounding box with sides ~10km away from the location point $myBounds = [ 'north' => $mylocation['lat'] + 0.1, 'south' => $mylocation['lat'] - 0.1, 'east' => $mylocation['lng'] + 0.1, 'west' => $mylocation['lng'] - 0.1, ]; $options['bounds'] = $myBounds; return $options; } );
Limit autocomplete results to specific Place Types
With the types option, it is possible to limit the autocomplete results to certain “Place Types”, like countries, regions, cities, municipalities or postal codes. A list of available Place Types can be found in the Places API documentation.
This code example limits the autocomplete results to (cities) only. See Table 3 in the documentation.
How to use custom PHP code?
PHP code can be added to your (child) theme's functions.php file. Alternatively, you can use the Custom Hooks add-on, or a code snippets plugin. More info
<?php add_filter( 'facetwp_proximity_autocomplete_options', function( $options ) { $options['types'] = ['(cities)']; // The '(cities)' type is listed in Table 3. You can only use 1 item from Table 3. return $options; });
If you want to limit the autocomplete results to multiple items, carefully read the instructions for using items from the three different tables. In the explanation above Table 3 is stated that you can only use one item from Table 3, or multiple from Table 1 or 2. In Table 3 it says (cities) is a “type collection” that matches locality and administrative_area_level_3. Both of these can be found in Table 2. So, for example, if you want to limit the results to (cities) and postal_code, you can do so by using items from Table 2 only:
How to use custom PHP code?
PHP code can be added to your (child) theme's functions.php file. Alternatively, you can use the Custom Hooks add-on, or a code snippets plugin. More info
<?php add_filter( 'facetwp_proximity_autocomplete_options', function( $options ) { $options['types'] = ['locality','administrative_area_level_3','postal_code']; // Multiple types from Table 2: Cities (= 'locality' + 'administrative_area_level_3', and 'postal_code') return $options; });
Note that you can specify a maximum of five types.
Fix issues with the number of autocomplete results
The Google Places API returns a maximum of 5 autocomplete results. Unfortunately, this number cannot be changed.
This may lead to issues where some search terms (like zip codes) do not show up in the dropdown because there are more than 5 results for it. A solution can be to limit autocomplete results to a specific country or region, to bias or restrict them towards a specific area, or to limit them to specific place types, like region. This will narrow the search, leading to a smaller number of autocomplete results.
Change the minimum character length and delay
By default, the Proximity facet starts displaying suggestions in its dropdown as soon as 3 characters are entered in its input field. And it does this with a delay of 250ms.
These values can be customized. The following code sets the minimum characters to 5 and the delay to 125 ms:
How to use custom PHP code?
PHP code can be added to your (child) theme's functions.php file. Alternatively, you can use the Custom Hooks add-on, or a code snippets plugin. More info
<?php add_filter( 'facetwp_assets', function( $assets ) { FWP()->display->json['proximity']['queryDelay'] = 125; // default = 250 milliseconds FWP()->display->json['proximity']['minLength'] = 5; // default = 3 characters return $assets; } );
Display the post distance
If you are using a Proximity facet, you can use the facetwp_get_distance() function to get each post’s distance from the user-specified location. When the facet is in use as a filter (when a location is entered in the facet field), the function will return the numeric distance, or FALSE otherwise.
The distance is calculated in the units specified in the Proximity facet’s “Unit of measurement” setting (miles or kilometers). Be aware that the distance output is a float value, which needs to be rounded before being displayed.
In your loop template code you can use it like this:
How to use custom PHP code?
PHP code can be added to your (child) theme's functions.php file. Alternatively, you can use the Custom Hooks add-on, or a code snippets plugin. More info
// Get the distance as a float value. $distance = facetwp_get_distance(); // Round distance to 2 decimals and append ' mi' or ' km'. if ( false !== $distance ) { echo round( $distance, 2 ) . ' mi'; }
To get the distance of a specific post only, you can pass a post_id:
How to use custom PHP code?
PHP code can be added to your (child) theme's functions.php file. Alternatively, you can use the Custom Hooks add-on, or a code snippets plugin. More info
// Get the distance as a float value. $distance = facetwp_get_distance( $post_id ); // Round distance to 2 decimals and append ' mi' or ' km'. if ( false !== $distance ) { echo round( $distance, 2 ) . ' km'; }
If your posts have multiple locations, the facetwp_get_distance() function will return the distance of the location that is closest to the user-specified location. And if you need to know which one that is, you can let FacetWP store that location’s lat/lng values, and retrieve them.
Display the post distance with the Listing Builder
If you want to display the post distance in a shortcode template made with the Listing Builder, you can create a custom dynamic tag that outputs the distance, with the help of the facetwp_builder_dynamic_tag_value hook.
Add the following to your (child) theme’s functions.php to create a {{ distance }} dynamic tag:
How to use custom PHP code?
PHP code can be added to your (child) theme's functions.php file. Alternatively, you can use the Custom Hooks add-on, or a code snippets plugin. More info
add_filter( 'facetwp_builder_dynamic_tag_value', function( $tag_value, $tag_name, $params ) { if ( 'distance' == $tag_name ) { $distance = facetwp_get_distance(); // Round distance to 2 decimals and append ' mi' or ' km'. if ( false !== $distance ) { $tag_value = round( $distance, 2 ) . ' mi'; } } return $tag_value; }, 10, 3 );
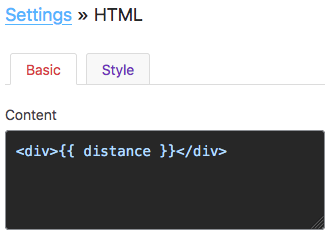
This tag can then be used in Listing Builder elements. You can for example create an HTML element and use the tag in its “Content” field, as shown in the image on the right.
Note that the distance will only be calculated and displayed when the Proximity facet is actually in use as a filter (when location is entered in its field).
Display the post distance with a custom shortcode
If you are using a page builder like Bricks, Beaver Builder or Elementor, or the WordPress block editor, the easiest way to display the post distance with each post is to add a Shortcode module/block to the individual post layout and use a custom shortcode.
First add the following code to your (child) theme’s functions.php to create the custom shortcode:
How to use custom PHP code?
PHP code can be added to your (child) theme's functions.php file. Alternatively, you can use the Custom Hooks add-on, or a code snippets plugin. More info
add_shortcode( 'fwp_distance', function() { $distance = facetwp_get_distance(); // Round distance to 2 decimals and append ' mi' or ' km'. if ( false !== $distance ) { return round( $distance, 2 ) . ' mi'; } return ''; } );

Then paste the [fwp_distance] shortcode into the Shortcode module/block. The image on the right shows an example for the Bricks Shortcode module.
You can also use this custom shortcode in your PHP loop template, using WP’s do_shortcode() function:
How to use custom PHP code?
PHP code can be added to your (child) theme's functions.php file. Alternatively, you can use the Custom Hooks add-on, or a code snippets plugin. More info
do_shortcode( '[fwp_distance]' );
Display the post distance in Bricks with a dynamic data tag
If you are using Bricks, another way to display the post distance is with a dynamic data echo.
First, add the following function to your (child) theme’s functions.php, in the Custom Hooks add-on, or with a code snippets plugin:
How to use custom PHP code?
PHP code can be added to your (child) theme's functions.php file. Alternatively, you can use the Custom Hooks add-on, or a code snippets plugin. More info
function fwp_distance() { $distance = facetwp_get_distance(); // Round distance to 2 decimals and append ' mi' or ' km' if ( false !== $distance ) { return round( $distance, 2 ) . ' mi'; } return ''; }
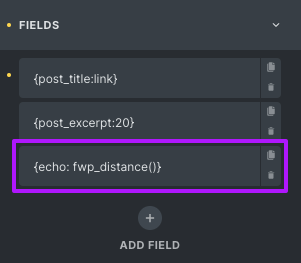
Then you can use the dynamic data tag {echo: fwp_distance()} to echo the distance, in any element that supports dynamic data tags. The image on the right shows how to add it as a field in a Bricks “Posts” element.
Display the post distance in map marker info windows
If you are using a Proximity facet together with a Map facet, it is possible to show the post distance in the info window that appears when a map marker is clicked.
To do so, open your Map facet’s settings, and add the following PHP code to the Marker content text field:
How to use custom PHP code?
PHP code can be added to your (child) theme's functions.php file. Alternatively, you can use the Custom Hooks add-on, or a code snippets plugin. More info
<?php // Get the distance as a float value. $distance = facetwp_get_distance(); // Round distance to 2 decimals and append ' mi' or ' km'. if ( false !== $distance ) { echo round( $distance, 2 ) . ' mi'; } ?>
Note that the post distance will only display when it is available: when the Proximity facet is in use and has a location entered.
Customize the post distance output
If you need to customize the output of the facetwp_get_distance() function, for example doing some calculations, rounding, or prepending/appending a string, you can use the following hook. Be aware that the passed $distance is a float value:
How to use custom PHP code?
PHP code can be added to your (child) theme's functions.php file. Alternatively, you can use the Custom Hooks add-on, or a code snippets plugin. More info
<?php add_filter( 'facetwp_proximity_distance_output', function( $distance ) { $distance = "Distance: " . round( $distance,2 ) + 5.5 . ' km'; return $distance; }, 10, 2 );
Store and get the (closest) post location
Add the following hook to your (child) theme’s functions.php to let FacetWP dynamically store the lat and lng values of each post in the filtered listing:
How to use custom PHP code?
PHP code can be added to your (child) theme's functions.php file. Alternatively, you can use the Custom Hooks add-on, or a code snippets plugin. More info
add_filter( 'facetwp_proximity_store_latlng', '__return_true' );
With this hook in place, and the Proximity facet in use as a filter, you can dynamically get the lat and lng values for a specific post (or for each post in the listing’s loop), as follows:
How to use custom PHP code?
PHP code can be added to your (child) theme's functions.php file. Alternatively, you can use the Custom Hooks add-on, or a code snippets plugin. More info
$latlngposts = FWP()->facet->facet_types['proximity']->post_latlng; if ( ! empty( $latlngposts ) ) { $latlng = $latlngposts[THE_POST_ID]; // Replace "THE_POST_ID" with the post id. If used in the loop, you can use: get_the_ID() $lat = $latlng[0]; $lng = $latlng[1]; // do something with $lat and $lng }
If your posts have multiple locations that are indexed by FacetWP, only one location is dynamically stored: the one that is closest to the user-specified location. This is the same location that is used by the facetwp_get_distance() function to calculate the post’s distance from the user-specified location.
Sort results by distance
When a Proximity facet is in use as a filter (with a location entered), the post IDs are automatically re-sorted in the post__in argument of the query, from nearest to furthest. (See below for how to prevent this).
This makes it possible to sort results by distance if a Proximity facet is in use, by adding the following code to your (child) theme’s functions.php. This order is retained until/unless a Sort facet is also used, which then overrules the sort order. Make sure to replace yoursortfacet in line 10 with the name of your Sort facet:
How to use custom PHP code?
PHP code can be added to your (child) theme's functions.php file. Alternatively, you can use the Custom Hooks add-on, or a code snippets plugin. More info
<?php add_action( 'pre_get_posts', function( $query ) { if ( ! class_exists( 'FacetWP_Helper' ) ) { return; } $facets_in_use = FWP()->facet->facets; $prefix = FWP()->helper->get_setting( 'prefix' ); // replace 'yoursortfacet' with the name of your sort facet $using_sort = isset( FWP()->facet->http_params['get'][ $prefix . 'yoursortfacet' ] ); $is_main_query = false; if ( is_array( FWP()->facet->template ) ) { if ( 'wp' != FWP()->facet->template['name'] || true === $query->get( 'facetwp' ) ) { $is_main_query = true; } } if ( ! empty( $facets_in_use ) && ! $using_sort && $is_main_query ) { foreach ( $facets_in_use as $f ) { if ( 'proximity' == $f['type'] && ! empty( $f['selected_values'] ) ) { $query->set( 'orderby', array( 'post__in' => 'ASC' ) ); // or 'DESC' } } } }, 1000 );
If the above code is not working, check if you are using the Post Types Order plugin. If so, make sure its “Auto Apply Sort” option is disabled.
Sort results by distance with a Sort facet

If you want to allow users to sort by distance as a sorting option in a Sort facet, create a new sort option and set its data source to post__in with ASC or DESC order.
If you make both a ASC and a DESC sort option, make sure each sort option has a unique technical name set.
Be aware that sorting by distance only works when a location has been entered in the Proximity facet.
Prevent ordering by distance of post__in argument
If you want to prevent the Proximity facet from re-ordering the post IDs within the post__in argument of the query, add the following code to your (child) theme’s functions.php:
How to use custom PHP code?
PHP code can be added to your (child) theme's functions.php file. Alternatively, you can use the Custom Hooks add-on, or a code snippets plugin. More info
<?php add_filter( 'facetwp_query_args', function ( $query_args ) { remove_filter( 'facetwp_filtered_post_ids', [ FWP()->helper->facet_types['proximity'], 'sort_by_distance' ] ); return $query_args; } );
Change the radius options programmatically
If you want to change the radius options programmatically, add the following code to your (child) theme’s functions.php. The first value will be the default radius:
How to use custom PHP code?
PHP code can be added to your (child) theme's functions.php file. Alternatively, you can use the Custom Hooks add-on, or a code snippets plugin. More info
add_filter( 'facetwp_proximity_radius_options', function( $radius_options ) { return array( 250, 500, 1000, 2500 ); // The first value is the default value }, 10, 2 );
Change the default radius programmatically
The following example shows how to programmatically customize the “Default radius” setting, only on a specific page.
Make sure to change the page ID on line 2 (or use another conditional tag). And change my_proximity_facet on line 3 to the name of your Proximity facet:
How to use custom PHP code?
PHP code can be added to your (child) theme's functions.php file. Alternatively, you can use the Custom Hooks add-on, or a code snippets plugin. More info
add_filter( 'facetwp_facet_render_args', function( $args ) { if ( is_page( 4956 ) ) { // Change to your page ID or use another condition if ( 'my_proximity_facet' == $args['facet']['name'] ) { // Change 'my_proximity_facet' to the name of your Proximity facet $args['facet']['radius_default'] = 300; // Set the default radius } } return $args; });
Note that if the Proximity facet’s “Radius UI” setting is set to “Slider”, the custom default radius set in line 4 must be within the range of the “Range (min)” and “Range (max)” setting. If it is set higher than Range (max), the Range (max) value will be used.
If the Proximity facet’s “Radius UI” setting is set to “Dropdown”, the custom default radius (as set in line 4) will be appended at the bottom of the list of radius choices if it is not already one of the defined choices in the “Radius options” setting.
Reset a Proximity facet when map filtering is used
If you are using a Map facet together with a Proximity facet, and you want to reset/clear the Proximity facet when the map itself is filtering (when the “Enable map filtering button” is enabled), add the following code to your (child) theme’s functions.php. Make sure to replace my_proximity_facet with the name of your Proximity facet:
How to use custom PHP code?
PHP code can be added to your (child) theme's functions.php file. Alternatively, you can use the Custom Hooks add-on, or a code snippets plugin. More info
add_action('facetwp_scripts', function () { ?> <script> (function($) { document.addEventListener('facetwp-refresh', function() { if ( 'undefined' != typeof FWP_MAP && true === FWP_MAP.is_filtering) { $('.facetwp-location').val(''); // resets the value of the input field $('.facetwp-lat').val(''); // reset hidden field $('.facetwp-lng').val(''); // reset hidden field $('.facetwp-radius option').each(function () { if (this.defaultSelected) { this.selected = true; return false; } // reset default radius if it is a dropdown }); FWP.facets['my_proximity_facet'] = []; // change 'my_proximity_facet' to name of your Proximity facet } }); })(fUtil); </script> <?php }, 100);
Override the Proximity facet value on refresh
If you are using custom JavaScript in which you need to force or override a Proximity facet’s value on refresh, you’ll need to set four separate values: the latitude, longitude, radius, and (URI-encoded) location string:
How to use custom PHP code?
PHP code can be added to your (child) theme's functions.php file. Alternatively, you can use the Custom Hooks add-on, or a code snippets plugin. More info
add_action( 'facetwp_scripts', function() { ?> <script> document.addEventListener('facetwp-refresh', function() { FWP.facets['my_proximity_facet'] = ['42.0883603','-87.98062650000001','150','Arlington%20Heights%2C%20IL%2C%20USA']; // Set lat, lng, radius, location. Replace 'my_proximity_facet' with the name of your Proximity facet }); </script> <?php }, 100 );
Note that the fourth value (the address) needs to be URI-encoded because it contains spaces and commas. To URI-encode readable location strings to usable facet values, you can use encodeURIComponent(), like this:
How to use custom JavaScript code?
JavaScript code can be placed in your (child) theme's main JavaScript file. Alternatively, you can add it manually between
<script>tags in the<head>section of your (child) theme's header.php file. You can also load it with a hook in your (child) theme's functions.php file, or in the Custom Hooks add-on. To load the code only on pages with facets, use thefacetwp_scriptshook. To load it on all pages, usewp_headorwp_footer. Or you can use a code snippets plugin. More info$address = 'Arlington Heights, IL, USA'; $location = encodeURIComponent( $address );
Display the Proximity facet at full width
By default, the Proximity facet displays at 240px width. To display it at 100% width of its container, add the following code to your (child) theme’s functions.php. The CSS also works for Search facets:
How to use custom PHP code?
PHP code can be added to your (child) theme's functions.php file. Alternatively, you can use the Custom Hooks add-on, or a code snippets plugin. More info
add_action( 'wp_head', function() { ?> <style> .facetwp-facet input.facetwp-location, .facetwp-facet input.facetwp-search, .facetwp-input-wrap { width: 100%; } </style> <?php }, 100 );
Use singular and plural radius dropdown label unit text
The radius options label unit text (“mi” or “km”) is translatable/customizable with the facetwp_i18n hook. However, if you have a singular value in your radius dropdown, you may want to change the text depending on if the value is singular or plural. For example: “1 Mile”, and “10 Miles”.
The following code shows how to do this:
How to use custom PHP code?
PHP code can be added to your (child) theme's functions.php file. Alternatively, you can use the Custom Hooks add-on, or a code snippets plugin. More info
// In a Proximity facet’s radius dropdown: // For plural radius values, changes 'mi' text to 'Miles'. // For singular radius values starting with '1 ', changes it to 'Mile'. add_action('facetwp_scripts', function () { ?> <script> (function($) { document.addEventListener('facetwp-loaded', function() { let radiusdropdown = document.querySelector('.facetwp-radius-dropdown'); radiusdropdown.querySelectorAll('option').forEach(option => { if (option.textContent.trim().startsWith('1 ')) { const newOptionText = option.textContent.replace(/mi\b/g, 'Mile'); // Replace 'mi' with 'Mile' if it starts with 1. option.textContent = newOptionText; } else { const newOptionText = option.textContent.replace(/mi\b/g, 'Miles'); // Replace 'mi' with 'Miles' if it starts with a plural number. option.textContent = newOptionText; } }); }); })(fUtil); </script> <?php }, 100);
Set the “Use Legacy Proximity facet” switch programmatically
The switch between the Legacy Proximity facet and the new Proximity facet is determined by the “Use Legacy Proximity facet” setting, located under FacetWP > Settings.This setting is only available in FacetWP v4.4 and newer, and is only visible if you have entered a key in the “Google Maps API key” setting above it.
If you need to set or override this switch programmatically, you can use the facetwp_proximity_places_version hook. Whatever you set with this hook will override the “Use Legacy Proximity facet” setting.
Note that this switch is site-wide: you can’t set it differently for specific pages or Proximity facets.
To use the Legacy Proximity facet (as described on this page), which needs Google’s legacy “Places API” enabled, set the version to places-service, like this:
How to use custom PHP code?
PHP code can be added to your (child) theme's functions.php file. Alternatively, you can use the Custom Hooks add-on, or a code snippets plugin. More info
add_filter( 'facetwp_proximity_places_version', function($version) { $version = 'places-service'; // Use the Legacy Proximity facet, which uses Google's legacy "Places API". return $version; } );
To use the new Proximity facet, which needs Google’s “Places API (New)” enabled, set the version to place-class, like this:
How to use custom PHP code?
PHP code can be added to your (child) theme's functions.php file. Alternatively, you can use the Custom Hooks add-on, or a code snippets plugin. More info
add_filter( 'facetwp_proximity_places_version', function($version) { $version = 'place-class'; // Use the new Proximity facet, which uses Google's "Places API (New)". return $version; } );
Note that the version naming is derived from the classes that Google uses for the legacy and new Places APIs.google_warnings]