User Post Type
Create filterable user listings
This plugin lets you connect WP users to a post type, so that you can create user listings, and filter users with facets like any other post type.
How it works
FacetWP can only index and filter posts (of any (custom) post type). However, WP users are not a post type, so users cannot be filtered directly.
To make users filterable by FacetWP, this add-on creates a new (hidden) upt_user custom post type, and creates a post for each WP user by syncing WP users to upt_user posts.
The add-on’s settings also let you sync user field data to the new upt_user posts. This data can then be used to:
- Display (custom) user field data in a user listing
- Use a (custom) user field as a facet data source to filter a user listing
- Use a (custom) user field in a meta_query in a user listing query.
The synced user data consists of the default user data that is available for each WP user, but also custom (user) fields that you added yourself. The add-on supports custom fields made with WP hooks, with Advanced Custom Fields and with BuddyPress. See the section below to learn how to create custom user fields.
The upt_user custom post type is not directly visible in the WP admin menu, but you can still access the menu item directly to see and check all synced users and their custom fields. Or you can force the admin menu item to appear.
Getting started
Download
Download the add-on from your account and install it as a plugin.
Setup
Here is a short video on how to set up the add-on:
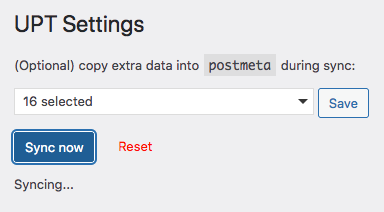
After installing and activating the add-on, browse to Settings > User Post Type and click the “Sync now” button.
As seen in the image on the right, you can also sync extra custom user fields (other than the default user fields) to the upt_user posts.
Syncing is not required to display that custom field data or to use those custom fields as a facet’s data source. Syncing extra custom user fields is only useful/needed if you use these fields in a meta_query in a custom WP_Query, as demonstrated in the example below.
If needed (to clear up any issues, or to make sure there is no stray unsynced data), you can click the “Reset” button, which wipes out all UPT User posts and all synced post data. Clicking “Sync now” will then recreate all posts and sync all selected user fields.
Here’s a list of dropdown choices and corresponding meta_query keys:
| Option | Meta Key |
|---|---|
| User ID | ID |
| User Login | user_login |
| User Email | user_email |
| User URL | user_url |
| Registration Date | user_registered |
| User Status | user_status |
| Display Name | display_name |
| Roles | roles |
| Usermeta field | meta-[fieldname]Fields made with with WP hooks or with Advanced Custom Fields are prefixed with meta- when synced. This means that the field name to use in a custom meta query is meta-[fieldname], e.g. meta-my_user_field. See the example below. |
| BuddyPress field | bp-[fieldID]Fields made with BuddyPress are stored by their BuddyPress field ID and are prefixed with bp- when synced. This means that the field name to use in a custom meta query is bp-[fieldID]. To find the field ID in BuddyPress, edit the field in Users -> Profile Fields, and check the URL for the field_id parameter, e.g. &field_id=2. In this example, this field will be synced/stored as bp-2. |
How to see and check synced users and custom user fields
The hidden upt_user custom post type that this add-on generates is not directly visible in the WP admin menu. If you prefer to always see it, you can force the UPT Users admin menu item to appear. Or you can access the upt_user post list screen directly, by using this URL:
https://yourdomain.com/wp-admin/edit.php?post_type=upt_user
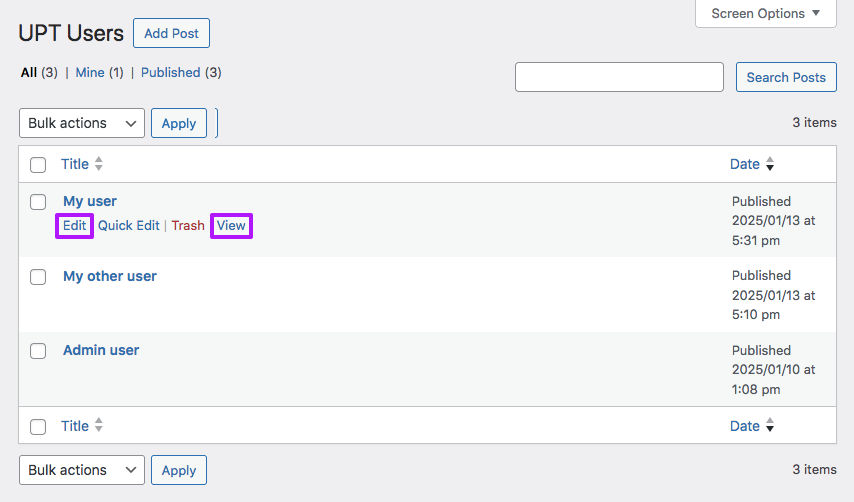
/user-x/ URL in the browser’s status bar at the bottom.In the UPT Users post list screen, you can see all synced users as individual posts. These upt_user posts have a post URL ending in /user-x/, where x corresponds with the WP user ID. If needed, you can use this ID to check for discrepancies after syncing. This post URL can be seen in the browser’s status bar at the bottom, by hovering over the “View” link under the post item, as shown in the image on the right.
If you click the “Edit” link of a upt_user post/user, you can also see all synced custom fields and their values.
If the Custom Fields metabox does not show up in the individual post edit screens, you probably have Advanced Custom Fields installed, which by default hides this metabox. To enable the metabox, add the following ACF hook to your (child) theme’s functions.php:
How to use custom PHP code?
PHP code can be added to your (child) theme's functions.php file. Alternatively, you can use the Custom Hooks add-on, or a code snippets plugin. More info
add_filter( 'acf/settings/remove_wp_meta_box', function( $remove ) { if ( ! is_admin() || ! function_exists( 'get_current_screen' ) ) { return $remove; } $screen = get_current_screen(); if ( $screen->base === 'post' && $screen->post_type === 'upt_user' ) { return false; // Re-enable the Custom Fields metabox } return $remove; }, 20 );
How to create and use custom user fields
Custom user fields can be created in several ways. The User Post Type add-on supports syncing any usermeta field created with WP hooks, with Advanced Custom Fields and with BuddyPress.
To create and use custom user fields, follow these steps:
1. Create a custom user field
Where to create custom user fields
If you want to add custom fields to users, it is important to add these fields to the WP user profile itself, and not to the (hidden) upt_user post type that the add-on creates and syncs to.
If you would attach a custom field to the upt_user post type, the data would be wiped out on each reset and sync that is performed in UPT User settings, or when saving the WP user profile (which also performs an automatic sync).
So, as a general rule: don’t add fields to, or edit data directly in upt_user posts. Always, add/edit the data to/in the WP user profile, and let the sync take care of the rest.
How to create custom user fields with Advanced Custom Fields
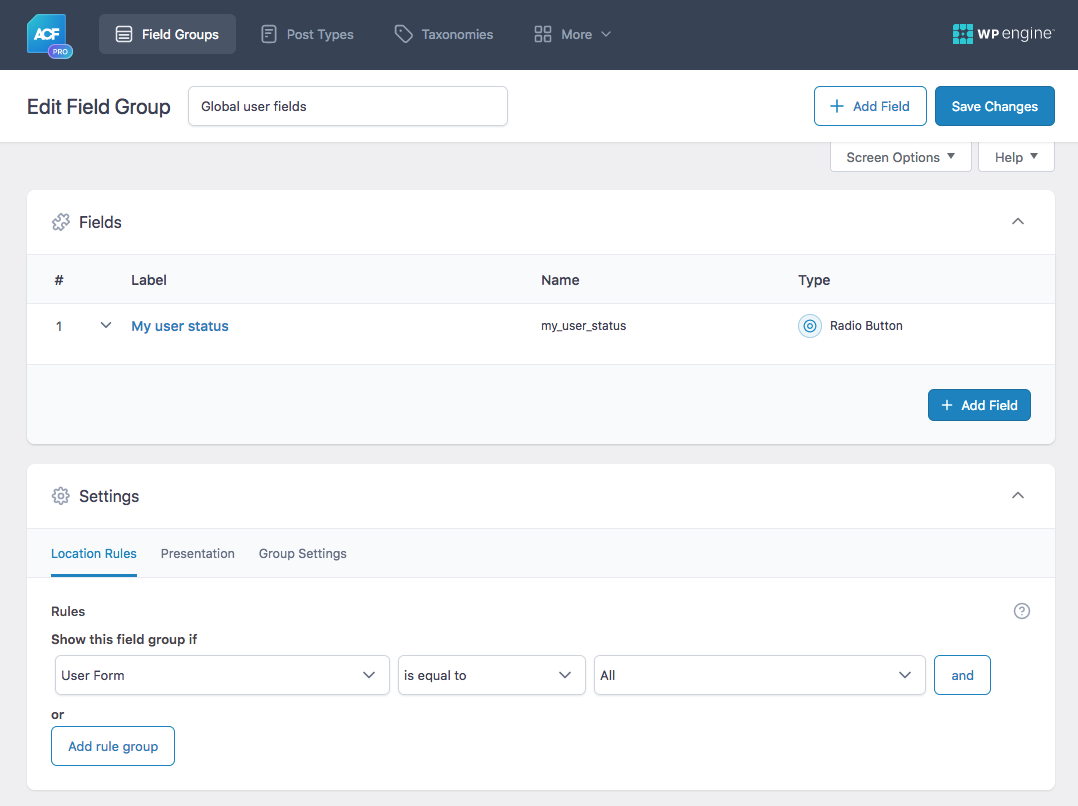
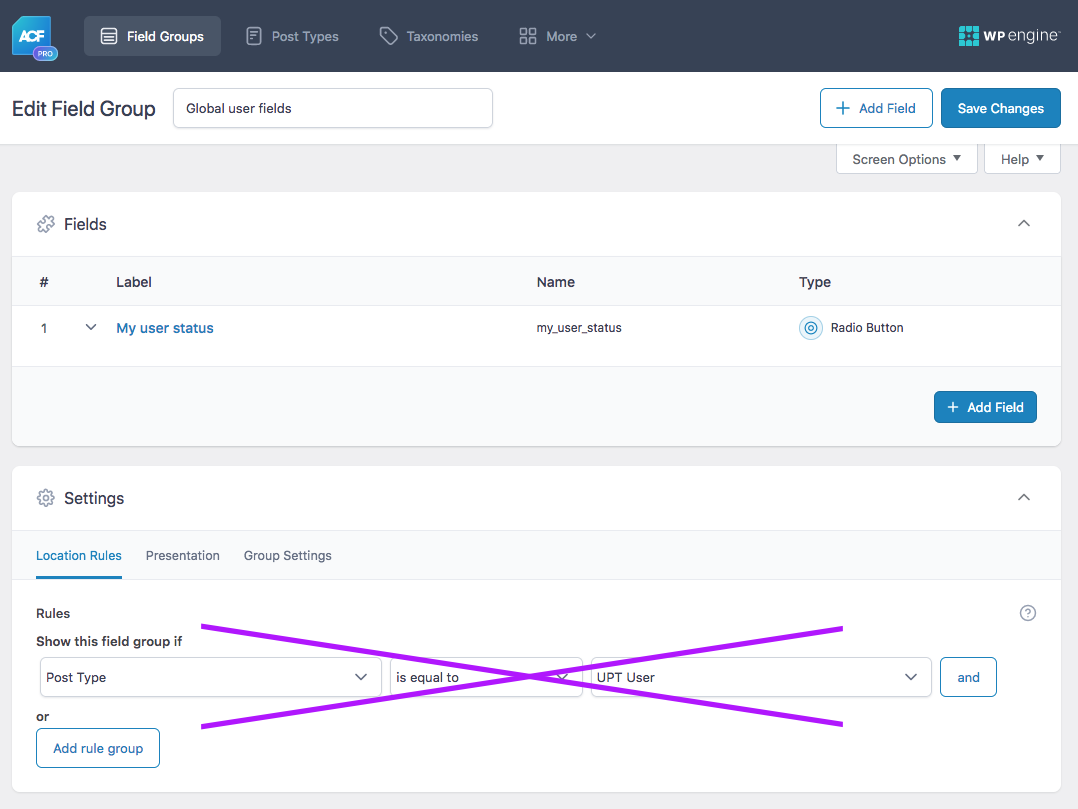
To create a custom WP user field with Advanced Custom Fields, first create a field group for your user field(s) and set its “Location Rules” to “User Form -> is equal to -> All”, as shown in the image below. This will make sure the field is attached to the WP users and will show up in the WP user profile pages.
Next, create your custom field in this field group, e.g. my_user_status:
It’s important to attach the field group to WP user profile, as shown above, and not to the upt_user post type like in the image below. If you’d connect the field to the upt_user post type, its data would be wiped out on each reset and sync that is performed in the UPT User settings, or when saving the WP user profile (which also performs an automatic sync).
upt_user post type.How to create custom user fields with BuddyPress
BuddyPress lets you add custom user field groups and user fields under Users -> Profile Fields:
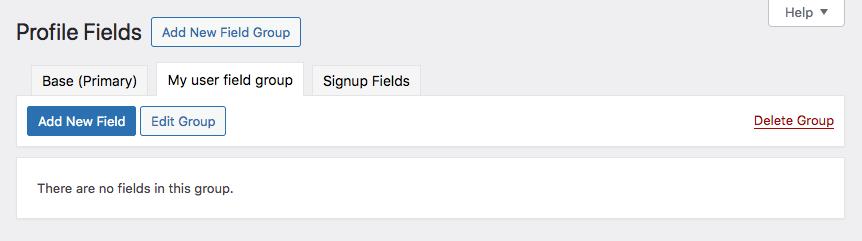
These fields will then show up in an “Extended Profile” tab on each WP user profile page.
How to create custom user fields with WP hooks
We recommend using Advanced Custom Fields to create custom user fields. But you can also do it without plugins, with WP hooks.
The following example creates a “Phone Number” field (with the field name phone_number) in each WP user profile page, under a “Extra Profile Information” heading:
How to use custom PHP code?
PHP code can be added to your (child) theme's functions.php file. Alternatively, you can use the Custom Hooks add-on, or a code snippets plugin. More info
/** * Show custom user profile fields * * @param WP_User $user The WP_User object. */ function my_show_extra_profile_fields( $user ) { ?> <h3><?php esc_html_e( 'Extra Profile Information', 'your-text-domain' ); ?></h3> <table class="form-table"> <tr> <th><label for="phone_number"><?php esc_html_e( 'Phone Number', 'your-text-domain' ); ?></label></th> <td> <input type="text" name="phone_number" id="phone_number" value="<?php echo esc_attr( get_user_meta( $user->ID, 'phone_number', true ) ); ?>" class="regular-text" /><br /> <span class="description"><?php esc_html_e( 'Please enter your phone number.', 'your-text-domain' ); ?></span> </td> </tr> </table> <?php } add_action( 'show_user_profile', 'my_show_extra_profile_fields' ); add_action( 'edit_user_profile', 'my_show_extra_profile_fields' ); /** * Save custom user profile fields * * @param int $user_id The ID of the user being updated. */ function my_save_extra_profile_fields( $user_id ) { if ( ! current_user_can( 'edit_user', $user_id ) ) { return false; } if ( isset( $_POST['phone_number'] ) ) { update_user_meta( $user_id, 'phone_number', sanitize_text_field( $_POST['phone_number'] ) ); } } add_action( 'personal_options_update', 'my_save_extra_profile_fields' ); add_action( 'edit_user_profile_update', 'my_save_extra_profile_fields' );
2. Populate the custom field and save WP users
After creating a custom user field, and before syncing it, make sure all WP user profiles are saved, so the field exists for all users. Where possible, also add a value for that field. User Post Type does not know of, and cannot sync fields that do not exist for a WP user.
3. Sync the custom field(s)
Depending on how you want to use the field data, the new custom field needs to be synced to the upt_user posts’ metadata.
To sync or not to sync?
There are three possible applications for (custom) user field data. Syncing the field is only required for the third application: using the field in a meta_query.
- To display (custom) user field data in a user listing, you can either use the WP user field, or the synced
upt_userpost field. Both will work, but using the WP user field is highly recommended to prevent issues with the field data not being available after a reset or faulty sync. This also means that as long as you use the WP (custom) user field, syncing that field is not needed. - To use a custom user field as a facet data source to filter a user listing, you can either use the WP user field, or the synced
upt_userpost field. Both will work, but using the WP user field is highly recommended to prevent issues with the field data not being available after a reset or faulty sync. This also means that as long as you use the WP (custom) user field, syncing that field is not needed. - To use a custom user field in a meta_query argument in a upt_user user listing query, you must use the synced
upt_userpost field (with its prefix). This also means that syncing that field is required for themeta_queryto work. For fields made with WP hooks or Advanced Custom Fields, the synced field name is prefixed withmeta-. For BuddyPress fields, the fields are synced by the field ID and prefixed withbp-.
How to sync
To sync a custom user field, go to Settings -> User Post Type. Optionally, you can first click “Reset”, which deletes all upt_user posts and wipes their data, which will be recreated on sync.
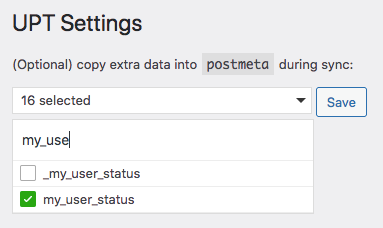
Find your new custom user field name in the dropdown. For each field name, you’ll also see one prefixed with an underscore (e.g. _my_user_status), which you can ignore. Select the one without the underscore, click Save, then click the blue “Sync now” button. Note that BuddyPress fields will show up as [fieldgroup] fieldname at the bottom of the dropdown.
When the sync has completed successfully, you’ll see “Sync complete”. If needed, you can check the resulting UPT User posts and their custom field values in their post edit screens as explained above.
Query all users
To display a list of all users, use WP_Query (not WP_User_Query ) like so:
How to use custom PHP code?
PHP code can be added to your (child) theme's functions.php file. Alternatively, you can use the Custom Hooks add-on, or a code snippets plugin. More info
$args = [ 'post_type' => 'upt_user', 'post_status' => 'publish', 'posts_per_page' => 10, ]; $query = new WP_Query( $args );
You can also use a Listing Builder listing, or for more elaborate queries, a Listing Builder listing in Dev mode, as shown below.
Query a subset of users
To query a subset of users, you need to create a custom WP_Query that uses meta_query to filter by existing user fields or by custom user fields.
Query users by existing user fields with a meta query
To display only administrators, select “Roles” in the settings page dropdown, then click the blue “Sync now” button.
Then you can use the roles field within meta_query:
How to use custom PHP code?
PHP code can be added to your (child) theme's functions.php file. Alternatively, you can use the Custom Hooks add-on, or a code snippets plugin. More info
$args = [ 'post_type' => 'upt_user', 'post_status' => 'publish', 'orderby' => [ 'title' => 'ASC' ], 'posts_per_page' => 30, 'meta_query' => [ [ 'key' => 'roles', 'value' => 'administrator', 'compare' => '=', ] ] ]; $query = new WP_Query( $args );
To do the same with multiple roles, in this example administrators and editors:
How to use custom PHP code?
PHP code can be added to your (child) theme's functions.php file. Alternatively, you can use the Custom Hooks add-on, or a code snippets plugin. More info
$args = [ 'post_type' => 'upt_user', 'post_status' => 'publish', 'orderby' => [ 'title' => 'ASC' ], 'posts_per_page' => 30, 'meta_query' => [ [ 'key' => 'roles', 'value' => [ 'administrator', 'editor' ], 'compare' => 'IN', ] ] ]; $query = new WP_Query( $args );
Query users by one or more custom user fields with a meta query
To use a custom user field in a meta_query argument in a upt_user listing query, you must use the synced upt_user post field, and not the WP user field. This also means that syncing that field is required for the meta_query to work.
The field name to use in the meta_query must include the prefix with which the field is synced/stored in upt_user postmeta. For fields made with WP hooks or Advanced Custom Fields, the synced field name is prefixed with meta-, e.g. meta-my_user_field. For BuddyPress fields, the fields are synced by the field ID and prefixed with bp-. To find the field ID in BuddyPress, edit the field in Users -> Profile Fields, and check the URL for the field_id parameter, e.g. &field_id=2. In this example, this field will be synced/stored as bp-2.
As an example, say you want to give users a custom “user status” field, and you want to display a user listing that excludes users with a specific status. To demonstrate using multiple meta queries, let’s also exclude users with the role “practitioner”.
To accomplish this, let’s first create the custom status field and attach it to WP’s user profile page.
Using Advanced Custom Fields, create a field group for your user field(s) and set its “Location Rules” to “User Form -> is equal to -> All”, as shown in the image below.
Next, create a new custom field in this field group, e.g. my_user_status. You can add more fields later.
Next, make sure all WP user profile pages are saved after adding the new field. If the field does not exist for the user, it cannot be synced, and it will not be available in the corresponding upt_user post’s postmeta. Querying by a non-existent field will result in no posts showing up in the listing.
To sync the new user field, go to Settings > User Post Type. Optionally, you can click “Reset”, which deletes all upt_user posts and wipes their data, which will be recreated on sync.
Find the field name my_user_status (and any other field you created). For each field name, you’ll also see one prefixed with an underscore (e.g. _my_user_status), which you can ignore. Select the one without the underscore, click Save, then click the blue “Sync now” button.
When the sync has completed successfully, you’ll see “Sync complete”. The new custom field values are now available in the upt_user posts’ postmeta. They are ready to be used in a meta_query argument when querying the upt_user post type, as demonstrated below.
If needed, you can check the resulting UPT User posts and their custom field values in their post edit screens as explained above.
Now let’s create a user listing with a query that uses the new my_user_status field. In the following example, we’ll use the Listing Builder in Dev mode, but you can do this in any other listing template type.
Create a new Listing Builder listing and set the “Display” tab to display whatever user data you want. For testing, just use “Display Name” or “Post Title” (which both output the user name).
In the “Query” tab, enable “Dev mode” in the top right, and paste the following query arguments:
How to use custom PHP code?
PHP code can be added to your (child) theme's functions.php file. Alternatively, you can use the Custom Hooks add-on, or a code snippets plugin. More info
<?php return [ 'post_type' => ['upt_user'], 'post_status' => ['publish'], 'meta_query' => [ 'relation' => 'AND', // The relation if you use multiple meta queries. Possible values: 'AND' or 'OR'. [ 'key' => 'roles', // Roles is an existing WP field 'compare' => 'NOT IN', // Field EXISTS and value is NOT IN ... 'value' => ['practitioner'], // array of values 'type' => 'CHAR', ], [ 'key' => 'meta-my_user_status', // IMPORTANT: Use meta-[fieldname] and make sure the field is synced in UPT settings 'compare' => 'NOT IN', // Field EXISTS and value is NOT IN ... 'value' => ['expired'], // array of values 'type' => 'CHAR', ] ], 'orderby' => 'meta_value', // Order by the meta key specified in 'meta_key' 'meta_key' => 'display_name', // The meta key to sort by 'order' => 'ASC', // Order A-Z 'posts_per_page' => 20 // Show 20 posts per page ];
In the above example we retrieve upt_user posts that do NOT have the practioner role AND for which the my_user_status field the value is NOT expired. We order the listing by the user display_name, in ascending order (A-Z), and retrieve 20 posts per page.
Important to notice is that in line 14 we use meta-my_user_status as key, and not my_user_status. This is because when syncing WP user fields (made with Advanced Custom Fields or with WP hooks) to the upt_user post type, all field names are prefixed with meta-. For BuddyPress fields, the fields are synced/stored by the BuddyPress field ID and prefixed with bp-. See above for how to find the field IDs.
If the meta_query does not work, the most probable reasons are:
- You did not sync the field.
- You synced the wrong field (e.g. the one prefixed with an underscore).
- The newly created field name already exists in WP.
- The WP users are not saved after creating the new field.
- The field is not populated for any WP user, which results in nothing being synced.
- You used the un-prefixed field name in the
meta_queryargument. The name needs to be prefixed withmeta-, as shown in line 14 above. (BuddyPress fields are stored by their BuddyPress field ID and prefixed withbp-).
Display (custom) user fields in a user listing
To display (custom) user fields/data in a user listing, best practice is to look up the actual WP user metadata/fields and display that, instead of the synced upt_user posts’ metadata/fields.
You could get and output the synced field connected to the upt_user post (which has its name prefixed with meta-). This will work, but it’s recommended to always use the WP user field to prevent issues with the field not being present after a reset or a problematic sync.
This also means that as long as you use the custom WP user field itself, syncing the field is not needed to display custom user field data in a user listing.
To retrieve and display WP users’ metadata you can use WP’s get_user_meta() function. Just replace $user_id with UPT()->get_user_id():
How to use custom PHP code?
PHP code can be added to your (child) theme's functions.php file. Alternatively, you can use the Custom Hooks add-on, or a code snippets plugin. More info
echo get_user_meta( UPT()->get_user_id(), 'your_field_name', true );
Outside of The Loop, pass in the post ID like so:
How to use custom PHP code?
PHP code can be added to your (child) theme's functions.php file. Alternatively, you can use the Custom Hooks add-on, or a code snippets plugin. More info
echo get_user_meta( UPT()->get_user_id( THE_POST_ID ), 'your_field_name', true );
Display the user avatar
To get a user’s photo, you can use WP’s get_avatar() function, assuming that the image is stored in WP’s default “Profile Picture” field:
How to use custom PHP code?
PHP code can be added to your (child) theme's functions.php file. Alternatively, you can use the Custom Hooks add-on, or a code snippets plugin. More info
echo get_avatar( UPT()->get_user_id(), 150 ); // 150 is the height and width of the avatar in pixels.
Add facets that filter by a (custom) user field
You can use any facet type to filter users by a (custom) user field. After creating a new facet, in the facet’s Data Source setting, you can either choose the custom WP user field itself, or the synced field connected to the upt_user post (which has its name prefixed with meta-). Both will work, but it’s recommended to always use the WP user field, to prevent issues with the field not being present after a reset or a problematic sync.
This also means that as long as you use the custom WP user field itself as data source, syncing the field is not needed to use a custom user field in a facet.
When the User Post Type add-on is installed, you’ll see a “User Fields” section in the Data source dropdown under which all default WP user fields are listed. Custom fields are listed at the bottom, twice. Make sure to choose the field that does not have its name prefixed with an _ underscore. If the custom user field was made with Advanced Custom Fields, it will also appear under the “ACF” heading in the Data Source dropdown, prefixed with its field group between square brackets.
Customize which users are synced
With the upt_sync_where and upt_sync_skip_user hooks, you can customize which users are being synced, as shown in the examples below.
Sync only specific users
To sync only users with a specific user ID, you can use the upt_sync_where hook. The following example syncs only users with ID’s 9, 10 and 11:
How to use custom PHP code?
PHP code can be added to your (child) theme's functions.php file. Alternatively, you can use the Custom Hooks add-on, or a code snippets plugin. More info
add_filter( 'upt_sync_where', function( $where ) { $where .= ' AND u.ID IN (9, 10, 11)'; // sync only user IDs 9, 10 and 11. return $where; });
Prevent a specific user from being synced
To prevent a specific user from being synced, use the following code and set the user’s ID in line 2:
How to use custom PHP code?
PHP code can be added to your (child) theme's functions.php file. Alternatively, you can use the Custom Hooks add-on, or a code snippets plugin. More info
add_filter( 'upt_sync_skip_user', function( $bool, $user_id ) { if ( 1 === $user_id ) { // Skip user with ID 1 return true; } return $bool; }, 10, 2 );
Prevent users with specific roles from being synced
To prevent users with a specific role from being synced, you can use the following snippet. Change the roles to be skipped in the array in line 3.
How to use custom PHP code?
PHP code can be added to your (child) theme's functions.php file. Alternatively, you can use the Custom Hooks add-on, or a code snippets plugin. More info
add_filter( 'upt_sync_skip_user', function( $bool, $user_id ) { $roles = (array) get_user_by( 'ID', $user_id )->roles; $roles_to_skip = [ 'dormant-student', 'dormant-teacher' ]; // Skip these roles foreach ( $roles_to_skip as $role ) { if ( in_array( $role, $roles ) ) { return true; // Skip this user } } return $bool; }, 10, 2 );
This also works for custom user roles made with a plugin, like for example User Role Editor.
You can also do the opposite:
Only sync users with a specific role
To sync only users with a specific role, you can use the following snippet. Change the roles to be synced in the array in line 3.
How to use custom PHP code?
PHP code can be added to your (child) theme's functions.php file. Alternatively, you can use the Custom Hooks add-on, or a code snippets plugin. More info
add_filter( 'upt_sync_skip_user', function( $bool, $user_id ) { $roles = (array) get_user_by( 'ID', $user_id )->roles; $roles_to_preserve = [ 'student','teacher' ]; // Sync only these roles $intersect = array_intersect( $roles, $roles_to_preserve ); if ( empty( $intersect ) ) { return true; // Skip users not in $roles_to_preserve } return $bool; }, 10, 2 );
Programmatically sync users
To programmatically sync a single user, use the following in your code or hook. Pass in the WP user ID in $user_id:
How to use custom PHP code?
PHP code can be added to your (child) theme's functions.php file. Alternatively, you can use the Custom Hooks add-on, or a code snippets plugin. More info
UPT()->sync->run_sync( $user_id );
To programmatically sync all users, use the following:
How to use custom PHP code?
PHP code can be added to your (child) theme's functions.php file. Alternatively, you can use the Custom Hooks add-on, or a code snippets plugin. More info
UPT()->sync->run_sync();
Note that users are already synced automatically when their profile is updated from the standard WP admin user profile edit page. Updating the user profile triggers WordPress’ profile_update action hook that the User Post Type add-on uses to trigger the sync.
Programmatically syncing users is only needed if you are using custom code or a plugin that updates user fields without running the profile_update action hook. You could check the plugin for a hook that fires after the user update is completed, and use that hook to trigger the sync.
Another way is to use the updated_user_meta hook (see: updated_{$meta_type}_meta) that fires after updating usermeta data.
The following example performs a user sync when the basic_user_avatar field is updated (when using the Basic User Avatars plugin). Note that for this to work, the field (basic_user_avatar in this case) first needs to be synced in the UPT Users settings.
How to use custom PHP code?
PHP code can be added to your (child) theme's functions.php file. Alternatively, you can use the Custom Hooks add-on, or a code snippets plugin. More info
add_action( 'updated_user_meta', function( $meta_id, $user_id, $meta_key, $meta_value ) { if ( 'basic_user_avatar' === $meta_key ) { UPT()->sync->run_sync( $user_id ); } }, 100, 4 );
Programmatically sync users on a schedule
The following example creates a cron job that performs an automatic user sync every 8 hours:
How to use custom PHP code?
PHP code can be added to your (child) theme's functions.php file. Alternatively, you can use the Custom Hooks add-on, or a code snippets plugin. More info
add_action( 'mysite_sync_users', 'mysite_sync_users_callback' ); function mysite_sync_users_callback() { UPT()->sync->run_sync(); } if ( ! wp_next_scheduled( 'mysite_sync_users' ) ) { wp_schedule_single_event( time() + 28800, 'mysite_sync_users' ); // 28800 seconds = every 8 hours }
Perform post-sync actions
To do something when the user sync has completed, you can use the upt_sync_post hook, which runs for each WP user being synced.
The $user_id is the ID of the WP user being synced, and the $post_id is the ID of the corresponding upt_post post it is being synced to.
How to use custom PHP code?
PHP code can be added to your (child) theme's functions.php file. Alternatively, you can use the Custom Hooks add-on, or a code snippets plugin. More info
add_action( 'upt_sync_post', function( $post_id, $user_id ) { // $post_id is the synced upt_user post ID // $user_id is the WP user ID if ( $post_id == 2345 ) { // do something after upt_user post with ID 2345 is synced } if ( $user_id == 3 ) { // do something after WP user with ID 3 is synced } }, 10, 2 );
Find a user’s associated upt_user post
Use the following if you have a WP user’s $user_id and want to find the $post_id of the associated upt_user post:
How to use custom PHP code?
PHP code can be added to your (child) theme's functions.php file. Alternatively, you can use the Custom Hooks add-on, or a code snippets plugin. More info
$post_id = (int) get_user_meta( $user_id, UPT()->meta_key, true );
Customize register_post_type arguments for the upt_user post type
You can use the upt_post_type_args hook to customize any arguments of the register_post_type function, when the upt_user post type is registered.
Two examples:
Force the admin menu item to appear
To force the “UPT Users” admin menu item to appear:
How to use custom PHP code?
PHP code can be added to your (child) theme's functions.php file. Alternatively, you can use the Custom Hooks add-on, or a code snippets plugin. More info
add_filter( 'upt_post_type_args', function( $args ) { $args['show_in_menu'] = true; return $args; });
If the Custom Fields metabox does not show up in the individual post edit screens, you probably have Advanced Custom Fields installed, which by default hides this metabox. To enable the metabox, add the following ACF hook to your (child) theme’s functions.php:
How to use custom PHP code?
PHP code can be added to your (child) theme's functions.php file. Alternatively, you can use the Custom Hooks add-on, or a code snippets plugin. More info
add_filter( 'acf/settings/remove_wp_meta_box', function( $remove ) { if ( ! is_admin() || ! function_exists( 'get_current_screen' ) ) { return $remove; } $screen = get_current_screen(); if ( $screen->base === 'post' && $screen->post_type === 'upt_user' ) { return false; // Re-enable the Custom Fields metabox } return $remove; }, 20 );
Prevent single upt_user posts from being visible
Set the publicly_queryable argument to false to prevent the single posts from the upt_user post type from being accessed on the front-end (via for example https://yourdomain.com/upt_user/user-1/):
How to use custom PHP code?
PHP code can be added to your (child) theme's functions.php file. Alternatively, you can use the Custom Hooks add-on, or a code snippets plugin. More info
add_filter( 'upt_post_type_args', function( $args ) { $args['publicly_queryable'] = false; return $args; });
Customize user field choices
The upt_user_choices hook can be used to add or remove items from the list of usermeta fields that appear in the UPT User dropdown to sync, and in all facets’ Data Source dropdown (under the “User Fields” heading).
Adding fields this way would only be useful if these fields are not stored like normal usermeta, e.g. in plugins or custom code that stores them another way. You can see a usage example of this hook in user-post-type/includes/class-buddypress.php.
Note that $choices is an associative array of key-value pairs, in which all non-default (non-WP) user fields are stored as 'meta-fieldname' => 'fieldname', where each fieldname in the key is prefixed with meta-:
How to use custom PHP code?
PHP code can be added to your (child) theme's functions.php file. Alternatively, you can use the Custom Hooks add-on, or a code snippets plugin. More info
add_filter( 'upt_user_choices', function( $choices ) { // Add or remove user fields from the UPT User dropdown and facet data source dropdowns (under the User Fields section heading). // E.g. $key ='my_custom_user_field'; $choices['meta-$key'] = $key; return $choices; } );
Customize access to the settings
If you need to give certain user roles access to the User Post Type add-on settings, you can use the upt_admin_settings_capability hook.
To change access to the main FacetWP plugin settings and other add-ons, you can use the facetwp_admin_settings_capability hook.
Using User Post Type with Relevanssi or SearchWP
Say you have a listing that retrieves users and want to use a Search facet with a SearchWP or Relevanssi search engine. To make this work, you’ll have to make sure that:
- SearchWP/Relevanssi is indexing the
upt_userpost type. - all user fields you want the user listing searched by are synced to
upt_userpost meta fields in the add-on’s settings. - these synced
upt_userpost meta fields are indexed by SearchWP/Relevanssi.
Changelog
0.8.1
- Dec 16, 2024
- New added `upt_admin_settings_capability` hookxx
0.8
- Aug 19, 2024
- Fixed adjust sync priority to improve 3rd party compatibility
0.7.8
- Feb 26, 2024
- Fixed PHP 8.2 deprecation notices
- Fixed potential name conflict when re-indexing
0.7.7
- Feb 23, 2022
- Fixed issue preventing value of "0" from getting indexed
0.7.6
- Nov 2, 2021
- Important Go into `Settings > User Post Type` and hit the "Sync" button
- Fixed issue causing a new meta row to get added on each user save
0.7.5
- Sep 10, 2021
- Fixed sync issues (prevents needing to manually re-sync in many cases)
0.7.4
- Jun 8, 2021
- New added `upt_sync_where` hook to customize the SQL WHERE clause
0.7.3
- Oct 29, 2020
- New added multisite support (only sync users of the current site)
See also
User Post Type
Create filterable user listings
Download this add-on from your account page:
Download Add-OnDec 16, 2024