
This tutorial shows how to create an “Export CSV” button that exports post data of the resulting posts before or after using facets.
The exported (and automatically downloaded) CSV file can then be used to import the data into Excel or other programs.
The code below adds all functionality needed to do this. The button will export the specified post data of all posts in the listing before or after facet filtering. It works for logged-in and logged-out users. Add the code to your (child) theme’s functions.php, a code snippets plugin, or in the Custom Hooks add-on.
The code consists of five parts:
Part 1 adds an “Export CSV” button above the listing template (the element with class facetwp-template). The button will have class fwp-export-btn, as set in line 18 (and checked in line 16). The class can be used to style the button, in lines 33-38. The button text will be “Export CSV”, as set in line 19.
Part 2 stores the (filtered) post IDs in a transient. The transient needs a $session_id, which we get with the fwp_get_export_session_id() function, which is Part 4.
For logged-in users, this $session_id is generated in line 73, with wp_get_session_token(), which gets the current session token from the logged_in cookie. For logged-out users, the $session_id is taken from a cookie fwp_export_session, which is set in Part 3.
The facetwp_filtered_post_ids hook that we use in Part 2 to get all filtered post IDs, needs a condition to make it run only on the intended listing template or page. In this example, we are using $class->ajax_params[‘template’] to check for the name of a Listing Builder listing template. So if you are using such a listing template, make sure to replace my_template in line 49 with its name. If you are using any other listing template type, you can use $class->http_params['uri'] instead, to check against the page URI (the part of the URL without the domain name and the query variables, and without beginning or ending slashes). For examples of this, see the facetwp_filtered_post_ids hook page.
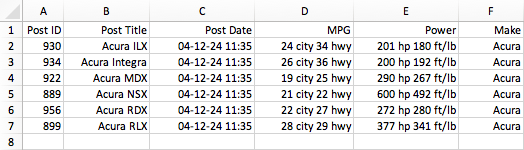
Part 5 handles the export to CSV. In this example, clicking the button will export a CSV with four columns: the post ID, post title, post date, and an Advanced Custom Fields custom field (which we get with ACF’s get_field() function). You can customize what post data is exported in the CSV, by adapting lines 130-134. Each of these columns in the CSV needs a heading, which can be set in lines 122-125.
If the export button should be available only for logged-in users, you could use an if ( is_user_logged_in() ) condition within the facetwp_scripts hook, surrounding all code within it. In that case you can remove Part 3 entirely, and also the cookie fallback in lines 77-81, and the wp_ajax_nopriv_fwp_export_csv action hook in line 86.
[export_filtered_post_data_csv]