Google Analytics 4
With Google Analytics 4, it’s very easy to track how users are interacting with facets:
Set up Google Analytics 4 for your website
The rest of this guide assumes that you have set up Google Analytics for your website. In short, the following steps are needed. If you are setting up a new property, you will be automatically guided through these steps. For existing properties, check the mentioned settings:
- Create a Google Analytics 4 account and a Property for your website.
- Create a “Web” Data Stream for your website. For an existing property you can find this under Admin > Property > Data Streams > Web.
- Make sure to enable “Enhanced measurement” in the process. You can find this setting later by navigating to Admin > Property > Data Streams, and then selecting your website’s Data Stream.
- If you are setting up a new property, the setup instructions will then guide you to the Google tag snippet. If you need to look up this tag snippet later, it can be found by navigating to Admin > Property > Data Streams > Web, and then selecting your websites Data Stream. In the next window, go to Google tag > Configure tag settings > Your Google tag > Installation instructions.
- Copy the Google tag snippet and paste it at the bottom of your website’s
<head>section, which can be found in your theme’s header.php file.
A default Google Analytics 4 gtag() snippet looks as follows (replace XXXXXXXXXX with your “Measurement ID”):
<!-- Google tag (gtag.js) -->
<script async src="https://www.googletagmanager.com/gtag/js?id=G-XXXXXXXXXX"></script>
<script>
  window.dataLayer = window.dataLayer || [];
  function gtag(){dataLayer.push(arguments);}
  gtag('js', new Date());

  gtag('config', 'G-XXXXXXXXXX');
</script>
Measuring pageviews
There are basically two ways to measure pageviews with facet selections. The first is the easiest. If you have followed the above setup instructions, you have to do nothing else:
Method 1: Track facet pages and history states
First, make sure “Enhanced measurement” is enabled, if you did not do so already while setting up your property. You can find this setting later by navigating to Admin > Property > Data Streams, and then selecting your website’s Data Stream:

Next, click on the cog icon in the bottom right of this setting, and under “Page views”, click “Show advanced settings”. Make sure that “Page changes based on browser history events” is enabled, which it is by default:
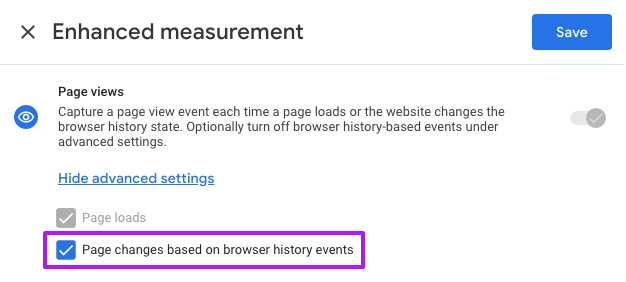
That’s it. With this setting enabled, a pageview is tracked when the browser history state changes, which happens when a user clicks the browser’s back or forward button. When the page URL changes after filtering with facets, the history state also changes, so these pageviews will be tracked too.
Method 2: Track facet pages but not history states
If you want to track facet pages, but don’t want to track pageviews triggered by changes in the history state (using the browser’s back or forward buttons), you can use the following method. This method also works if you want to keep the “Enhanced measurement” setting entirely disabled.
First, navigate to Admin > Property > Data Streams, and then select your website’s Data Stream. Click on the cog icon in the bottom right of this setting, and under “Page views”, click “Show advanced settings”. Make sure that “Page changes based on browser history events” is disabled:

Without this setting, history states will not be tracked anymore. This includes dynamic pageviews with facet selections. To track these, you can “manually” trigger a pageview by adding the following snippet to your site’s <head> section (which can be found in your theme’s header.php file), below your tag snippet:
<script>
  document.addEventListener('facetwp-loaded', function() {
    if (FWP.loaded) {
      gtag('event', 'page_view');
    }
  });
</script>
This snippet uses the facetwp_loaded event, which fires after each facet interaction. Before sending the pageview, it checks for FWP.loaded which is only true after the initial page load (which will already be tracked by Google Analytics).
Disable tracking of facet pages
If you don’t want to track pageviews when selecting facets, navigate to Admin > Property > Data Streams, and then select your website’s Data Stream. Click on the cog icon in the bottom right of this setting, and under “Page views”, click “Show advanced settings”. Make sure that “Page changes based on browser history events” is disabled:
With this setting disabled, and no manual triggering of pageviews, both history states (using the browser’s back or forward buttons) and dynamic pageviews with facet selections will not be tracked anymore.
Note that a direct page (re)load of a URL with a facet selection in it will be tracked because it does not change the history state.
Verify pageview measuring
If you want to verify that facet pages and/or history states (using the browser’s back or forward buttons) are measured properly, the best way to do so is by using Google Analytics’ “DebugView”. The DebugView feature can be found in your website’s Property menu, at the bottom.
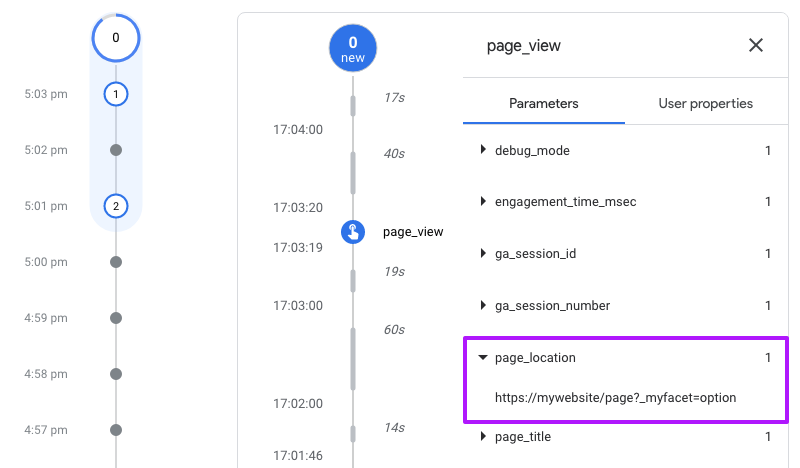
DebugView lets you see live pageviews coming in (with a slight delay of ~20 seconds). For each pageview, you can see its parameters. The most useful one is page_location, which will show the full URL, including all URL parameters if the page has facet selections:
To be able to use DebugView, you need to enable Google Analytic’s Debug Mode. This can be done in multiple ways, but the easiest is by temporarily setting it as a parameter in your Google tag snippet, as follows:
<!-- Google tag (gtag.js) -->
<script async src="https://www.googletagmanager.com/gtag/js?id=G-XXXXXXXXXX"></script>
<script>
  window.dataLayer = window.dataLayer || [];
  function gtag(){dataLayer.push(arguments);}
  gtag('js', new Date());

  gtag('config', 'G-XXXXXXXXXX', { 'debug_mode':true });
</script>
If you are using the second method above, you’ll also need to add this to the second snippet that triggers dynamic pageviews:
<script>
  document.addEventListener('facetwp-loaded', function() {
    if (FWP.loaded) {
      gtag('event', 'page_view', { 'debug_mode':true });
    }
  });
</script>
If you’re done verifying, make sure to disable Debug Mode again by removing the debug_mode parameter from the snippet(s). Note that setting the parameter to false does not disable it.